This battle was fought to test the latest version of my adaptation of Joseph Morschauser’s ‘Modern’ period wargames rules for use on a 3-inch square gridded battlefield, and specifically to see how well the new ‘hit effect’ rule would work.
Scenario
Now that the bulk of the Morschauserland Regular Army had been defeated and destroyed, the Eastlanders were intent on continuing their advance on Morschauser City. They stopped for a short time to regroup and to bring their forces up to strength, and this gave the Morschauserlanders enough time to set up a last ditch defence line on the road to Morschauser City.
This defence line was constructed from obsolete tanks taken from the Army’s reserve stocks and sandbagged defences that were manned by the remnants of the Morschauserland Regular Army. In addition four concealed minefields were laid, and some barbed wire entanglements erected. The position of each of the minefields and barbed wire entanglements was determined by throwing 2D6 to indicate which column they would be placed in and a D12 for the row. As Morschauser himself writes:
LET THE DICE DECIDE!
Forces Deployed
The following map shows the initial positions held by the Morschauserlanders and the main axes of attack used by the Eastlanders. As occurred in the previous battle, the 1st Wave of the Eastland attack contained the 203rd Rifles and 101st Self-propelled Artillery (on the northern axis of advance) and 204th Rifles and 102nd Self-propelled Artillery (allocated to the southern axis of advance). The subsequent two waves were to advance on to the battlefield as and when the Eastland commander felt that they were needed to exploit any breakthrough or reinforce any stalled attacks.


Both sides threw a die to see which side would move first; the Morschauserlanders threw a 1 and the Eastlanders threw a 5; therefore the Eastlanders moved first.
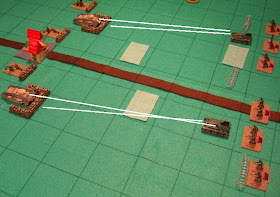
The 1st Wave of the Eastland attack advanced on to the battlefield. The 101st Self-propelled Artillery engaged the dug-in Tank Unit to their front. They threw a 4 and missed their target. The 102nd Self-propelled Artillery followed suit and engaged the dug-in Tank Unit to their front. They also threw a 4 and missed their target.
As no other Eastland Units were in range of possible targets, it was then the turn of the Morschauserlanders to fire. The 1st Reserve Tanks engaged the 101st Self-propelled Artillery, threw a 4, and missed their target. The 2nd Reserve Tanks then fired at the 102nd Self-propelled Artillery, threw a 5, and hit it. Because the 102nd Self-propelled Artillery was in the open they required a 6 to survive the hit, but they threw a 2 and were destroyed.
Both sides threw a die to see which side would move first; the Morschauserlanders threw a 5 and the Eastlanders threw a 2; therefore the Morschauserlanders moved first.
Once again the Morschauserlanders remained behind their defences, content to engage the attacking Eastlanders at long range.
The 1st Reserve Tanks again engaged the 101st Self-propelled Artillery, threw a 6, and hit their target. The 101st Self-propelled Artillery threw a 4 to determine the effect of the hit, but as they were in the open this was not enough to save them from destruction.
The 2nd Reserve Tanks then fired at the southernmost Rifle Unit of the 204th Rifles, threw a 5, and hit it as well! The Rifle Unit also threw to determine the effect of the hit, but the score of 1 was too low to save them from being destroyed.

The leading Rifle Unit of the 203rd Rifles opened fire on the 2nd Machine Guns. They threw a 5 and hit their target, but because the 2nd Machine Guns were behind soft cover they were able to throw to determine the effect of the hit. They threw a 5 … and survived. The remaining Rifle Unit of the 204th Rifles fired at the 5th Machine Guns. They threw a 3 and missed their target.

Both sides threw a die to see which side would move first; the Morschauserlanders threw a 4 and the Eastlanders threw a 3; therefore the Morschauserlanders moved first.
The 2nd Machine Guns opened fire on the leading Rifle Unit of 203rd Rifles. They threw a 1 and missed their target. The 1st Reserve Tanks also engaged the same target and threw a 6, hitting it. Because the Rifle Unit of the 203rd Rifles was in the open it needed a throw of 6 to survive; unfortunately it threw a 5 and was destroyed.
The 4th Machine Guns then opened fire on the remaining Rifle Unit of 204th Rifles, and threw a 5, which meant that they had hit their target. A throw of 6 by the Rifle Unit was, however, sufficient to ensure their survival for the present. The 5th Machine Guns then fired at the same Rifle Unit of 204th Rifles. They also threw a 5, which meant that the target had been hit a second time. The Rifle Unit threw a 4, but this time the score was too low to ensure their survival, and they were destroyed.

Whilst the remaining Rifle Unit of the 203rd Rifles removed the barbed wire entanglement that was hampering its advance, the right-hand Tank Unit of 101st Tanks opened fire on the 1st Reserve Tanks. They threw a 1 and missed their target.
The left-hand Tank Unit of 101st Tanks engaged the 2nd Reserve Tanks, but they threw a 5, hitting their target. Because the 2nd Reserve Tanks were behind soft cover, they needed a throw of 5 or 6 to survive, but they threw a 3 and were destroyed.

Both sides threw a die to see which side would move first; the Morschauserlanders threw a 6 and the Eastlanders threw a 4; therefore the Morschauserlanders moved first.
Having lost such an important part of their defences, it was vital that the Morschauserlanders inflicted casualties on the Eastland attackers before they came too close.
The 1st Reserve Tanks opened fire on the right-hand Tank Unit of the 101st Tanks. They threw a 3 and missed their target. The 1st Artillery then fired at the left-hand Tank Unit of the 101st Tanks, threw a 6 and hit it. The Tank Unit threw to see if it would survive the hit, but its score of 1 was far too low and it was destroyed.

The centre Rifle Unit of 205th Rifles engaged the 5th Machine Guns, threw a 2, and missed its target. The last Rifle Unit of the 203rd Rifles fired at the 2nd Machine Guns, threw a 4, and also failed to hit its target.

Both sides threw a die to see which side would move first; the Morschauserlanders threw a 4 and the Eastlanders threw a 5; therefore the Eastlanders moved first.
The Eastland commander now decided to throw in the 3rd Wave of troops. Whilst they advanced onto the battlefield, the Rifle Units of the 203rd and 205th Rifles advanced towards the Morschauserland defences.
The last Rifle Unit of the 203rd Rifles fired again at the 2nd Machine Guns, threw yet another 4, and again failed to hit its target. The right-hand Rifle Unit of 205th Rifles engaged the 4th Machine Guns, threw a 3, and also missed its target. The centre Rifle Unit of 205th Rifles opened fire on the 1st Artillery, threw a 1, and missed its target.
The 101st Artillery fired at the 1st Reserve Tanks. They threw a 5, thus hitting their target. Because the 1st Reserve Tanks were in soft cover they were able to throw to determine the effect of the hit; they threw a 4 … and were destroyed.

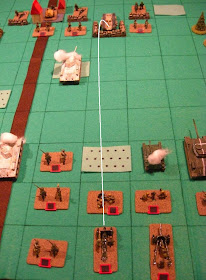

Both sides threw a die to see which side would move first; the Morschauserlanders threw a 2 and the Eastlanders threw a 5; therefore the Eastlanders moved first.
The Eastland troops advanced towards the centre of the Morschauserland defences. The right-hand Rifle Unit of the 205th Rifles fired at the 4th Machine Guns at short range. They threw a 5, and hit their target, which in turn threw a 1. Despite being in soft cover, the 4th Machine Guns were destroyed, and the Rifle Unit – which had not yet moved – advanced and occupied the now vacant defences.
The left-hand Rifle Unit of the 205th Rifles engaged the 5th Machine Guns and threw a 5, with the result that they also hit their target. The 5th Machine Guns threw a die to determine the result of the hit, and their score of 4 was insufficient to prevent them from being destroyed.


The 1st Artillery opened fire on the centre Tank Unit of the 102nd Tanks. A score of 5 was enough to hit the Tank Unit, which threw a 3 to determine the effect of the hit. This was not a high enough score to prevent the Tank Unit’s destruction.
The 2nd Machine Guns turned to their right and engaged the Rifle Unit of the 205th Rifles that has just broken through the defence line. A score of 6 ensured that they hit their target, which threw a score of 3 in response. The Rifle Unit was destroyed!

Both sides threw a die to see which side would move first; the Morschauserlanders threw a 4 and the Eastlanders threw a 3; therefore the Morschauserlanders moved first.
Although their situation was desperate, the Morschauserland defenders refused to retreat. The 1st Artillery opened fire on the nearest Tank Unit of the 102nd Tanks, and threw a 5, hitting it. The Tank Unit threw a 5 in reply, but this was insufficient to prevent its destruction.

Conclusions
The new 'hit effect' rule worked very well, and because it was much more difficult to destroy dug-in troops, the battle lasted much longer than before.
I now feel that the rules are at a stage where they are playable and that further tinkering and development is presently unnecessary. I would like to incorporate some air support and air-to-air combat rules at some time in the future, but for the time being I am happy with the rules as they are.
Joseph Morschauser’s original rules were basically very sound, simple to use, and easy to remember, and my adaptation of them has provided me with lots of interesting problems to solve and some exceedingly enjoyable play-tests. I intend to continue to use them for the foreseeable future, and already have ideas about how to adapt them for colonial wargaming … but that, as they say, is another as yet to be told story.
Scenario
Now that the bulk of the Morschauserland Regular Army had been defeated and destroyed, the Eastlanders were intent on continuing their advance on Morschauser City. They stopped for a short time to regroup and to bring their forces up to strength, and this gave the Morschauserlanders enough time to set up a last ditch defence line on the road to Morschauser City.
This defence line was constructed from obsolete tanks taken from the Army’s reserve stocks and sandbagged defences that were manned by the remnants of the Morschauserland Regular Army. In addition four concealed minefields were laid, and some barbed wire entanglements erected. The position of each of the minefields and barbed wire entanglements was determined by throwing 2D6 to indicate which column they would be placed in and a D12 for the row. As Morschauser himself writes:
Forces Deployed
- Morschauserland
- 2nd Machine Guns: 1 x Machine Gun Unit
- 4th Machine Guns: 1 x Machine Gun Unit
- 5th Machine Guns: 1 x Machine Gun Unit
- 1st Artillery: 1 x Howitzer Unit
- 1st Reserve Tanks: 1 x Tank Unit
- 2nd Reserve Tanks: 1 x Tank Unit
- 203rd Rifles: 3 x Rifle Units
- 204th Rifles: 3 x Rifle Units
- 101st Self-Propelled Artillery: 1 x SP Field Gun Unit
- 102nd Self-propelled Artillery: 1 x SP Field Gun Unit
- 101st Tanks: 2 x Tank Units
- 205th Rifles: 3 x Rifle Units
- 102nd Tanks: 3 x Tank Units
- 101st Rifles: 3 x Rifle Units
- 102nd Rifles: 3 x Rifle Units
- 102nd Machine Guns: 1 x Machine Gun Unit
- 102nd Mortars: 1 x Mortar Unit
- 101st Artillery: 1 x Howitzer Unit
- 101st Antitank Artillery: 1 x Anti-tank Gun Unit
The following map shows the initial positions held by the Morschauserlanders and the main axes of attack used by the Eastlanders. As occurred in the previous battle, the 1st Wave of the Eastland attack contained the 203rd Rifles and 101st Self-propelled Artillery (on the northern axis of advance) and 204th Rifles and 102nd Self-propelled Artillery (allocated to the southern axis of advance). The subsequent two waves were to advance on to the battlefield as and when the Eastland commander felt that they were needed to exploit any breakthrough or reinforce any stalled attacks.


Turn 1Morschauserland’s ‘Forlorn Hope’: The final defence line on the road to Morschauser City.
Both sides threw a die to see which side would move first; the Morschauserlanders threw a 1 and the Eastlanders threw a 5; therefore the Eastlanders moved first.
The 1st Wave of the Eastland attack advanced on to the battlefield. The 101st Self-propelled Artillery engaged the dug-in Tank Unit to their front. They threw a 4 and missed their target. The 102nd Self-propelled Artillery followed suit and engaged the dug-in Tank Unit to their front. They also threw a 4 and missed their target.
As no other Eastland Units were in range of possible targets, it was then the turn of the Morschauserlanders to fire. The 1st Reserve Tanks engaged the 101st Self-propelled Artillery, threw a 4, and missed their target. The 2nd Reserve Tanks then fired at the 102nd Self-propelled Artillery, threw a 5, and hit it. Because the 102nd Self-propelled Artillery was in the open they required a 6 to survive the hit, but they threw a 2 and were destroyed.

Turn 2First blood to Morschauserland! During the opening exchange of fire, the 2nd Reserve Tanks destroyed the 102nd Self-propelled Artillery.
Both sides threw a die to see which side would move first; the Morschauserlanders threw a 5 and the Eastlanders threw a 2; therefore the Morschauserlanders moved first.
Once again the Morschauserlanders remained behind their defences, content to engage the attacking Eastlanders at long range.
The 1st Reserve Tanks again engaged the 101st Self-propelled Artillery, threw a 6, and hit their target. The 101st Self-propelled Artillery threw a 4 to determine the effect of the hit, but as they were in the open this was not enough to save them from destruction.
The 2nd Reserve Tanks then fired at the southernmost Rifle Unit of the 204th Rifles, threw a 5, and hit it as well! The Rifle Unit also threw to determine the effect of the hit, but the score of 1 was too low to save them from being destroyed.

It was now the turn of the Eastlanders to move. The Eastland commander had insufficient room to deploy the 2nd Wave of his troops until the 203rd and 204th Rifles had moved forward. Both Units did advance … but a barbed wire entanglement held up the right-hand Rifle Unit of the 203rd Rifles and the left-hand Rifle Unit of the 203rd Rifles marched straight into one of the concealed minefields. A dice was thrown, and the score of 4 resulted in the Rifle Unit’s destruction. At the same time the right-hand and centre Rifle Units of the 204th Rifles were able to advance unopposed until the latter also marched into another concealed minefield. A further dice was thrown, a 5 was scored, and that Rifle Unit was also destroyed.The Morschauserlanders continued to cause casualties on 1st Wave of the advancing Eastlanders.
The leading Rifle Unit of the 203rd Rifles opened fire on the 2nd Machine Guns. They threw a 5 and hit their target, but because the 2nd Machine Guns were behind soft cover they were able to throw to determine the effect of the hit. They threw a 5 … and survived. The remaining Rifle Unit of the 204th Rifles fired at the 5th Machine Guns. They threw a 3 and missed their target.

Turn 3The leading Eastland 1st Wave Rifle Units were unable to inflict casualties on the Morschauserland defenders.
Both sides threw a die to see which side would move first; the Morschauserlanders threw a 4 and the Eastlanders threw a 3; therefore the Morschauserlanders moved first.
The 2nd Machine Guns opened fire on the leading Rifle Unit of 203rd Rifles. They threw a 1 and missed their target. The 1st Reserve Tanks also engaged the same target and threw a 6, hitting it. Because the Rifle Unit of the 203rd Rifles was in the open it needed a throw of 6 to survive; unfortunately it threw a 5 and was destroyed.
The 4th Machine Guns then opened fire on the remaining Rifle Unit of 204th Rifles, and threw a 5, which meant that they had hit their target. A throw of 6 by the Rifle Unit was, however, sufficient to ensure their survival for the present. The 5th Machine Guns then fired at the same Rifle Unit of 204th Rifles. They also threw a 5, which meant that the target had been hit a second time. The Rifle Unit threw a 4, but this time the score was too low to ensure their survival, and they were destroyed.

The Eastlander commander then deployed the 2nd Wave of his troops. Their axis of advance straddled the main road, and they were led by the 101st Tanks, with the 205th Rifles deployed in line abreast behind the Tank Units.The Morschauserland defenders wiped out almost the whole 1st Wave of Eastland attackers before the 2nd Wave was deployed onto the battlefield.
Whilst the remaining Rifle Unit of the 203rd Rifles removed the barbed wire entanglement that was hampering its advance, the right-hand Tank Unit of 101st Tanks opened fire on the 1st Reserve Tanks. They threw a 1 and missed their target.
The left-hand Tank Unit of 101st Tanks engaged the 2nd Reserve Tanks, but they threw a 5, hitting their target. Because the 2nd Reserve Tanks were behind soft cover, they needed a throw of 5 or 6 to survive, but they threw a 3 and were destroyed.

Turn 4The Eastlanders finally inflicted some casualties on the Morschauserland defenders when a Tank Unit of the 101st Tanks destroyed the 2nd Reserve Tanks.
Both sides threw a die to see which side would move first; the Morschauserlanders threw a 6 and the Eastlanders threw a 4; therefore the Morschauserlanders moved first.
Having lost such an important part of their defences, it was vital that the Morschauserlanders inflicted casualties on the Eastland attackers before they came too close.
The 1st Reserve Tanks opened fire on the right-hand Tank Unit of the 101st Tanks. They threw a 3 and missed their target. The 1st Artillery then fired at the left-hand Tank Unit of the 101st Tanks, threw a 6 and hit it. The Tank Unit threw to see if it would survive the hit, but its score of 1 was far too low and it was destroyed.

The remaining Eastland Units moved forward. Unfortunately the remaining Tank Unit of 101st Tanks drove straight into one of the concealed minefields; a die was thrown, and the score of 4 resulted in the Unit’s destruction!Whilst the gunfire of the 1st Reserve Tanks proved to be ineffective, the 1st Artillery destroyed a Tank Unit of the 101st Tanks as it advanced towards the defence line.
The centre Rifle Unit of 205th Rifles engaged the 5th Machine Guns, threw a 2, and missed its target. The last Rifle Unit of the 203rd Rifles fired at the 2nd Machine Guns, threw a 4, and also failed to hit its target.

Turn 5The improvised Morschauserland defences – and their stop-gap defenders – proved to be a match for the first two waves of Eastland attackers. The burning hulks of the attacker’s tanks provided testament to the doggedness of the defence … and the effectiveness of concealed minefields!
Both sides threw a die to see which side would move first; the Morschauserlanders threw a 4 and the Eastlanders threw a 5; therefore the Eastlanders moved first.
The Eastland commander now decided to throw in the 3rd Wave of troops. Whilst they advanced onto the battlefield, the Rifle Units of the 203rd and 205th Rifles advanced towards the Morschauserland defences.
The last Rifle Unit of the 203rd Rifles fired again at the 2nd Machine Guns, threw yet another 4, and again failed to hit its target. The right-hand Rifle Unit of 205th Rifles engaged the 4th Machine Guns, threw a 3, and also missed its target. The centre Rifle Unit of 205th Rifles opened fire on the 1st Artillery, threw a 1, and missed its target.
The 101st Artillery fired at the 1st Reserve Tanks. They threw a 5, thus hitting their target. Because the 1st Reserve Tanks were in soft cover they were able to throw to determine the effect of the hit; they threw a 4 … and were destroyed.

The 203rd and 205th Rifles engaged the Morschauserland defenders at short range, but were unable to inflict any casualties.

The Morschauserland defenders then fired back at their attackers. The 2nd Machine Guns fired at the last Rifle Unit of the 203rd Rifles, threw a 5, and hit them. The 203rd Rifles were in the open, threw a 3, and as a result they were destroyed. The 4th Machine Guns engaged the right-hand Rifle Unit of 205th Rifles, threw a 1, and missed their target. The 1st Artillery opened fire on the centre Rifle Unit of 205th Rifles, threw a 5, and hit their target. Because the Rifle Unit of 205th Rifles was in the open they threw to see if they would survive; their score was 3 and they were destroyed.The 101st Artillery were much more successful than the Eastland Rifle Units, and were able to destroy the last remaining Reserve Tank Unit.

Turn 6The Morschauserland defenders fired at the 203rd and 205th Rifles at short range, and wiped out two of the three attacking Rifle Units.
Both sides threw a die to see which side would move first; the Morschauserlanders threw a 2 and the Eastlanders threw a 5; therefore the Eastlanders moved first.
The Eastland troops advanced towards the centre of the Morschauserland defences. The right-hand Rifle Unit of the 205th Rifles fired at the 4th Machine Guns at short range. They threw a 5, and hit their target, which in turn threw a 1. Despite being in soft cover, the 4th Machine Guns were destroyed, and the Rifle Unit – which had not yet moved – advanced and occupied the now vacant defences.
The left-hand Rifle Unit of the 205th Rifles engaged the 5th Machine Guns and threw a 5, with the result that they also hit their target. The 5th Machine Guns threw a die to determine the result of the hit, and their score of 4 was insufficient to prevent them from being destroyed.

The right-hand Tank Unit of the 102nd Tanks opened fire on the 2nd Machine Guns. They threw a 3 and missed their target. The centre Tank Unit of the 102nd Tanks followed suit, and also missed when they threw a 1. The left-hand Tank Unit also engaged the 2nd Machine Guns, threw a 5, and hit their target. The 2nd Machine Guns threw a die to see if they survived the hit; their score of 6 was sufficient to ensure that they did.The 205th Rifles finally overcame the Morschauserland 4th and 5th Machine Gun Units.

The Morschauserlanders were now reduced to 50% of their original strength, and stood a 50:50 chance of retreating (i.e. A score of 1, 2, or 3 = Retreat; 4, 5, or 6 = Fight on). The Morschauserland defenders, knowing that unless help came they were the last hope of preventing the Eastlanders reaching Morschauser City, threw a 5, stayed put, and engaged the closest enemy Units.The 102nd Tanks attempted to destroy the 2nd Machine Gun Unit with gunfire.
The 1st Artillery opened fire on the centre Tank Unit of the 102nd Tanks. A score of 5 was enough to hit the Tank Unit, which threw a 3 to determine the effect of the hit. This was not a high enough score to prevent the Tank Unit’s destruction.
The 2nd Machine Guns turned to their right and engaged the Rifle Unit of the 205th Rifles that has just broken through the defence line. A score of 6 ensured that they hit their target, which threw a score of 3 in response. The Rifle Unit was destroyed!

Turn 7The Morschauserlanders were determined to fight on despite being outnumbered, and continued to inflict casualties upon their attackers.
Both sides threw a die to see which side would move first; the Morschauserlanders threw a 4 and the Eastlanders threw a 3; therefore the Morschauserlanders moved first.
Although their situation was desperate, the Morschauserland defenders refused to retreat. The 1st Artillery opened fire on the nearest Tank Unit of the 102nd Tanks, and threw a 5, hitting it. The Tank Unit threw a 5 in reply, but this was insufficient to prevent its destruction.

The destruction of the second Tank Unit of the 102nd Tanks meant that the Eastlanders were reduced to less than 50% of their original strength. This meant that they stood a 50:50 chance of retreating (i.e. A score of 1, 2, or 3 = Retreat; 4, 5, or 6 = Fight on). The Eastlanders threw a 1, and began to withdraw from the battlefield. Morschauser City was safe … for the time being.The 1st Artillery knocked out a second Tank Unit of the 102nd Tanks.
Conclusions
The new 'hit effect' rule worked very well, and because it was much more difficult to destroy dug-in troops, the battle lasted much longer than before.
I now feel that the rules are at a stage where they are playable and that further tinkering and development is presently unnecessary. I would like to incorporate some air support and air-to-air combat rules at some time in the future, but for the time being I am happy with the rules as they are.
Joseph Morschauser’s original rules were basically very sound, simple to use, and easy to remember, and my adaptation of them has provided me with lots of interesting problems to solve and some exceedingly enjoyable play-tests. I intend to continue to use them for the foreseeable future, and already have ideas about how to adapt them for colonial wargaming … but that, as they say, is another as yet to be told story.


