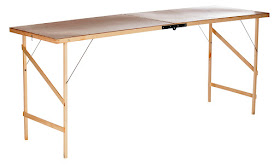
I originally intended to use a large cork notice board as the baseboard for my model railway, but several of my regular blog readers who are also railway modellers suggested that a half of a pasting table would be better. As a result, I paid a visit to the branch of THE RANGE at the Outlet Shopping Centre near to the Historic Dockyard Chatham and bought one.
Yesterday I took the pasting table apart. The two halves were easy to separate as they were only held together by two hinges, and the legs were dismantled so that the soft pine they were made of could be reused. This left me with two sections that are constructed using a sheet of hardboard on a pine frame.
At this point I realised that the hardboard was only attached to the frame by U-shaped staples and that the corner joints of the pine frame were just pushed together. I was concerned that the pasting table baseboard might be a bit flimsy if I left it as it was, and I therefore carefully removed the staples, glued the corner joints together, and then glued and screwed the hardboard back onto to the frame. I then cut one of the legs so that it would fit inside the frame and glued it in place so that it could act as a centre brace for my baseboard.
Before doing anything else, I then sealed the hardboard and the frame using two coats of PVA glue as I find that this makes painting wooden surfaces much easier.

What are the measurements of the half of the table you are using Bob?
ReplyDeleteMaudlin Jack Tar,
DeleteThe half pasting table measures 35” x 22” (89.9cm x 55.9cm).
All the best,
Bob
A great start and the pasting table looks like a good way to go, you are right to beef it up and glue and screw as the original construction of these tables is indeed flimsy.
ReplyDeleteDonnie McGibbon,
DeleteCheers! I hadn’t realised just how flimsy the pasting table was until I took it apart. That said, it’s still a lot more robust than the notice board that I was going to use!
The bracing piece in the middle was necessary because the whole thing sagged a bit in the centre.
All the best,
Bob
I'm following your endevours with grat interest , being a closet railway fan !
ReplyDeleteThe Good Soldier Svjek,
DeleteI’ve been watching quite a few railway modelling ‘how to …’ videos on YouTube … and I must admit that I have serious concerns that anyone will gain a great deal from watching my layout evolve. I recently watched one modeller using tweezers to add individual 1:72nd-scale fern fronds to his model, which is something that I’ve never considered doing at any point in my modelling career of nearly seventy years!
Mine is going to be much more of a slap-dash affair, so please don’t be too disappointed by the outcome.
All the best,
Bob
Hi Bob, could I suggest using some more of the legs to make a couple more cross struts underneath. Hardboard is, as you've noticed, notorious for sagging. I'd also add some more running parallel with the long edges as just to be sure. The last thing you want when you've made some progress is to find the board warping. Good luck with this.
ReplyDeleteBrian Cameron,
DeleteThanks for the suggestion. I’ll certainly add some additional cross bracing to ensure that the sagging is reduced to a minimum.
All the best,
Bob