Having built one armoured wagon, I decided that my armoured train needed a second, different style of armoured wagon to make it complete.
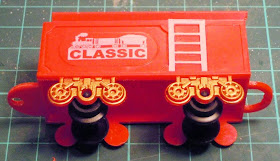
I used the boxcar that came with the train set as the basis of my second armoured wagon.
I removed the wheels (which popped out very easily as usual) ...
... and I then used a razor saw to carefully remove the false wheels that were moulded onto the boxcar's wheel flanges.
Using the moulded line just in front of the double doors and the ventilator on the side of the boxcar as guides, I carefully sawed off part of the boxcar.
I then glued two long pieces of plastic strip inside the open area just above the wheel flanges to strengthen the wagon and to provide something to glue the platform of the armoured wagon to.
Once the glue had cured, I glued two short pieces of plastic strip inside the front of the raised part of the boxcar to provide something to glue the new front of that part to.
Once the glue had cured, I carefully cut two pieces of Plasticard to the right size, and glued them to form the platform of the armoured wagon ...
... and the front of the raised part of the armoured wagon.
I then selected a discarded roof from a passenger carriage.
I carefully cut the sides off using a razor saw ...
... and trimmed it to the length I required.
I then glued it on top of the roof of the raised part of the boxcar.
I wanted to fit some sort of casemate to the front of my armoured wagon, and I found two sponsons from an Airfix World War I tank in my spares box.
I glued them together ...
... and once the glue had cured, I used a razor saw to cut off part of the assembly to form the casemate.
I then trimmed a piece of Plasticard to the right size and shape, and glued it over the holes that were used to locate the original model's 6-pounder gun mountings.
Another part of the tank model provided a suitable mantlet for the gun that I wanted to fit in the casemate, and after a small amount of trimming, I glued it in place.
Once the glue had cured, I glued the whole assembly onto the armoured wagon's platform.
Whilst the glue was curing I made the armoured wagon's armament (a cannon) from two pieces of plastic tube, and when the glue had cured I glued the cannon barrel in place.
The final task was to fit the armoured skirts to the wheel flanges. In this case I chose to give each wheel flange a separate skirt made from Plasticard.


