When I awoke this morning the sun was shining ... but within an hour all that had changed and the weather forecast predicted heavy rain for the rest of the day. So what was I to do? The answer came back ... do something wargamey!
(I am not sure whether such a word exists in the English language, but 'wargamey' sounds like it should do!)
I therefore set to work on a couple of things that I have been thinking about doing. The first was to glue some painted metal 20mm-scale Russian World War II figures to some bases. I have had these figures for a long time, and had just never got around to basing them. I had actually forgotten about them until my big clear-out earlier this year, when I found them in a box inside a large storage crate with a lot of other stuff. I decided to base the figures on individual bases, and as I had a large bag of new copper-covered steel pennies available, I used them.

Once the superglue had 'cured', I painted the bases with some matt grey enamel paint. This acted as an undercoat and gave the next coat of paint (the top coat) something to adhere to.
Whilst the undercoat was drying, I started on my second project for the day. This arose from a conversation I had earlier in the week with Ian Drury. Ian introduced me to the benefits of area movement back in 1998 when he staged a session at COW (the Conference of Wargamers) about an American invasion of a Japanese-held island. The island (New Stanhall) was actually a map of Jersey divided up into different-sized and shaped areas, and the individual figures represented a company on Infantry. The rules were simple to learn and easy to use, but the scenario made it a very interesting battle to fight.
In our recent conversation Ian outlined some ideas he had for an operational-level wargame that used area movement, figures/models, and a simple combat system based on that used in MEGABLITZ. This has struck a chord with me, and it seemed like I had an ideal opportunity today to play around with the concept.
My starting point was reading the report in THE NUGGET of the 1998 session at COW (the Conference of Wargamers). I realised that what Ian proposed needed a higher level of resolution (Regiment/Brigade at least, and more likely Divisional-level) and I wondered how I could achieve that.
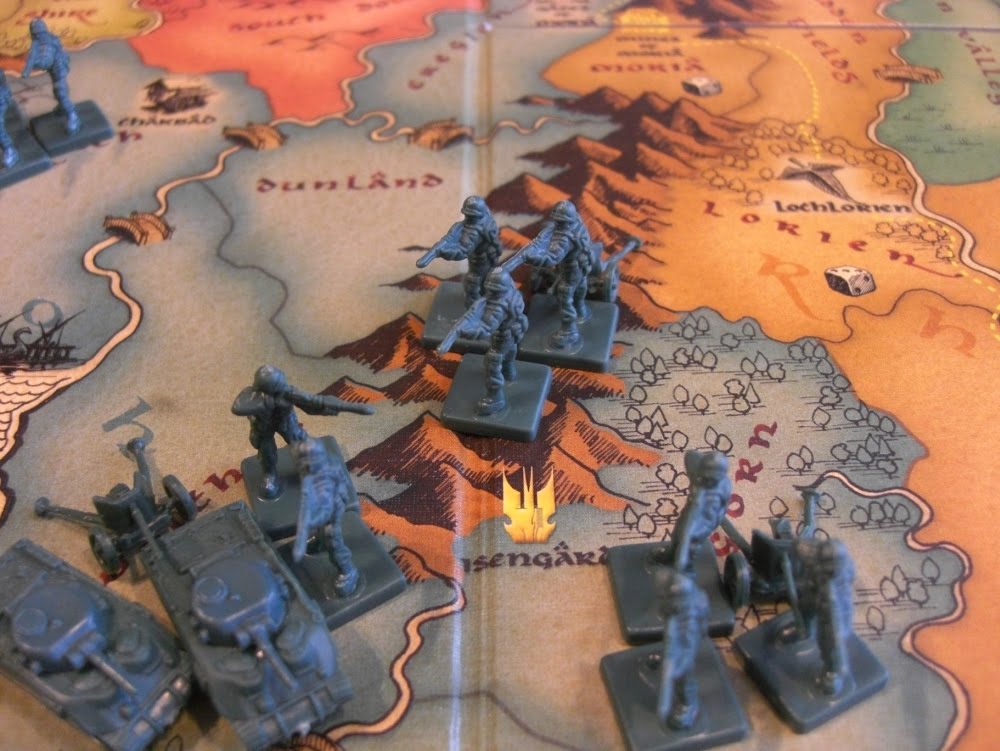
I therefore decided to experiment with figures and other playing pieces from my MEMOIR '44 wargame and a suitable map. Finding a suitable map was actually easier than I thought it might be (I had visions of drawing my own on a large piece of paper). A glance through my small collection of boardgames soon produced a likely candidate ... Risk: Lord of the Rings edition!

Before I could start, however, I needed to cobble together some rules.
Units
For some months the situation on the border between Rohan and Gondor had been tense. Both sides were claiming that the other was encroaching upon their territory, and despite diplomatic efforts by the other nations of Middenheim, war became inevitable.
The two sides mobilised the following armies:
Not wishing to be seen to be escalating the situation, Rohan screened the border area with her separate Infantry Regiments whilst holding her Divisions in the middle and north of the country. Gondor, on the other hand, moved her mobile forces up to the border in preparation for an attack.
Turn 1
Gondor began the war by attacking Rohan! They threw a 2 on their D6 dice, and could move two units.

One of Gondor's Tank Division's pushed across the border and obliterated the single Rohanic Infantry Regiment protecting the area.

At the other end of the border the second Gondorian Tank Division destroyed both the Rohanic Infantry Regiments defending the border.

Rohan threw 4 on its D6 and decided to move thee units. One of the Rohanic Infantry Divisions attacked a Gondorian Tank Division, and almost forced it to retreat.

This was followed by Rohan's only Tank Division taking on one of its Gondorian opposite numbers ... and considerably reducing its effectiveness!

Rohan's final move was to bring one of its two uncommitted Infantry Divisions forward to support its Tank Division.

Turn 2
Rohan won the right to move first this turn. The Rohan side was permitted to move three units.
The Rohanic Tank Division immediately attacked a Gondorian Tank Division ... and reduced it to a single Tank Regiment!

This was then attacked by one of Rohans Infantry Divisions, but they were unable to cause it any further casualties.

Rohan also moved one of its Infantry Divisions into the Mountains.

The Gondorians were permitted to move four units. They began by attacking the Rohanic Tank Division with the remnant of one of its own Tank Divisions ... and managed to destroy one of its Tank Regiments.

They followed this up with a second attack on the Rohanic Tank Division by the other Gondorian Tank Division, but this had no effect.

The Gondorians also began moving Infantry Divisions forward on their right ...

... and left flanks.

Turn 3
Rohan was again able to move its units first. They threw 5 on their D6 die and could therefore move five units.
First its Tank Division mounted another attack on a Gondorian Tank Division ... and wiped it out!

One of the Rohanic Infantry Divisions then attacked the remaining Gondorian Tank Regiment and forced it to retreat back into Gondor.

Finally Rohan moved both its other Infantry Divisions forward.


At this point the Gondorians had been force back behind their own frontiers and their army had been reduced to almost half its initial strength. The government of Gondor felt that it had no alternative but to seek a ceasefire, which Rohan was only to pleased to agree to as their government had no wish to invade and conquer Gondor.
For such a hurriedly designed set of rules they actually functioned quite well. I don't think that I have designed a game that is anything like the one Ian Drury envisaged ... but it was a simple and fun way to spend part of a wet Saturday in July, and you never know, I might revisit this again in the future!
PS. Everything that I used to fight this battle was stuff that I already had on my shelves. All I did was to use the various bits and pieces in ways that its original designers had not though to use them.
PPS. It is still raining!
(I am not sure whether such a word exists in the English language, but 'wargamey' sounds like it should do!)
I therefore set to work on a couple of things that I have been thinking about doing. The first was to glue some painted metal 20mm-scale Russian World War II figures to some bases. I have had these figures for a long time, and had just never got around to basing them. I had actually forgotten about them until my big clear-out earlier this year, when I found them in a box inside a large storage crate with a lot of other stuff. I decided to base the figures on individual bases, and as I had a large bag of new copper-covered steel pennies available, I used them.

Once the superglue had 'cured', I painted the bases with some matt grey enamel paint. This acted as an undercoat and gave the next coat of paint (the top coat) something to adhere to.
Whilst the undercoat was drying, I started on my second project for the day. This arose from a conversation I had earlier in the week with Ian Drury. Ian introduced me to the benefits of area movement back in 1998 when he staged a session at COW (the Conference of Wargamers) about an American invasion of a Japanese-held island. The island (New Stanhall) was actually a map of Jersey divided up into different-sized and shaped areas, and the individual figures represented a company on Infantry. The rules were simple to learn and easy to use, but the scenario made it a very interesting battle to fight.
In our recent conversation Ian outlined some ideas he had for an operational-level wargame that used area movement, figures/models, and a simple combat system based on that used in MEGABLITZ. This has struck a chord with me, and it seemed like I had an ideal opportunity today to play around with the concept.
My starting point was reading the report in THE NUGGET of the 1998 session at COW (the Conference of Wargamers). I realised that what Ian proposed needed a higher level of resolution (Regiment/Brigade at least, and more likely Divisional-level) and I wondered how I could achieve that.
I therefore decided to experiment with figures and other playing pieces from my MEMOIR '44 wargame and a suitable map. Finding a suitable map was actually easier than I thought it might be (I had visions of drawing my own on a large piece of paper). A glance through my small collection of boardgames soon produced a likely candidate ... Risk: Lord of the Rings edition!

Before I could start, however, I needed to cobble together some rules.
RULES
Units
- Each Infantry figure, Gun, or Tank represents a Regiment of that type.
- An Infantry Regiment costs 1 point to create and throws 1 Combat Dice.
- An Artillery Regiment costs 2 points to create and throws 2 Combat Dice.
- A Tank Regiment costs 3 points to create and throws 3 Combat Dice.
- An Infantry Division has 2 to 4 Infantry Regiments and 1 or 2 Artillery Regiments.
- A Tank Division has 2 to 3 Tank Regiments, 1 or 2 Infantry Regiments, and 1 or 2 Artillery Regiments.
- Both sides throw a D6 die; side with the highest score moves first.
- The side moving first (Side A) throws a D6 die; this determines the number of Divisions or individual Regiments they can move.
- Side A moves each Division or separate Regiment they wish to move in turn, resolving any combats as they occur.
- Once Side A has moved the number of Divisions or separate Regiments it is allowed to move, Side B may them throw a D6 dice and follows the same move and combat resolution procedure.
- Both sides throw two D6 dice. This determines how many points they may spend to 'build' new Regiments and Divisions. (This is an optional rules to be used in a longer game.)
- Infantry Regiments and Divisions: 1 map area per turn.
- Tank Regiments and Divisions: 2 map areas per turn.
- Only Infantry Regiments and Divisions may pass through mountains. They take one turn to enter the mountains and one to leave.
- Tank Divisions reduce their movement to 1 map area per turn in woods, forests, marshes etc.
- Combat is resolved using Combat Dice marked as per MEMOIR '44
- Each Division throws a Combat Dice for every point the Division is worth (i.e How much it cost to create. For example, an Infantry Division with 3 Infantry Regiments and 1 Artillery Regiment is cost 5 points = 5 Combat Dice).
- Each separate Regiment throws a Combat Dice for every point the Regiment is worth (i.e. how much it cost to create. For example, a Tank Regiment cost 3 points = 3 Combat Dice).
- Two Infantry symbols 'kills' an Infantry Regiment.
- Two Grenade symbols 'kills' an Artillery Regiment.
- Two Tank symbols 'kill' a Tank Regiment.
- Two Flag symbols forces a separate Regiment to retreat.
- Three Flag symbols forces a Division to retreat.
THE INVASION OF ROHAN
For some months the situation on the border between Rohan and Gondor had been tense. Both sides were claiming that the other was encroaching upon their territory, and despite diplomatic efforts by the other nations of Middenheim, war became inevitable.
The two sides mobilised the following armies:
- Rohan: A Tank Division (with two Tank Regiments, two Infantry Regiments, and an Artillery Regiment), Three Infantry Divisions (each with three Infantry Regiments and an Artillery Regiment), and Three separate Infantry Regiments.
- Gondor: Two Tank Divisions (each with two Tank Regiments, two Infantry Regiments, and an Artillery Regiment), Three Infantry Divisions (each with three Infantry Regiments and an Artillery Regiment), and Two separate Infantry Regiments.
Not wishing to be seen to be escalating the situation, Rohan screened the border area with her separate Infantry Regiments whilst holding her Divisions in the middle and north of the country. Gondor, on the other hand, moved her mobile forces up to the border in preparation for an attack.
Turn 1
Gondor began the war by attacking Rohan! They threw a 2 on their D6 dice, and could move two units.

One of Gondor's Tank Division's pushed across the border and obliterated the single Rohanic Infantry Regiment protecting the area.

At the other end of the border the second Gondorian Tank Division destroyed both the Rohanic Infantry Regiments defending the border.

Rohan threw 4 on its D6 and decided to move thee units. One of the Rohanic Infantry Divisions attacked a Gondorian Tank Division, and almost forced it to retreat.

This was followed by Rohan's only Tank Division taking on one of its Gondorian opposite numbers ... and considerably reducing its effectiveness!

Rohan's final move was to bring one of its two uncommitted Infantry Divisions forward to support its Tank Division.

Turn 2
Rohan won the right to move first this turn. The Rohan side was permitted to move three units.
The Rohanic Tank Division immediately attacked a Gondorian Tank Division ... and reduced it to a single Tank Regiment!

This was then attacked by one of Rohans Infantry Divisions, but they were unable to cause it any further casualties.

Rohan also moved one of its Infantry Divisions into the Mountains.
The Gondorians were permitted to move four units. They began by attacking the Rohanic Tank Division with the remnant of one of its own Tank Divisions ... and managed to destroy one of its Tank Regiments.

They followed this up with a second attack on the Rohanic Tank Division by the other Gondorian Tank Division, but this had no effect.

The Gondorians also began moving Infantry Divisions forward on their right ...

... and left flanks.

Turn 3
Rohan was again able to move its units first. They threw 5 on their D6 die and could therefore move five units.
First its Tank Division mounted another attack on a Gondorian Tank Division ... and wiped it out!

One of the Rohanic Infantry Divisions then attacked the remaining Gondorian Tank Regiment and forced it to retreat back into Gondor.

Finally Rohan moved both its other Infantry Divisions forward.


At this point the Gondorians had been force back behind their own frontiers and their army had been reduced to almost half its initial strength. The government of Gondor felt that it had no alternative but to seek a ceasefire, which Rohan was only to pleased to agree to as their government had no wish to invade and conquer Gondor.
CONCLUSIONS
For such a hurriedly designed set of rules they actually functioned quite well. I don't think that I have designed a game that is anything like the one Ian Drury envisaged ... but it was a simple and fun way to spend part of a wet Saturday in July, and you never know, I might revisit this again in the future!
PS. Everything that I used to fight this battle was stuff that I already had on my shelves. All I did was to use the various bits and pieces in ways that its original designers had not though to use them.
PPS. It is still raining!


Bob,
ReplyDeleteNice simple rules and a great way of utilising the LOTR RISK map.
I'm amending them to suit my collection of Napoleonic style RISK figures.
It occurs to me that this could also serve as a campaign system to generate Portable Wargame style battles, as it would be quite practicable to have duplicate maps and either use an umpire or something akin to Featherstone's famous 'matchbox system' to discover when tactical contacts are made...
Arthur1815,
ReplyDeleteThe LOTR map was there ... so I used it.
I would be interested to hear how you amend the rules for an earlier era. I also have a set of RISK figures, and it would be nice to find a use for them.
You are right about the map's potential for use as a campaign map that will work with my PORTABLE WARGAME rules (or some similar set of rules). I may consider it as a option for the future.
All the best,
Bob
This looks like a great little game. My son is bugging me to play something so I'm going to do it quick and dirty with LotR Risk and maybe some bits with Conquest of the Empire. I'll let you know how it goes.
ReplyDeleteSean,
ReplyDeleteI will be interested to hear how you get on.
I see no reason why we cannot create our own games using bits from commercial games, especially if we have fun doing it.
Good luck with your efforts.
All the best,
Bob
I need to start writing this kind of thing down when I come up with it on the bus. Invariably I don't and end up thinking about it too much and my "generic fast dogfight" rules become a bizzarely complex set of modifiers and action types representing whichever rabbit hole I fell down first.
ReplyDeleteArquinsiel,
ReplyDeleteWe have all been there and done something similar!
I used to try to carry a notepad with me to write down 'good' ideas; now I use the notepad facility on my iPhone instead.
All the best,
Bob
Hi Bob, just a follow up. I tried your rules and posted about it here:
ReplyDeletehttp://seanswgcorner.blogspot.com/2012/07/memoir-third-age-3019.html
I think I sorted out how the combat dice were marked, I don't have nor have I ever played Memoir 44 et al.
Still needs some ironing out and I think I'm going to add a leader rule borrowed from Conquest of the Empire.
I also had no idea what the Star did so I made a rule that 2 Stars defeated a fleet, 3 stars killed a leader.
Bob,
ReplyDeleteI started writing a Napoleonic variant, but then ended up adding too much that was inappropriate to the command level and scale of the game - though I might well use some of the ideas elsewhere! - so now have to do a ruthless prune/rewrite.
I just looked at a free set of SYW rules on the internet, but lost interest as soon as I read the contents page and saw it ran to 78 pages!
But I hope to be able to send it soon...
All the best,
Arthur
Bob,
ReplyDeleteWhilst on my way to teach tonight, thinking about your game on the LOTR Risk map, it suddenly occurred to me that the combination of various countries, a sea coast and mountain ranges made the map ideally suited to Imagi-Nation Wars of South American Liberation, rather than campaigns involving army corps in Central Europe.
Of course, this means I must produce yet another version of the rules to suit the much smaller forces - but the opportunity to feature El Supremo and, perhaps, La Natividad lying off shore is too good to miss!
I'm now thinking of one figure representing a company/troop or less and one gun a section of two at most, rather than regiments and batteries.
Arthur
Sean,
ReplyDeleteI read your blog entry and I must admit that your game looked rather interesting.
The dice I use are marked as follows: 2 x Infantry (Soldier), 1 x Armour (Tank), 1 x Retreat (Flag), 1 x Miss (Star), and 1 x Any Unit Hit (Grenade).
I look forward to hearing how this project develops.
All the best,
Bob
Arthur1815,
ReplyDeleteHave you got a copy of the C&C:Napoleonics rules? I understand that they are available as a free download and they might give you a few ideas.
All the best,
Bob
Arthur1815,
ReplyDeleteYou are a genius! The map would do wonderfully well for that sort of campaign, and the idea that ships could be used to transport units up and down the coast and to maintain blockades would make for an interesting variation on the theme.
I also think that your 1 figure = 1 company etc. is probably a better one than I had for my game.
All the best,
Bob
Bob: I think you have supplied the answer to what rule system to use for the map warfare in Jono's World (Sideon IV) - or at least the basis of an answer. I rather think I ought to have subdivided the map into regions rather than squares as I have done, so some modification might be needed...
ReplyDeleteOf course, with air and naval elements to be built in, things will become more complex, but I thank you for giving something simple to work on.
Just one query - or possibly a suggestion: I wonder how the campaign would have gone had combats been resolved by both sides rolling at once. Attrition rates would be a whole lot faster, I can see that!
Cheers,
Ion
Archduke Piccolo,
ReplyDeleteI am pleased to hear that my modest and rather cobbled together efforts have been of use to you, and may have helped you to make progress with your own project.
I suspect that had the campaign battles been fought with both sides throwing their Combat Dice at the same time the results would have been far bloodier ... and the war would have been over very quickly.
All the best,
Bob
Hi Bob,
ReplyDeleteLoved it to bits and funny how South America cropped up....;-)
All the best,
DC
David,
ReplyDeleteArthur1815 has now written a very interesting set of rules that use the old Napoleonic RISK figures and the LOTR RISK map. They have been aimed at fighting an imagi-nation version of the South American Wars of Liberation.
I suspect the we will both look forward to seeing how this project will develop.
All the best,
Bob