For the next play-test of my ITCHY AND SCRATCHY rules I decided to re-visit the Rusland Civil War.
This play-test was set up so that I could try out a couple of ideas that had been occupying my mind over the previous days, namely the use of the rules with multi-figure based units and a playing card-driven unit activation system where each unit was allocated a specific playing card (as outlined in my blog entry).
Scenario
Major General Lentilov had a problem. He had been set the task of removing a large stockpile of weapons and ammunition from the town of Sittangrad on the River Malyava before revolutionary forces under the command of ColCom (Column Commander) Kornilov captured the town. In order to do this Lentilov had to hold the town – and its bridge – until the end of the day (i.e. for six turns).
Although he had only arrived in Sittangrad a few days before he received the order to abandon the town after its valuable contents had been removed, he had managed to order the construction of a series of defences (including trenches and barbed wire) behind which his troops could fight.

He did not have very many troops, but what he had were good:
Turn 1
Col Com Kornilov moved his forces towards Sittangrad. Major General Lentilov chose not to open fire on the advancing troops as he intended to hold his fire until they were much closer.

Turn 2
At the behest of ColCom Kornilov, the Red Banner Artillery Battery opened fire on the 101st Machine Gun Battalion, but the range was too great to achieve any serious results.

The 207th Rifle Battalion moved forward ...
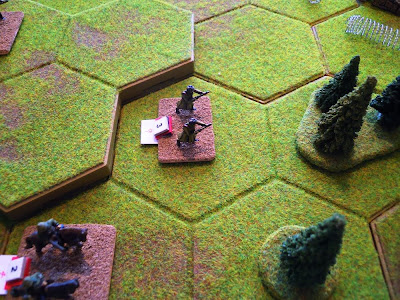
... and in response Major General Lentilov changed his position so that he could support and command the 101st Machine Gun Battalion.

The 100th Artillery Battery then engaged the Red Banner Artillery Battery but the target was too far away for it to suffer any casualties.

202nd Cavalry Regiment advanced on the right wing ...

... whilst the Red Banner Artillery Battery fired for a second time at the 101st Machine Gun Battalion ... with the same negative result.

In the centre the 205th Rifle Battalion moved forward ...

... supported by the 206th Rifle Battalion.

On the left the 204th Rifle Battalion moved closer to the enemy trenches ...
... but it was then overtaken by the 203rd Rifle Battalion.

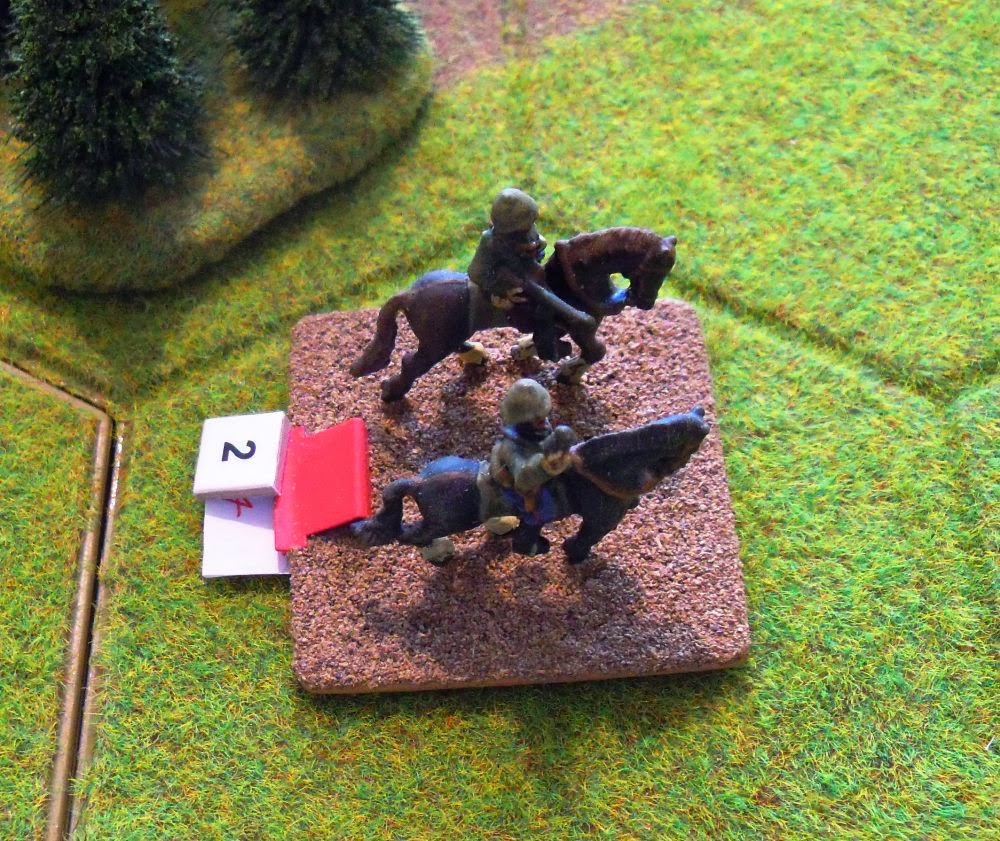
On the right the 201st Cavalry Regiment moved up behind the 202nd Cavalry Regiment.

Turn 3
The 205th Rifle Regiment charged forward into the barbed wire. (I decided that any unit stopped by barbed wire would not be allowed to engage in any form of combat until the barbed wire was removed.)

This gave Major General Kornilov the opportunity to order the 101st Machine Gun Battalion to fire at 205th Rifle Regiment ... with devastating results!

The 204th Rifle Regiment advanced towards the enemy defences and fired at the 104th Rifle Battalion, but was unable to cause them any casualties.

The 202nd Cavalry Regiment charged into the barbed wire on the left flank of the defences around Sittangrad ...

... and the Red Banner Artillery Battery fired at the 101st Machine Gun Battalion. The artillery was on target but yet again it was ineffectual.

The 103rd Rifle Battalion opened fire on the 202nd Cavalry Regiment ... and emptied half of the Regiment's saddles!

The 102nd Rifle Battalion fired at the remnants of the 205th Rifle Battalion ... and wiped them out!

The 101st Machine Gun Battalion shot at the 203rd Rifle Battalion and inflicted a casualty.

The 100th Artillery Battery fired over open sights at the oncoming 204th Rifle Battalion and caused it its first casualty.

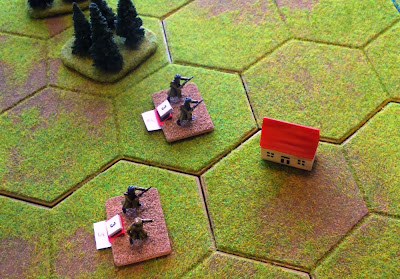
On the other flank the 207th Rifle Battalion sought cover in the nearby wood ... and will no doubt incur the wrath of its political masters in the very near future for not showing a sufficiently aggressive attitude.

The 104th Rifle Battalion joined in the general firefight that had developed along the line of Sittangrad's defences, but was unable to inflict any casualties on the 203rd Rifle Battalion.

In the centre the 206th Rifle Battalion moved into the barbed wire protecting one face of the position occupied by the 101st Machine Gun Battalion.

At this point ColCom Kornilov ordered the Red Banner Artillery Battery to fire at the troublesome 101st Machine Gun Battalion. Their fire missed the 101st Machine Gun Battalion ... but hit and killed Major General Lentilov!

Whilst this was happening, the 203rd Rifle Battalion moved into the field of barbed wire in front of the 104th Rifle Battalion ...

... and on the right flank the 201st Cavalry Regiment joined the depleted 202nd Cavalry Regiment.

(At this point in the battle the ColCom Kornilov's troops had lost 6SP and their opponents had lost only 1 ... but it was their General, Major General Lentilov.)
Turn 4
Despite the loss of their commander, the 101st Machine Gun Battalion was undaunted and inflicted serious casualties upon the 206th Rifle Battalion.

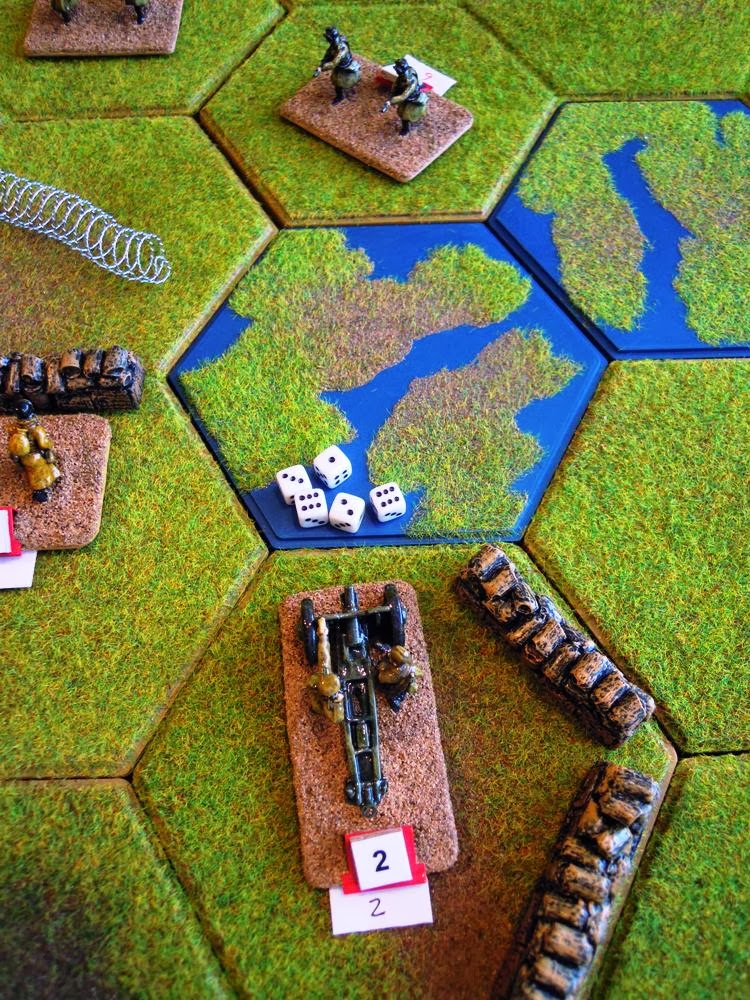
The 204th Rifle Battalion fired over the marshy area at the 100th Artillery Battery, but caused no casualties.

The 202nd Cavalry Regiment managed to remove the barbed wire and engaged the 103rd Rifle Battalion in close combat. The 202nd Cavalry Regiment won the close combat, and the 103rd Rifle Battalion was reduced to half strength. (The 103rd Rifle Battalion could have given ground, but preferred to accept an additional casualty in order not to be forced to retreat.)

The Red Banner Artillery Battery tried to repeat its earlier success but was unable to hit the 101st Machine Gun Battalion.

The 103rd Rifle Battalion counter-attacked the 202nd Cavalry Regiment ... and completely destroyed it!

The 207th Rifle Battalion emerged from the wood and advanced towards the enemy positions.

The 104th Rifle Battalion fired at the 203rd Rifle Battalion, but were unable to inflict any casualties upon them.

The 203rd Rifle Battalion then removed the barbed wire that had earlier halted their advance and charged forward to engage the 104th Rifle Battalion. Despite the intensity of the fighting, neither side suffered any casualties.

The 100th Artillery Battery fired at the 204th Rifle Battalion and caused them a further casualty.

The 201st Cavalry Regiment finally fought their way through the barbed wire in front to the enemy's defences and attacked to 103rd Rifle Regiment. Neither side suffered any casualties ...

... but the 201st Cavalry Regiment was forced to withdraw.

In the centre the 206th Rifle Battalion attacked the 101st Machine Gun Battalion, but immolated itself in the process.

(At this point the attackers had reached their Exhaustion Point.)
The 102nd Rifle Battalion opened fire on the 201st Cavalry Regiment, but the range was too great and the fire too inaccurate for them cause any casualties.

ColCom Kornilov encouraged the Red Banner Artillery Battery to make more attempt to destroy the 101st Machine Gun Battalion ... but although they were on target the trenches prevented the 101st Machine Gun Battalion from suffering any casualties.

Realising the he was not going to be able to capture the bridge over the River Malyava by nightfall, ColCom Kornilov recalled his troops ... and effectively signed his own death warrant for failing to achieve his objective.

Although their casualties had been relatively light, the death of Major General Lentilov was a blow from which his army would take time to recover. They had achieved all that they had been asked to do ... but the loss of such a great general had been a high price to pay.
Conclusions
This play-test was set up so that I could try out a couple of ideas that had been occupying my mind over the previous days, namely the use of the rules with multi-figure based units and a playing card-driven unit activation system where each unit was allocated a specific playing card (as outlined in my blog entry).
Scenario
Major General Lentilov had a problem. He had been set the task of removing a large stockpile of weapons and ammunition from the town of Sittangrad on the River Malyava before revolutionary forces under the command of ColCom (Column Commander) Kornilov captured the town. In order to do this Lentilov had to hold the town – and its bridge – until the end of the day (i.e. for six turns).
Although he had only arrived in Sittangrad a few days before he received the order to abandon the town after its valuable contents had been removed, he had managed to order the construction of a series of defences (including trenches and barbed wire) behind which his troops could fight.

He did not have very many troops, but what he had were good:
- Major General Lentilov: SP = 1 (Black 1)
- 100th Artillery Battery: SP = 2 (Black 2)
- 101st Machine Gun Battalion: SP = 2 (Black 3)
- 102nd Rifle Battalion: SP = 4 (Black 4)
- 103rd Rifle Battalion: SP = 4 (Black 5)
- 104th Rifle Battalion: SP = 4 (Black 6)
- Exhaustion Point: The loss of 9 SP
- ColCom Kornilov: SP = 1 (Red 1)
- Red Banner Artillery Battery: SP = 2 (Red 2)
- 201st Cavalry Regiment: SP = 2 (Red 3)
- 202nd Cavalry Regiment: SP = 2 (Red 4)
- 203rd Rifle Battalion: SP = 3 (Red 5)
- 204th Rifle Battalion: SP = 3 (Red 6)
- 205th Rifle Battalion: SP = 3 (Red 7)
- 206th Rifle Battalion: SP = 3 (Red 8)
- 207th Rifle Battalion: SP = 3 (Red 9)
- Exhaustion Point: The loss of 11 SP
Turn 1
Col Com Kornilov moved his forces towards Sittangrad. Major General Lentilov chose not to open fire on the advancing troops as he intended to hold his fire until they were much closer.

Turn 2
At the behest of ColCom Kornilov, the Red Banner Artillery Battery opened fire on the 101st Machine Gun Battalion, but the range was too great to achieve any serious results.

The 207th Rifle Battalion moved forward ...

... and in response Major General Lentilov changed his position so that he could support and command the 101st Machine Gun Battalion.

The 100th Artillery Battery then engaged the Red Banner Artillery Battery but the target was too far away for it to suffer any casualties.

202nd Cavalry Regiment advanced on the right wing ...
... whilst the Red Banner Artillery Battery fired for a second time at the 101st Machine Gun Battalion ... with the same negative result.

In the centre the 205th Rifle Battalion moved forward ...

... supported by the 206th Rifle Battalion.

On the left the 204th Rifle Battalion moved closer to the enemy trenches ...

... but it was then overtaken by the 203rd Rifle Battalion.

On the right the 201st Cavalry Regiment moved up behind the 202nd Cavalry Regiment.

Turn 3
The 205th Rifle Regiment charged forward into the barbed wire. (I decided that any unit stopped by barbed wire would not be allowed to engage in any form of combat until the barbed wire was removed.)

This gave Major General Kornilov the opportunity to order the 101st Machine Gun Battalion to fire at 205th Rifle Regiment ... with devastating results!

The 204th Rifle Regiment advanced towards the enemy defences and fired at the 104th Rifle Battalion, but was unable to cause them any casualties.

The 202nd Cavalry Regiment charged into the barbed wire on the left flank of the defences around Sittangrad ...

... and the Red Banner Artillery Battery fired at the 101st Machine Gun Battalion. The artillery was on target but yet again it was ineffectual.

The 103rd Rifle Battalion opened fire on the 202nd Cavalry Regiment ... and emptied half of the Regiment's saddles!

The 102nd Rifle Battalion fired at the remnants of the 205th Rifle Battalion ... and wiped them out!

The 101st Machine Gun Battalion shot at the 203rd Rifle Battalion and inflicted a casualty.

The 100th Artillery Battery fired over open sights at the oncoming 204th Rifle Battalion and caused it its first casualty.
On the other flank the 207th Rifle Battalion sought cover in the nearby wood ... and will no doubt incur the wrath of its political masters in the very near future for not showing a sufficiently aggressive attitude.

The 104th Rifle Battalion joined in the general firefight that had developed along the line of Sittangrad's defences, but was unable to inflict any casualties on the 203rd Rifle Battalion.

In the centre the 206th Rifle Battalion moved into the barbed wire protecting one face of the position occupied by the 101st Machine Gun Battalion.

At this point ColCom Kornilov ordered the Red Banner Artillery Battery to fire at the troublesome 101st Machine Gun Battalion. Their fire missed the 101st Machine Gun Battalion ... but hit and killed Major General Lentilov!

Whilst this was happening, the 203rd Rifle Battalion moved into the field of barbed wire in front of the 104th Rifle Battalion ...

... and on the right flank the 201st Cavalry Regiment joined the depleted 202nd Cavalry Regiment.

(At this point in the battle the ColCom Kornilov's troops had lost 6SP and their opponents had lost only 1 ... but it was their General, Major General Lentilov.)
Turn 4
Despite the loss of their commander, the 101st Machine Gun Battalion was undaunted and inflicted serious casualties upon the 206th Rifle Battalion.

The 204th Rifle Battalion fired over the marshy area at the 100th Artillery Battery, but caused no casualties.

The 202nd Cavalry Regiment managed to remove the barbed wire and engaged the 103rd Rifle Battalion in close combat. The 202nd Cavalry Regiment won the close combat, and the 103rd Rifle Battalion was reduced to half strength. (The 103rd Rifle Battalion could have given ground, but preferred to accept an additional casualty in order not to be forced to retreat.)

The Red Banner Artillery Battery tried to repeat its earlier success but was unable to hit the 101st Machine Gun Battalion.

The 103rd Rifle Battalion counter-attacked the 202nd Cavalry Regiment ... and completely destroyed it!

The 207th Rifle Battalion emerged from the wood and advanced towards the enemy positions.

The 104th Rifle Battalion fired at the 203rd Rifle Battalion, but were unable to inflict any casualties upon them.

The 203rd Rifle Battalion then removed the barbed wire that had earlier halted their advance and charged forward to engage the 104th Rifle Battalion. Despite the intensity of the fighting, neither side suffered any casualties.

The 100th Artillery Battery fired at the 204th Rifle Battalion and caused them a further casualty.

The 201st Cavalry Regiment finally fought their way through the barbed wire in front to the enemy's defences and attacked to 103rd Rifle Regiment. Neither side suffered any casualties ...

... but the 201st Cavalry Regiment was forced to withdraw.

In the centre the 206th Rifle Battalion attacked the 101st Machine Gun Battalion, but immolated itself in the process.

(At this point the attackers had reached their Exhaustion Point.)
The 102nd Rifle Battalion opened fire on the 201st Cavalry Regiment, but the range was too great and the fire too inaccurate for them cause any casualties.

ColCom Kornilov encouraged the Red Banner Artillery Battery to make more attempt to destroy the 101st Machine Gun Battalion ... but although they were on target the trenches prevented the 101st Machine Gun Battalion from suffering any casualties.

Realising the he was not going to be able to capture the bridge over the River Malyava by nightfall, ColCom Kornilov recalled his troops ... and effectively signed his own death warrant for failing to achieve his objective.

Although their casualties had been relatively light, the death of Major General Lentilov was a blow from which his army would take time to recover. They had achieved all that they had been asked to do ... but the loss of such a great general had been a high price to pay.
Conclusions
- The simplest version of the playing card-driven unit activation that I outlined in my earlier blog entry worked very well indeed, and produced some interesting results.
- The tabletop was unencumbered with playing card tiles, which – from my point of view – improved the whole look of the battle.
- One unforeseen by-product of the playing card-driven unit activation was the aid the cards gave me when I was writing the turn-by-turn battle report. I had kept the cards in the order that they were turned over and this helped me to keep an accurate record of which units were activated in what order.
- Using multi-figure unit bases and magnetic strength markers ensured that units did not 'dwindle away' but remained intact until they were destroyed. This was aesthetically much more pleasing on the eye ... and has given me something to think about as I had previously be of a mind to only use single-figure bases in future.


Interesting variant of the famous 'Sittangbad' action! The Black Ruslanders held the place with ease: it would interesting to see what might have happened were the Red infantry the same quality/strength as their opponents.
ReplyDeleteThe whole concept is come along very promisingly!
Archduke Piccolo,
ReplyDeleteI wondered how many people would spot the origins of the scenario!
The Black Ruslanders certainly benefited from the quality of the units and the defences that they had, and it was reassuring that the rules relating to the effect of trenches and barbed wire worked.
The death of Major General Lentilov was pure bad luck on his part ... but does show that getting involved in the front-line fighting does have its risks.
The specific card per unit activation system worked better than I had hoped. There was less detritus on the battlefield and it had the added bonus of helping me to record whom had done what to whom. I also feel that the multi-figure base with a magnetic strength marker = one unit looked more aesthetically pleasing on the eye than one or two individual figures remaining after a unit has suffered casualties.
I do hope to run some more play-tests in the near future, but with Christmas looming it may not be as easy as I would otherwise have hoped.
All the best,
Bob
Great game report, Bob. I am slowly putting together a board, and terrain to play these games. I'll be using my Cross Fire and PITS 15mm figures - I also could use my Franco-Prussian War figures.
ReplyDeleteBUT Where on earth(literally!) do you get those "magnetic markers"? I have looked everywhere here in the colonies but no joy!
Dick Bryant
"No scenario survives first contact with a wargamer!"
Dick Bryant,
ReplyDeleteI am pleased to read that you are both following the latest developments are getting ready to try them out for yourself.
The magnetic markers (i.e. the changeable strength point markers) are home-made from a sheet of self-adhesive steel paper, some thick mounting board, a large self-adhesive parcel label that will go through a computer printer (so that the numbers can be printed onto it), and some see-through sticky-backed plastic.
The self-adhesive steel paper is stuck onto one side of a suitably-sized piece of mounting board. The mounting board is then turned over and the label (on which the numbers have been printed) is stuck on the other side. The numbers are then covered with a piece of see-through sticky-backed plastic. Using a sharp knife, a non-slip cutting board, and a steel-edged ruler, the rows of numbers are carefully cut out.
They are fixed to the coloured tags (which are called Supaclips and are made by a company called Rapseco) using short pieces of self-adhesive magnetic tape.
If you cannot get hold of the bits that you need, let me know and I will see if I can help you in any way that I can.
All the best,
Bob
Good looking game. I'm glad the card activation worked. Perhaps simplest is best.
ReplyDeleteSean,
ReplyDeleteIt was a great little battle, and I am pleased that you enjoyed reading the battle report.
The playing card activation system worked even better than I had hoped, and as you so rightly comment, the simple ideas are usually the best ones!
All the best,
Bob
Thanks Bob
ReplyDeleteI was able to find the Supaclips on Amazon and have them on order. The rest, once you explain it, is quite straight forward.
As soon as they arrive I am ready to go.
Dick Bryant
Charge! There are no lead widows.
Dick Bryant,
ReplyDeleteGlad that I could be of help!
I glued the Supaclips to my bases using Superglue, and used different coloured clips for different nationalities.
All the best,
Bob
Bob,
ReplyDeleteAnother great report, with pictures that really explain the action and show the workings of the rules instead of just being eye-candy - though they are also very aesthetically pleasing.
The game did look so much better without the cards being present on the terrain, and the activation system clearly worked well. A rework of Blasthof Bridge next?
Regards,
Arthur
Arthur1815,
ReplyDeleteI must admit that I was more than a little pleased with both the new unit activation system and the 'look' of the battle report.
Although the playing card tiles are less intrusive than even the smallest playing cards when they are laid down on the tabletop, they are still too large to look aesthetically pleasing. The 'off battlefield' card activation system is much better in that respect ... and has the added bonus of helping me to keep track of what has happened. I used the smaller dice so that readers could actually see the results … and I think that that helped as well.
Is a re-fight of Blasthof Bridge on the cards? Well it is funny that you should mention that but … you’ll have to wait and see!
All the best,
Bob