Pages

Friday 30 April 2010

My priorities for April were ...

  1. Finish testing my card-driven turn sequence.
    Done ... but the mechanism still needs some further development before I will be totally happy with it.
  2. Write the latest draft of my development of Joseph Morshauser's wargames rules (incorporating the card-driven turn sequence).
    Done ... but I think that it will need to be revised once I get the card-driven turn sequence just the way I want it to be.
  3. Play-test the rules (which will be an excuse to fight some tabletop battles for a change!).
    Done ... but the play-test was not a full play-test, and I think that one is needed if I am to be sure that I have got the balance between the various elements of the rules just right.
  4. Finish the map of Maldacia.
    Not even started yet!
Well I managed to do at least some of the things I set out to do, and I hope to get the rest done early in May, so it was not so bad a month after all!

Too busy to wargame … I wonder why?

I noticed this morning that I have only managed to write eighteen blog entries this month, and this made me realise how little wargaming I have actually done. I have thought about it, read and bought books about it, and have even had a very short play-test battle … but the reality is that I have actually done very little wargaming as such.

Why?

Well one reason is that my wife and I went on a cruise, but this only accounted for one of the past four weeks. The main reason is, however, that dreaded four-letter word … WORK!

The decision by the local authority to mount its own inspection of the Sixth Form where I work meant that I had to spend quite a lot of time during my recent Easter holiday preparing lessons, materials, and data that they might want to see. Needless to say, that did not want to see any of it! On top of that, the senior management have arranged for all of the staff – except themselves – to undertake two hours of ‘professional development’ per week (i.e. lectures and practical sessions designed to improve our teaching methodology) in addition to our normal workload. They have made it very clear that these extra hours are not an optional extra; they are compulsory and unpaid. Finally all this has coincided with the annual NSS (National Student Sampling) exercise for BTEC courses.

N.B. For those of my readers who do not know what a BTEC course is, it is course that is vocationally orientated. It has no final examination but has continuous – and rigorous – assessments. I teach Business Level 1 [the lowest level you can get; it is aimed at students who have few or no previous qualifications], Travel and Tourism Level 2 [the equivalent of qualifications most pupils get at the end of Year 11], and Travel and Tourism Level 3 [equivalent to degree-entry qualifications]).

The NSS is a sample of assessed work done by students, and the process is intended to ensure that the quality of the assessments taking place nationally is of the required standard. The problem is that the process of collecting the assessed work and preparing it for the NSS is both very time consuming and very bureaucratic. The lecturer who set the assessment and who assessed the work has to pass it to another lecturer – the Internal Verifier – who then checks that both are of the required standard. Any changes have to be noted and acted upon, or an action plan has to be put in place to achieve the required changes. This is all then checked by the person who has been nominated to be in charge of Quality Assurance. Once all this has been done, the paperwork – which by now is the size of a small mountain – is checked at least twice more before it is sent to the External Verifier, who then checks it all again and decides whether or not it matches the National Standard. Hopefully it does, because if it does not the whole sampling process has to be done again, but with the required changes stipulated by the External Verifier.

Simple, isn’t it!

Thinking about it, I now wonder how I had any time to do anything other than work. Hopefully next month will be a bit less intense … but I doubt it as we are scheduled to undergo another inspection sometime during May.

As the Chinese proverb says ‘May you live in interesting times’; I just wish that I didn’t!

Thursday 29 April 2010

A Very British Civil War (VBCW)

As my earlier blog entries and my interest in the Interbellum blog must have made obvious, I enjoy alternative history and imagi-nations/imaginary wars set in the inter-war period. This – combined with my long-held interest in the Spanish Civil War and the Chaco War, my love of the Tintin stories, and the fact the Sir Ian McKellen's version of RICHARD III is one of my favourite films – made the Very British Civil War 'project' something that I found very appealing, and I have followed its development with considerable interest.

Whilst I was at Salute 2010 I was able to buy three of the four source books that have so far been published by Solway Crafts and Miniatures, and today I ordered the fourth book in the series. Having read the first three, I am looking forward to reading this latest volume when it arrives.

Monday 26 April 2010

I have been reading ... a book about the Irish Army

I have just finished re-reading Donal MacCarron's book about the Irish Army during the Second World War. The book is 'STEP TOGETHER!' (Published in 1999 by Irish Academic Press [ISBN 0 7165 2619 0]) and it tells the story of the Irish Army from the outbreak of World War II – when it only numbered 7,500 men – until 1945 when it had 60,000 full-time and 290,000 part-time personnel.

The book is full of wonderful anecdotes as well as numerous black and white photographs. I bought it some time ago and read it almost straight away, but since my interest in the inter-war era has been growing … and I have been looking for a prototype small European army upon which to base one or more of my imagi-nation armies … it seemed the right time to read it again.

I would recommend this book to any reader who has an interest in some of the more obscure armies of the 1930s and 1940s; it is well worth trying to find a copy if you can.

Sunday 25 April 2010

Seen at Salute 2010 but not bought ... yet

One product that I wanted to have a look at before deciding whether to buy it or not was the new range of hard plastic figures being sold by The Plastic Soldier Company.

Having seen the figures I must say that I was very impressed. They seem to be of a size that will fit in with most other manufacturer's 20mm scale figures, and the price for 57 figures (3 sprues of 19 figures) is £10.00, which makes them a bargain for anyone who wants to build up a large Russian force of World War II infantry for not too much money.

So why didn't I buy any?

Because the company intends to produce the same figures in 15mm scale. I saw samples of these small figures ... and they were very nice indeed. The 15mm figures are in exactly the same poses as their large brothers, and I was told that they will be sold in boxes of over 200 figures for a price in the region of £17.50. If this project proves to be a success, the company hopes to produce all future figure releases in both 20mm and 15mm scales.

Now I already have quite a large collection of 20mm figures, vehicles and equipment, and these new figures would fit in very nicely with them. However pressure on storage space is making me think about moving down to 15mm for future projects, and the 15mm figures would make this a viable option. I am therefore going to have a long, hard think before I decide what to do.

You know it makes sense ... at least, that is what I keep telling myself!

Saturday 24 April 2010

Salute 2010

I arrived at ExCel in Docklands by 9.45 a.m. (I travelled by Docklands Light Railway from Woolwich, and was able to use my Freedom Pass for the first time!) and joined the queue to get in. The queue was huge, and stretched right across the concourse and into a vacant exhibition hall ... where it wound backward and forward across the empty hall.

Apparently the Fire Officer was unhappy about some aspects of the arrangements in the venue, and the doors were not opened until just after 10.00 a.m. I finally got in at about 10.10 a.m., and immediately went for a walk round to get my bearings and to gauge what was on offer.

There was quite a lot to see!

Three of the walls of the venue were taken up by traders' stands and the 'bring-and-buy' area (the fourth wall is the one with all the loading and unloading doors taking up most of the wall space). The rest of the venue was filled with 'blocks' of more traders' stands and games.

The following is a brief overview of the games that I saw and thought were worth photographing. You will notice that they fall into one or more of the following categories:
  • They use hexed terrain.
  • They are set in the late 19th or early 20th centuries.
  • They are using some innovative ideas.
  • They were a bit different from other more 'run of the mill' games.
The Great War in Italy (Scarab Miniatures and Kallistra)
This was not featured in the official show guide, and occupied one end of a table that also featured a Sci-Fi game – Projekt X – set in a Weird War II setting.

Siege of Begrade (Eversham Wargames Club)
Although the terrain used was Hexon II, as far as I could tell the rules did not use area movement.

Glider Assault (Honnington Wargame Group)
This was a recreation of the famous glider assault by elements of 6th Airborne Division on the bridge over the River Orne.

This game was of particular interest to me because:
  • My father served with 6th Airborne Division during the Second World War (but not as a member of the force that took part this operation)
  • I was able to visit the bridge (now known as the Pegasus Bridge) last year

The Second Battle of Seroczyn, Poland 1939 (Deal Wargames Society)
This was a very impressive game (as one has come to expect from the Deal group) which dealt with one of the earliest battles of World War II. The following images were taken from opposite ends of the table, and give some idea of the size of the game and the excellence of the scenery used.

'My Feet Hurt Mum!' (South East Essex Military Society)
I know a lot of the members of SEEMS from my days of wargaming in basement of Eric Knowles's shop NEW MODEL ARMY, and I always make a point of having a look at their games. They always put something on that is a bit special, and this game was no different.

Franco-Belgian troops were attempting to stem the advance of a mobile German force but seemed to be in danger of being overwhelmed.

The grassy part of the terrain was made from teddy bear fur that has been over sprayed with varying shades of green and brown, and this was both impressive and effective, as was the use of the small camera tripods that enabled the aircraft to 'fly' over the battlefield.

The Battle of Miloslaw (The Continental Wars Society)
The Continental Wars Society can always be relied upon to stage something a bit different.

In this case they chose the Battle of Miloslaw (April 1848), where an army of Polish patriots fought the troops of their Prussian occupiers.

The figures had been specially commissioned for the game, and were very unusual as they were wearing uniforms from a period when the styles were evolving from those worn in the immediate post-Napoleonic era to those worn during the mid-19th century.

I have been meaning to join the Society for some years, and actually managed it this year, mainly thanks to the very helpful and informative attitude of the members who were running the game and talking to the passing punters. This is something some of the other groups at Salute would be well advised to learn from (No names, no pack-drill).

First Battle of Chaeronea (Society of Ancients)
Although I am not a member of the Society, I know a lot of people who are and I always pay a visit to whatever game they are running because it will always be impressive. This was no exception.

Nice, simple but effective terrain and figures, with Professor Phil Sabin on hand to ensure that the game proceeded smoothly. What more could you ask for?

Battle of Britain Aerial Raid 1940 – Isle of Wight (Wessex Wargamers – Winchester)
This was a game where the hexed terrain was used very effectively. I watched a couple of moves, and the whole thing moved along at a very brisk pace considering that the players had only just begun to learn the rules.

Aquanef (Matthew Hartley and Steve Blease)
In some ways this was the most innovative game that I saw all day as it appears to have 'solved' the problem of fighting naval battles that involve both surface and underwater craft – you put the surface craft on circular bases (made from redundant CDs) and 'fly' them over the bottom of the sea on upturned plastic beer glasses. So simple and so clever ...

Furthermore, the model ironclads were marvellous in their own right, and hopefully they will soon be on sale to those of us who have an interest in that period of naval history and wargaming.

Blood on the sand – and not a Redcoat in sight (Skirmish Wargames)
There is no doubt about it – wargames that use 54mm figures look impressive! If only I had the room and the time ...

Science Fiction games (Various)
There were a lot of science fiction games this year ... which is not surprising as this was the show's theme! The following picture is of 'A Rig Too Far' and gives some idea of the amount of effort that was put into these games.

And finally ...
I did not spend all my time wandering around taking photographs. I also had a lot more time than usual to chat to the many wargamers I know who were at Salute ... and I managed to purchase one or two things that I wanted. These purchases included:

  • Membership of the Continental Wars Society (I was given both the latest issue of the Society's newsletter, 'The Foreign Correspondent' and a monograph about the Gruson 'Fahrpanzer')
  • Three more boxes of KV-1 and KV-2 Soviet Heavy Tanks made by Pegasus Hobbies
  • 1938: A Very British Civil War (The Source Book)
  • 1938: A Very British Civil War (The Gathering Storm Part One – Scotland and the North)
  • 1938: A Very British Civil War (The Gathering Storm Part Two – The Midlands and the South)
The latter three purchases were pure self-indulgence, although I suspect that they will be very useful as I develop the stories of Laurania and Maldacia during the 1920s and 1930s.

Friday 23 April 2010

Salute is on tomorrow

I shall be going to Salute tomorrow ... and for the first time in years it will be as a normal punter and not as someone who is putting on a game.

For some years I have helped to run the games put on at Salute by the members of Wargame Developments, but this year – for some reason best know to the South London Warlords – we were not invited to do so. This will give me the opportunity to spend some time looking at the various trader stands that are there – and possibly making a few purchases – as well as at the games that are being put on. I will take my camera with me, and with a bit of luck I should be able to write a blog entry sometime over the weekend about what I see and do.

Now where did I put my wallet?

Thursday 22 April 2010

A problem with the card-driven turn sequence

As readers of this blog will be aware, whilst I was on my recent cruise I read and re-read both the latest draft of the 'Modern' wargames rules that I have been developing from Joseph Morschauser's original rules and WHEN EMPIRES CLASH! As a result I realised that the card-driven turn sequence I had developed for the former had a basic flaw.

The flaw is quite a simple one, and only comes to light when armies of significantly different sizes are deployed on the battlefield.
  • If a large army (e.g. 24 Units) commanded by a ‘Good’ commander faces a small army (e.g. 12 Units) commanded by a ‘Poor’ commander, it is almost unbeatable because the larger army will be able to activate far more of its Units each turn that the smaller army (i.e. an average of 20 Units per turn for the large army and 4 Units per turn for the smaller army).
  • If a large army (e.g. 24 Units) commanded by a ‘Poor’ commander faces a small army (e.g. 12 Units) commanded by a ‘Good’ commander, the outcome should be fairer as the number of Units activated by both armies will be reasonably balanced each turn (i.e. an average of 12 Units per turn for the large army and 10 Units per turn for the smaller army).
  • If a very large army (e.g. 36 Units) commanded by a ‘Poor’ commander faces a small army (e.g. 12 Units) commanded by a ‘Good’ commander, the outcome should be in favour of the very large army as the number of Units activated by very large army should be much higher than the number activated by the smaller army (i.e. an average of 18 Units per turn for the very large army and 10 Units per turn for the smaller army).
In light of this I have been giving the matter some significant thinking time, and I am looking at ways in which the number of Unit activations that a commander can make each turn can be limited without creating a very cumbersome game mechanism. I am almost there … but I still have a bit father to go before I have what I consider to be a working solution.

Monday 19 April 2010

Interbellum: A progress report

Since I launched the Interbellum blog on 25th March 2010 it has flourished even more than I had hoped that it would.

As of today it has had thirty-three blog entries from the nine contributors, and has attracted eighteen followers. It has also 'identified' at least eighteen inter-war imagi-nations. Not bad for for such a new project!

My own contribution has been rather limited, but now I have returned from my latest cruise I am raring to go. I have lots of ideas for the development of Laurania and Maldacia, particularly concerning their armed forces, but more of that later. Suffice it to say that I will be going to SALUTE next Saturday with a shopping list.

Sunday 18 April 2010

I have been to … Ireland, Spain, and France

It has become the norm for my wife and I to go on a short cruise at sometime over the Easter holiday, and this year was no exception. Our trip on P&O’s MV Oriana took us to Dublin and Cork in Ireland, Bilbao in Northern Spain, and Brest on the French Atlantic coast.

Day 1: Southampton
Having had an uneventful journey from London to Southampton, we were aboard by 1.00 p.m. and unpacked in plenty of time to ‘sail away’ at 5.45 p.m. On our way out of harbour we passed the latest addition to the P&O fleet – MV Azura – which looked to me very much like a block of apartments on top of a ship’s hull; functional, modern … and ugly.

Day 2: At sea
We spent the day sailing at what seemed like a very leisurely pace down the English Channel until about 3.00 p.m. when, after reaching Land’s End, the ship turned northward and headed towards the Irish Sea. Just off the coast near Falmouth the ship was ‘buzzed’ by a Royal Navy Sea King SAR (Search And Rescue) helicopter, which then flew off to practice low-level hovering closer inshore.

I spent part of the afternoon re-reading the latest draft of my adaptation and development of Joseph Morschauser’s wargames rules and comparing it with the most recent version (from late last year) of the WHEN EMPIRES CLASH! rules. The latter included several alternative card-driven turn sequences that players could choose from, and as a result of re-visiting WHEN EMPIRES CLASH! I have had some more thoughts about the mechanisms I developed for the former.

Day 3: Dublin
Although it was quite cold when we arrived alongside just after 8.00 a.m. the sun soon began to cause the temperature to rise to a much more seasonal level.

We spent the morning on a sightseeing tour by coach that took us round all the major places of importance in the city. These included several of the locations that were important during the Easter Rising of 1916, namely the General Post Office, The Customs House, St. Stephen’s Green, Dublin Castle, and the Four Courts. We also paid a visit to the Guinness Brewery, where we learned about the history of the company and the brewing process used to make Guinness. The visit was topped off – quite literally – with a visit to the Gravity Bar where we were able to sup the best pint of Guinness I have every tasted whilst looking at a panoramic view of Dublin.

On the way into the city we passed one of the Irish Navy’s offshore patrol vessel, LE Niamh (P52). She was a very smart looking ship, and seemed ideally suited for her main tasks, which are protecting Irish territorial waters, fishery protection, and anti-smuggling patrols.

As we will be passing Haulbowline Island – the HQ of the Irish Navy – as we sail into Cobh (the port that serves the City of Cork) tomorrow, there is a chance that we may see some more ships of the Irish Navy.

Day 4: Cobh/Cork
Despite being very sunny, the wind made it feel cold, and as the day went on the weather became cloudier and colder. We went ashore with the intention of following the ‘Titanic Trail’ around Cobh, but we began our visit by going to the Cobh Heritage Centre. This is part of the railway station, and is right next to the Cruise Ship Terminal (two pontoons that the cruise liners moor alongside!).

The Heritage Centre traces the development of Cobh as Ireland’s main migrant port. Initially most of the ‘migrants’ were actually convicts who were being sent to Australia in the aftermath of the abortive 1798 rebellion, but many people who were forced to emigrate as a result of the Potato Famine and the economic decline Ireland subsequently suffered followed them. The Centre also has a section devoted to the lost of the RMS Titanic in April 1912, but a much larger portion of the exhibits deals with the sinking by a German U-boat of the RMS Lusitania in 1915.

After leaving the Heritage Centre we walked along the seafront to the J. F. Kennedy Park, where two cannons are displayed on what appear to be iron garrison carriages. One of the cannon is definitely British (it has a ‘GR’ cipher) whilst the other appears to be Russian as its trunnion markings are in Cyrillic script.

There is no indication where the cannons came from or why they are on display, and we can only assume that they are to commemorate Cobh’s role as a Royal Navy base during the Napoleonic and Crimean Wars.

We then walked a little further along the seafront and saw both the Titanic

… and Lusitania Memorials.

We finished our walk ashore by visiting St. Colman’s Cathedral and the Cobh Museum. The latter is very small but contains considerable memorabilia that relates to Cobh’s role as a naval base during World War I and in particular the close relationship that the town developed with the US Navy ships that were based there.

During our passage out of Cobh we passed very close to Haulbowline Island, and it was very apparent that most of the Irish Navy’s ships were alongside the dock area there. These included LE Eithne (P31) as well as LE Orla (P41) – an ex-Royal Navy ‘Peacock’ class coastal patrol vessel – LE Roisin (P51), and two ships of the 'Deirdre' Class of offshore patrol vessels.

We were also passed by LE Ciara (P42) – another ex-Royal Navy ‘Peacock’ class coastal patrol vessel – as she returned to base.

Day 5: At sea
We spent the day sailing southwards towards our next port-of-call, Bilbao in Spain. The weather was overcast and the wind caused the temperature to be quite cold. As a result I had the opportunity to read and re-read the latest draft of my adaptation and development of Joseph Morschauser’s wargames rules. Having considered changing the card-driven turn sequence so that it was more like that used in WHEN EMPIRES CLASH!, I am still in two minds as to whether or not to leave things as they are or to make the changes. Time … and a bit more thought … will help me decide what to do.

Day 6: Bilbao
Although the weather was quite cool to start with, the clouds dispersed soon after we arrived in the centre of Bilbao and the temperature gradually rose until it was warm enough to feel comfortable but not too hot to take a gentle stroll. We walked through the centre of the city from the Plaza Circular to the Plaza de Frederico Moyua and down to the Guggenheim Museum which is situated next to the river (the Rio Ibaizabal). From their we made our way along the river’s edge to the Puente Zubizuri and then back to the shuttle bus pick-up point, stopping along the way at a typical Spanish bar called the Jardines Terraza for some refreshments.

Because the next part of our cruise takes us to Brest – which is approximately 360 nautical miles from Bilbao – we had to sail by 5.00 p.m. in order to get there by tomorrow morning. We were escorted out of the harbour by both a local police launch and a small Guardia Civil patrol boat, which was considerably less than the escort we had the last time we visited Bilbao. On that occasion frogmen were deployed whilst the ship was at anchor to ensure that members of ETA did not attach limpet mines to the ship, and our escort included a police launch, a Guardia Civil patrol boat and helicopter, and Spanish Coast Guard cutter and helicopter.

Day 7: Brest
It was a bright and sunny day and we were able to spend some time ashore walking through the main shopping area. I had hoped that as Brest is a major French naval port I might find shops that specialised in supplying warship model kits and parts or naval books, but unfortunately I could find neither.

During our passage out of the port during the afternoon we passed the chateau that houses both the Brest Naval Museum and the local French Naval Headquarters.

In the Military Harbour there were two ‘Georges Leygues’ class destroyers – including FS Lamotte-Piquet (D645) – tied up alongside.

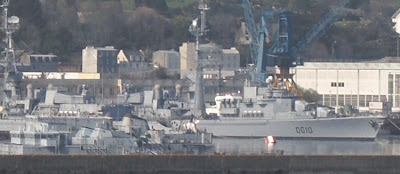
Nearer to the old German submarine pens, the French missile range tracking ship FS Monge (A601) was moored next to the harbour mole whilst amongst the plethora of small training vessels there were two more examples of French destroyers, FS De Grasse (D612) and FS Tourville (D610).

Right at the end of the Military Harbour are the old concrete German submarine pens, and we passed these as we finally left Brest.

It was interesting to see that the French Navy still uses the structure to house some of its smaller warships, and some of these could be seen moored just inside the entrance to the pens.

Day 8: Southampton ... and home
We docked in Southampton on time and were able to disembark by just after 9.00 a.m. The traffic on the motorways seemed lighter than normal, and this may well be due to both London Heathrow and London Gatwick being closed due to the current ban on all flights in UK airspace. Even though we had to stop on the way home to do some food shopping, we were home just after midday.

Wargames on film and TV: Peter Cushing

My thanks go to robertpeel999 for making me aware of a short film extract that is on vodpod. It is a film item from British Pathe News (the newsreel that was put on at the cinema between films) about Peter Cushing collecting model soldiers and playing wargames using the rules written by H.G.Wells in LITTLE WARS.

Saturday 10 April 2010

A play-test of sorts

I finally managed to arrange a play-test of sorts this afternoon in amongst all the other domestic tasks I have had to complete before tomorrow. Because I had to set the whole thing up in a bit of a rush I decided to use the board from MEMOIR '44 for the terrain and some painted World War I Minifigs 15mm figures that were given to me last year. I added a couple of old Peter Laing Field Guns, and a 15mm French Tank from the AXIS AND ALLIES MINIATURES range.

The 'attackers' (Black) had six Infantry Units, a Machine Gun Unit, a Field Gun Unit, a Tank Unit, and a Command Unit.

The 'defenders' (Red) had three Infantry Units, a Machine Gun Unit, a Field Gun Unit, and a Command Unit. Most of these were either in entrenchments or concealed behind hills.

I only managed to run through the first two moves before I had to stop the play-test, but the rules worked very smoothly, and I was particularly pleased with the new card-driven turn sequence.

Turn 1
N.B. The numbers on the images indicate the order in which Units were activated, and show their starting position and their finishing position or target.

The attackers activated a Unit first, and their Field Gun Unit opened fire – with no effect – upon one of the defender's dug-in Infantry Units (1). They then repeated this action (2), again with no effect. The attacker's Tank Unit then moved forward twice (3 & 4), at which point the defenders were able to activate their Field Gun Unit (5), which fired at and knocked out the attacker's Tank Unit. The final activation of the turn allowed the defender' to move a previously concealed Infantry Unit forward (6) so that it was on top of one of the hills.

Turn 2

The second turn saw much more action than the first. The defenders activated an Infantry Unit, but decided to leave it where it was (1), safely in its entrenchments. The attackers then fired their Field Gun Unit twice at the other entrenched defending Infantry Unit (2 & 3), but again failed to hit it on both occasions. The attackers then moved a column of two Infantry Units forward twice (4 & 5 and 6 & 7) until they were up to the river in the centre of the battlefield. The leading attacking Infantry Unit then engaged the defender's Machine Gun Unit (8) and destroyed it. The same attacking Infantry Unit then fired twice at the defending Infantry Unit on top of the hill (9 & 10), and destroyed it as well. Retribution was swift, however, and the defender's Field Gun Unit engaged both the attacking Infantry Units near the river, and destroyed them (11 & 12).

At this point I had to end the play-test. Honours were about even on both sides, and the card-driven turn sequence allowed both the attacked and the defenders to respond to the developing situations without being sure that everything that they might have planned to do would happen.

Friday 9 April 2010

Perhaps tomorrow ...

Well I never quite managed to get round to running the play-test of the latest draft of the 'Modern' period wargames rules that I had planned for today. My persistent cold left me feeling very unwell ... and then I had to drive to Maidstone (a round trip of over 60 miles) to collect a new piece of furniture that we had ordered. By the time I got back, had lunch, and completed several other domestic chores, my day was pretty well over.

Perhaps tomorrow will be better ... you never know ...

Thursday 8 April 2010

I know I am supposed to be on holiday but ...

Before Christmas the Sixth Form where I work was inspected … and was found wanting. This has meant a lot of extra work for everyone, including me. We know that we will be re-inspected sometime soon (probably in May) and we have all been preparing for the inspection. It was therefore something of a shock to discover that the Local Authority has decided to ‘help’ by having its own ‘mock’ inspection to see if we are up to scratch.

This ‘extra’ inspection will take place two days after we return from the Easter holidays, and as a result I have spent most of my free time since Tuesday preparing a whole term’s teaching materials and the related scheme-of-work because the inspection team will want to see it when they come in.

Now for those of you who were brought up on the ‘turn to page 5 and read to page 10’ and ‘write an essay about … ‘ school of teaching this might seem to be a bit odd. After all, the courses have syllabuses, the student’s have textbooks, and loads of materials are available free to download form the Internet, so what is the problem?

Well … a large proportion of my students do not speak English as a first language, and so most of the textbooks and readily available teaching materials are just unsuitable. I have to re-write them before they can be used, and I have found that it is actually quicker to do the whole thing from scratch. In addition, we are moving to a more student-centred style of learning (not teaching) where materials have to be suitable for a wide range of abilities and individual needs; they also have to be available electronically so that the student can access them 24:7.

I have now finished my preparation for next term. The task sheets are written, the support materials (including the inevitable PowerPoint presentations) have been created, and the whole lot has been uploaded to the Sixth Form’s ‘learning gateway’. This process is very time consuming and mentally tiring, which is why my wargaming and blogging have been very much on the backburner for the past few days. I only hope that after a good night’s sleep I will be able to get enough energy together to play-test my new rules tomorrow.

Wednesday 7 April 2010

'Modern' wargames rules now available on line

The 'Modern' wargames rules that I have been developing from Joseph Morschauser's original rules are now available as a PDF download from the RED HEX WARGAMES website.

They are under the title ADAPTATION OF MORSCHAUSER'S 'MODERN' PERIOD WARGAMES RULES FOR A 4-INCH HEX GRIDDED BATTLEFIELD, and the password needed to download the rules is '20thcentury'.

Monday 5 April 2010

First draft of the new 'Modern' wargames rules

First, an explanation.

When I sat down to write the first draft of my latest development of Joseph Morschauser's rules I fully intended it to use individually based figures. However I have not yet had the time or the inclination to rebase (or should that be de-base?) any of my existing 20mm troops and so I decided to go with multi-figure bases for this draft.

Secondly, I have moved away from 3-inch/75mm squares to 4-inch/100mm hexes because I wanted to use my large collection of Hexon II terrain and because I happen to think that hexes work better with the less linear warfare of the mid to late 20th century.

Thirdly, I hoped that my play-tests could be set in the 1930s as I have really begun to 'get into' that era of warfare recently as a result of my involvement in the Interbellum blog.

On to the rules ...

- o 0 o -

20th CENTURY WARGAMES RULES
Developed by Bob Cordery from Joseph Morschauser's original 'Modern' period wargames rules.

PLAYING EQUIPMENT

The following equipment is needed to fight battles using these rules:
  • A battlefield and suitable terrain;
  • Two armies;
  • A battle scenario (either generated by a campaign or as a ‘one-off’ battle);
  • A pack of playing cards with fifty-two playing cards divided into two colours (Red and Black) and four suits (Hearts, Clubs, Diamonds, and Spades);
  • At least two D6 dice (one for each side).
BATTLEFIELD AND TERRAIN

The Gridded Battlefield

  • Battles are fought out on a gridded battlefield marked in a grid of 4-inch/100mm hexes.
Terrain
  • Pieces of terrain that are not flat and/or open terrain (e.g. trees, buildings) must fit – whenever possible – within one hex on the battlefield.
  • The placement of a piece of terrain in a hex indicates that entire hex is filled by that type of terrain (e.g. a tree in a hex indicates that the entire hex is wooded; a building in a hex indicates that the entire hex is a built-up area).
  • Where pieces of terrain are large than an individual hex (e.g. a hill) they must be sized in multiples of hexes (e.g. two hexes, three hexes, or six hexes) and be marked in 4-inch/100mm hexes in the same way as the battlefield.
ARMIES
  • The armies used are made up of a number of Units.
  • Units can be grouped together for aesthetic purposes but are treated as separate entities during the battle.
UNITS

Types of Unit
  • There are several different categories of Unit.
  • These are:
    • Infantry;
    • Cavalry;
    • Artillery;
    • AFV;
    • Command;
    • Miscellaneous.
NB. Although data about minefields has been included under ‘Miscellaneous’ in the Unit Data section below, they are not Units as such.
Command Units
  • Command Units represent the player's alter ego on the battlefield.
  • A Command Unit may not initiate combat with enemy Units, although it can support friendly Units and may defend itself if it is attacked.
  • Before the battle begins both sides must decide how good their respective commanders are.
  • For battles that are fought as part of a campaign, a commander’s ability (or Command Value) will be determined by the events leading up to the battle.
    • If the commander is rated as ‘Good’, the commander has a Command Value of 2.
    • If the commander is rated as ‘Average’, the commander has a Command Value of 3.
    • If the commander is rated as ‘Poor’, the commander has a Command Value of 4.
  • In the case of 'one-off' battles a commander’s ability (or Command Ability) is determined by the throw of a D6 die:
    • Score is 1 or 2: Commander is 'Poor'.
    • Score is 3, 4 or 5: Commander is 'Average'.
    • Score is 6: Commander is 'Good'.
  • A commander's Command Value affects their ability to activate stands (see Turn Sequence).
  • If a Command Unit is destroyed the player can continue to activate Units but the Command Value is increased.
    • If the commander was rated as ‘Good’, the Command Value is increased to 3.
    • If the commander was rated as ‘Average’, the Command Value is increased to 4.
    • If the commander was rated as ‘Poor’, the Command Value is increased to 5.
  • The presence of a Command Unit in a hex that is adjacent to one occupied by a friendly Unit reduces that friendly Unit's Close Combat Power by 1.
Representing Units on the Battlefield
  • Units are represented by a number of model figures and equipment (e.g. a Field Gun and gun crew) mounted on a common base.
  • AFV Units are represented by a single model that may be mounted on a base.
  • Miscellaneous Units are represented by a single model or terrain marker.
Base Sizes
  • There is no set base sizes for Units, but a base must fit within the limits of a 4-inch/100mm hex.
Unit Data

Infantry Units
  • Rifle:
    • Can move 2 hexes.
    • Weapon range is 4 hexes.
    • D6 score to hit is 5 or 6.
    • Close Combat factor is 3.
  • Submachine Gun:
    • Can move 2 hexes.
    • Weapon range is 2 hexes.
    • D6 score to hit is 4, 5 or 6.
    • Close Combat factor is 3.
  • Machine Gun:
    • Can move 2 hexes.
    • Weapon range is 4 hexes.
    • D6 score to hit is 4, 5 or 6.
    • Close Combat factor is 3.
  • Antitank Rocket:
    • Can move 2 hexes.
    • Weapon range is 2 hexes.
    • D6 score to hit is 5 or 6.
    • Close Combat factor is 3.
  • Mortar:
    • Can move 2 hexes.
    • Weapon range is 4 hexes.
    • D6 score to hit is 5 or 6.
    • Close Combat factor is 3.
  • Engineer:
    • Can move 2 hexes.
    • Weapon range is 4 hexes.
    • D6 score to hit is 5 or 6.
    • Close Combat factor is 3.
Cavalry Units
  • Rifle:
    • Can move 3 hexes.
    • Weapon range is 4 hexes but may only fire when dismounted.
    • D6 score to hit is 5 or 6.
    • Close Combat factor is 3.
Artillery Units
  • Antitank Gun:
    • Can move 2 hexes.
    • Weapon range is 6 hexes.
    • D6 score to hit is 5 or 6.
    • Close Combat factor is 5.
  • Field Gun:
    • Can move 2 hexes.
    • Weapon range is 9 hexes.
    • D6 score to hit is 5 or 6.
    • Close Combat factor is 5.
  • Field Howitzer:
    • Can move 2 hexes.
    • Weapon range is 6 hexes.
    • D6 score to hit is 5 or 6.
    • Close Combat factor is 5.
AFV Units
  • Tank:
    • Can move 4 hexes on roads and 2 hexes off roads.
    • Weapon range is 6 hexes.
    • D6 score to hit is 5 or 6.
    • Close Combat factor is 3.
  • Armoured Car (Armed with a Machine Gun):
    • Can move 6 hexes on roads and 2 hexes off roads.
    • Weapon range is 4 hexes.
    • D6 score to hit is 4, 5 or 6.
    • Close Combat factor is 5.
  • Self-propelled Gun:
    • Can move 4 hexes on roads and 2 hexes off roads.
    • Weapon range depends upon its armament (see Artillery Units).
    • D6 score to hit is 5 or 6.
    • Close Combat factor is 3.
Command Units
  • Command:
    • Cannot initiate combat with enemy Units.
    • Can move 2 hexes.
    • Weapon range is 2 hexes.
    • D6 score to hit is 4, 5 or 6.
    • Reduces the Close Combat factor of any friendly Unit in adjacent hex by 1.
Miscellaneous
  • Pillbox (Armed with a Machine Gun):
    • Weapon range is 4 hexes.
    • D6 score to hit is 4, 5 or 6.
  • Minefield:
    • D6 score to hit is 5 or 6.
TURN SEQUENCE

Before battle commences
  • Each side is allocated a colour – Red or Black.
  • The number of Units each side has on the battlefield at the beginning of the battle is counted.
  • This determines the number of playing cards of each colour that are placed in the Unit Activation Pack.
  • Before the first turn the Unit Activation Pack is thoroughly shuffled and placed face down where both players can see it.
During a battle
  • The top playing card in the Unit Activation Pack is turned over to reveal which side will have the opportunity to activate a Unit that is already on the battlefield or that has arrived on the edge of the battlefield.
  • The commander of that side must then see if they can activate the Unit.
  • They throw a D6.
    • If the score is equal to or more than the commander’s Command Ability, they may activate a Unit of their choice.
    • If the score is less than the commander’s Command Ability, they may not activate a Unit.
  • Once an activated Unit has completed all the actions it may take, the playing card is discarded and the next playing card in the Unit Activation pack is turned over and the procedure is repeated.
  • Once all the playing cards in the Unit Activation Pack have been turned over the turn has ended.
  • The playing cards in the Unit Activation Pack are gathered together and are shuffled again before the next turn begins.
  • If a Unit has been destroyed during the turn, a playing card of the appropriate colour is removed from the Unit Activation pack before the pack is shuffled for the next turn.
  • If a Unit has entered the battlefield during the turn, a playing card of the appropriate colour is added to the Unit Activation pack before the pack is shuffled for the next turn.
MOVEMENT
  • A Unit may pass through a hex occupied by a friendly Unit.
  • A Unit can end its activation in the same hex as another Unit as long as there is sufficient room in the hex to allow this to occur.
  • Machine Gun, Mortar, and Artillery Units may not move and then fire or fire and then move during the same activation; they may either fire or move.
  • Changing the direction a Unit is facing in order that it can defend itself from a Close Combat attack does not count as movement.
  • A Unit can change its direction any number of times during its movement.
  • A Unit can be moved all or part of its movement distance once it is activated, but cannot be moved again during the same activation (i.e. If a Unit has moved only part of its movement distance during an activation, it cannot be moved the rest of its movement distance later in the same activation).
  • A Unit cannot move through a hex that is adjacent to a hex occupied by an enemy Unit.
  • If a Unit moves into a hex that is adjacent to a hex occupied by an enemy Unit it must:
    • Stop in that hex;
    • Face the enemy Unit;
    • Move no further during that activation;
    • Fire at the enemy Unit if it that is permitted and it has not fired before moving, and
    • Engage in Close Combat if that is permitted.
  • If a Unit moves into a hex that is adjacent to two or more hexes occupied by enemy Units, it must choose which enemy Unit to face and engage in Close Combat.
  • If a Unit is activated and it is already in a hex that is adjacent to a hex occupied by an enemy Unit it can:
    • Break contact with the enemy Unit by moving into a hex that is not adjacent to a hex occupied by an enemy Unit or
    • Remain in contact with the enemy Unit and behave as if it had just moved into a hex that is adjacent to a hex occupied by an enemy Unit (i.e. follow the procedure laid down above).
FIRE COMBAT

General Rules

  • Each Unit can only fire once during each activation, and all of that fire must be directed at the same target.
  • Machine Gun, Mortar, and Artillery Units may not move and then fire or fire and then move during the same activation; they may either fire or move.
  • Fire Combat can take place before or after a Unit has moved.
  • Fire Combat cannot take place after the Unit has engaged in Close Combat.
  • The effects of different weapon types are as follows:
    • Rifle fire, Submachine Gun fire, and Machine Gun fire can only destroy Infantry, Cavalry, and Artillery Units.
    • Artillery fire (including Mortars and all forms of Artillery), Tank fire, and Antitank Rocket fire can destroy all types of Units.
  • With the exception of Tank and Armoured Car Units and Pillboxes, Units have a 120-degree arc of fire forwards.
  • Tank and Armoured Car Units and Pillboxes have a 360-degree arc of fire.
  • With the exception of Mortar and Howitzer Units, Units can only fire at enemy Units that are visible and in direct line-of-sight.
  • Mortar and Howitzer Units can fire over other Units, trees, hills, etc., and hit enemy Units behind these obstacles.
  • Direct line-of-sight is an imaginary, straight line from the centre of a hex to the centre of another hex.
Resolving Fire Combat
  • To determine if Fire Combat has been effective, the firing side throws a D6 die for the Unit that is firing and compares the result with the relevant section in the Unit Data section shown above.
  • To determine the effect of a hit on a Unit, the side whose Unit has been hit throws a D6 die:
    • If the target is in the open, a die score of 1, 2, 3, 4, or 5 results in the Unit being destroyed.
    • If the target is in soft cover (e.g. woods), a die score of 1, 2, 3, or 4 results in the Unit being destroyed.
    • If the target is in hard cover (e.g. entrenchments), a die score of 1, 2, or 3 results in the Unit being destroyed.
CLOSE COMBAT

General Rules

  • If opposing Units are in adjacent hexes they are in Close Combat Range.
  • Opposing Units in Close Combat Range must engage in Close Combat.
  • A Unit cannot move past an enemy Unit within Close Combat Range without engaging in Close Combat.
  • If a Unit is blocked part way through its movement by a Close Combat situation, it cannot move further.
  • A Command Unit may not initiate a Close Combat but may defend itself if attacked.
  • The presence of a Command Unit in a hex that is adjacent to one occupied by a friendly Unit reduces that friendly Unit's Close Combat Power by 1.
  • Close Combat is conducted at the end of an activation; it can never take place at any other point during an activation.
Resolving Close Combat
  • The Unit that is initiating the Close Combat is the Attacker; the Unit they are attacking is the Defender.
  • The Attacker and Defender both roll a D6 die for their Unit.
  • The results of each die rolled are then assessed:
    • If an Attacker’s die roll is greater than or equal to its Close Combat Power, the Defender's Unit is destroyed.
    • If a Defender’s die roll is greater than or equal to its Close Combat Power, the Attacker's Unit is destroyed.
    • If one Unit is destroyed, the surviving Unit has won the Close Combat.
    • If neither Unit is destroyed, the Close Combat ends as a draw.
    • If both Units are destroyed, the Close Combat has resulted in mutual annihilation.
SPECIAL RULES

Roads

  • Except where shown above, roads do not increase the maximum distance a Unit may move.
  • A Unit must remain on the road for its entire movement during a turn if it uses the ‘on roads’ movement distance.
Hills
  • 1 point is temporarily added to the Close Combat Power used by a Unit that is in Close Combat with an enemy Unit that is uphill from it.
  • A Unit uses 1 additional hex of movement to cross a hill contour.
Rivers
  • When crossing a river at a ford, a Unit moves into the river during activation A and stops; it can move up to it maximum movement distance out of the river during activation B.
  • A Unit that is in a river can fire during its turn.
  • 1 point is temporarily added to the Close Combat Power used by a Unit that is in Close Combat with an enemy Unit positioned on the bank of the river it is crossing.
Woods & Built-up Areas
  • Only Infantry and Cavalry Units can move through woods or built-up areas off road; all other Units must move on roads if passing through woods or built-up areas.
  • Mortar and Field Howitzer Units that are in woods or built-up areas can fire out of the woods or built-up areas at an enemy Unit.
  • All other Units that are in woods can only fire out of the woods or built-up areas at an enemy Unit if the firing Unit is no more than 1 hex into the wood or built-up areas.
  • An enemy Unit cannot see a Unit that is in a wood or built-up areas Unit unless the enemy Unit comes within 3 hexes of the Unit that is in the wood or built-up areas and throws a D6 die that scores a 4, 5, or 6.
Minefields
  • An Engineer Unit can lay a minefield that fills a hex by remaining next to the hex for 3 turns.
  • An Engineer Unit can remove a minefield that fills a hex by remaining next to the hex for 5 turns.
  • A Unit may move through a minefield without stopping but must throw a D6 die when it passes through the minefield; a score of 4, 5, or 6 destroys the Unit as it passes through the minefield.
Barbed Wire
  • A Unit can lay a 100mm length of barbed wire in a hex by remaining in the hex for 1 turn.
  • A Unit can remove a 100mm length of barbed wire in a hex by remaining in the hex for 1 turn.
  • Tank and Self-propelled Gun Units can move through barbed wire without stopping.
  • All other Units must stop and may remove the barbed wire during their next activation or stop and not resume their movement until their next activation.

Sunday 4 April 2010

A new Osprey

Yesterday's post brought my latest book purchase ... the Osprey book about the OTTOMAN INFANTRYMAN 1914-18.

The book is part of the WARRIOR series (No.145 [ISBN 978 1 84603 506 7]) and was written by David Nicolle. The excellent illustrations were created by Christa Hook.

The OTTOMAN INFANTRYMAN costs £11.99 ($18.95 US) and is published by Osprey Publications.

Saturday 3 April 2010

Card-driven Turn Sequences: The last word ... I hope!

As I had recorded and processed up all my tests on a spreadsheet it was not too difficult a task to see what the effect of running the tests with different gradings for Black and Red. The results are as follows:

Where Black and Red are graded as 'Good':
  • Black activated 89.50% of its units.
  • Red activated 87.50% of its units.
  • The statistical prediction indicates that it should have been 83.33% in each case.
Where Black and Red are graded as 'Average':
  • Black activated 76.50% of its units.
  • Red activated 73.50% of its units.
  • The statistical prediction indicates that it should have been 66.66% in each case.
Where Black and Red are graded as 'Poor':
  • Black activated 58.00% of its units.
  • Red activated 58.50% of its units.
  • The statistical prediction indicates that it should have been 50.00% in each case.

Card-driven Turn Sequences: The latest (and hopefully last) test

Having recovered slightly from my cold, I decided to test the latest version of the card-driven turn sequence I have been working on.

As before I set up a Unit Activation Pack that had ten Red and ten Black playing cards, and the test was to consist of twenty turns. The Red commander was graded as ‘Good’ and needed to score 2 or higher when they threw a D6 whilst the Black commander was grades as ‘Poor’ and needed to throw a 4 or higher.

The results are as follows (the cards that activated a unit have an asterisk [*] next to them):
  1. Red, Black, Black, Black*, Red*, Black*, Red*, Black, Red*, Black*, Black, Red*, Red*, Red*, Black*, Black*, Black, Red*, Red*, Red* (5 Black and 9 Red [70.00%] of the cards were activated)
  2. Red, Red*, Red, Black, Black*, Black*, Black*, Black, Red*, Black*, Black, Black*, Red*, Red*, Red*, Red, Red*, Red*, Black, Black (5 Black and 7 Red [60.00%] of the cards were activated)
  3. Red*, Black*, Black, Red*, Black*, Red*, Black*, Black*, Red*, Red*, Red*, Black, Red*, Black*, Red*, Black*, Red*, Black, Red*, Black* (7 Black and 10 Red [85.00%] of the cards were activated)
  4. Red*, Red*, Red*, Black, Black, Black*, Red*, Black*, Red, Red*, Red*, Black*, Black*, Black*, Black, Red*, Black, Red, Black*, Red* (6 Black and 8 Red [70.00%] of the cards were activated)
  5. Black*, Red*, Black*, Red*, Red*, Red*, Black*, Black*, Black, Red*, Red*, Red*, Red*, Black, Black*, Red*, Red, Black, Black*, Black (6 Black and 9 Red [75.00%] of the cards were activated)
  6. Black, Black, Red*, Black, Black*, Red*, Black*, Black*, Red*, Red*, Red*, Black, Red*, Red*, Red*, Red*, Red*, Black, Black, Black (3 Black and 10 Red [65.00%] of the cards were activated)
  7. Black, Red, Black*, Black*, Red, Black*, Black, Black*, Black*, Red*, Red*, Black*, Red*, Red*, Red*, Black*, Black, Red, Red*, Red (7 Black and 6 Red [65.00%] of the cards were activated)
  8. Black*, Red*, Red*, Black, Red*, Black*, Red*, Black, Red*, Red*, Black*, Black*, Red*, Red*, Black*, Black*, Red*, Red*, Black*, Black (7 Black and 10 Red [85.00%] of the cards were activated)
  9. Red, Red*, Red, Black, Black, Red, Black*, Red*, Black*, Red*, Red*, Black, Black*, Black*, Black*, Red*, Red, Red*, Black, Black* (6 Black and 6 Red [60.00%] of the cards were activated)
  10. Black, Black*, Black, Red, Red*, Black*, Black, Red*, Red*, Black*, Red*, Red*, Red*, Red*, Black*, Black*, Red*, Black*, Red*, Black* (7 Black and 9 Red [80.00%] of the cards were activated)
  11. Red*, Black*, Black*, Black*, Red*, Black*, Red*, Black*, Red*, Black, Black*, Red*, Red*, Red*, Black, Black, Black*, Red*, Red*, Red* (7 Black and 10 Red [85.00%] of the cards were activated)
  12. Red*, Red*, Red*, Black*, Black*, Black, Black, Black*, Red*, Black, Black, Black*, Red*, Red*, Red*, Red*, Red*, Red*, Black*, Black (5 Black and 10 Red [75.00%] of the cards were activated)
  13. Red, Black, Black, Red*, Black, Red*, Black*, Black*, Red*, Red*, Red*, Black*, Red*, Black, Red*, Black, Red*, Black, Red*, Black* (4 Black and 9 Red [65.00%] of the cards were activated)
  14. Red*, Red*, Red*, Black*, Black*, Black, Red*, Black, Red, Red*, Red*, Black*, Black*, Black*, Black, Red*, Black, Red*, Black*, Red* (6 Black and 9 Red [75.00%] of the cards were activated)
  15. Black*, Red*, Black, Red, Red*, Red*, Black, Black, Black*, Red*, Red*, Red*, Red*, Black, Black*, Red*, Red*, Black*, Black, Black* (5 Black and 9 Red [70.00%] of the cards were activated)
  16. Black*, Black, Red*, Black*, Black, Red, Black*, Black, Red*, Red*, Red*, Black*, Red*, Red*, Red*, Red*, Red*, Black*, Black*, Black* (7 Black and 9 Red [80.00%] of the cards were activated)
  17. Black, Red*, Black, Black*, Red*, Black, Black, Black*, Black*, Red, Red*, Black, Red*, Red*, Red, Black*, Black*, Red*, Red*, Red* (5 Black and 8 Red [65.00%] of the cards were activated)
  18. Black*, Red*, Red*, Black, Red*, Black*, Red*, Black*, Red*, Red*, Black*, Black*, Red*, Red*, Black*, Black, Red*, Red, Black, Black (6 Black and 9 Red [75.00%] of the cards were activated)
  19. Red*, Red*, Red*, Black, Black, Red, Black*, Red*, Black*, Red*, Red*, Black, Black, Black*, Black, Red*, Red*, Red*, Black*, Black* (5 Black and 9 Red [70.00%] of the cards were activated)
  20. Black*, Black, Black*, Red*, Red*, Black*, Black, Red*, Red*, Black*, Red*, Red*, Red*, Red*, Black*, Black*, Red, Black, Red*, Black* (7 Black and 9 Red [80.00%] of the cards were activated)
Overall 58.00% of Black cards and 87.50% of Red cards resulted in a unit being activated. This compares favourably with the 50.00% and 83.33% rates of activation that the dice throws should have generated.

I now feel that I have got the balance between unpredictability and predictability about right (nothing is ever perfect, after all) and I can proceed to the next stage in the development process … adding this card-driven turn sequence to my version of Joseph Morschauser’s wargames rules and play-testing it. Only then will I know if it does what I want to it do.

Friday 2 April 2010

Nugget 234

I have temporarily solved the web authoring software problem that had prevented me from uploading the latest issue of the PDF versions of THE NUGGET and THE NUGGET COLOUR SUPPLEMENT to the Wargame Developments website, and both are now available for full and e-members of Wargame Developments to download or read online.

Read and enjoy!