On last Tuesday afternoon, Gary Sheffield and I fought our second online Portable Wargame. The scenario was set during the Seven Weeks War, and saw two equal forces of Austrian and Prussian troops (each comprising two battalions of Jägers, six battalions of line infantry, and a battery of field artillery) trying to beat each other to seize and hold a road bridge over a river.
Gary commanded the Austrians, and I was in charge of the Prussians.

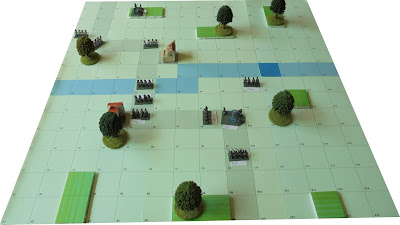
The Austrians entered at N2 and the Prussians at A9.
Before the battle

The Austrian force, led by the 1st Fiedler Jäger Battalion, entered the battlefield, followed by 2nd Mundt Jäger Battalion and the I/3 and II/3 Esterhase Infantry Battalions.
In reply, the Prussians sent forward the 1st Tarlenheim Jäger Battalion, 2nd Hentzau Jäger Battalion, I/3 Strelsau Infantry Battalion, and 1st Strackenz Field Artillery Battery.

The Austrian force began to advance on its objective, and were joined on the battlefield by III/3 Esterhase Infantry Battalion and 1st Riemeck Field Artillery Battery.
The Prussians also maintained their steady progress towards the bridge.

Whilst the Jägers managed to rush forward to secure the bridge, the rest of the force (with the exception of I/3 Esterhase Infantry Battalion) continued their steady advance.
Stimulated by the sudden rush forward by the Austrian Jägers, the Prussian 1st Tarlenheim Jägers also moved forward rapidly to prevent any further Austrian movement across the bridge, whilst the 2nd Hentzau Jägers moved to secure the ford over the river. The rest of the force, which had been joined by the II/3 Strelsau Infantry Battalion, continued to move forward.

Whilst the 1st Feidler and 1st Tarlenheim Jägers fought for control of the bridge, The rest of the Austrian troops began to deploy as best they could in order to secure their end of the bridge.
The Prussians sought to exploit the situation by moving the 2nd Hentzau Jägers so that they could begin to cross the river ford, and bringing forward the III/3 Strelsau Infantry Battalion, which was accompanied by the force commander, General Baron von Sapt.

The fighting between the opposing Jäger battalions resulted in both being forced to withdraw, but left the Austrians in control of the bridge. The Austrians used the opportunity to begin moves to intercept the 2nd Henzau Jäger Battalion, which had by now crossed the river at the ford and to bring forward the I/4 Sachs Infantry Battalion.
The Prussian commander sought to move his troops into positions where they could assault the bridge and drive off the Austrian forces deployed there.

Whilst the fighting near the bridge remained inconclusive, both sides tried to bring more troops forward or to deploy those that they had to meet developing threats.
Austrian concerns about the 2nd Henzau Jäger Battalion led to the movement of the III/3 Esterhase Infantry Battalion toward the enemy Jägers in order to cut them off. Matters were helped by the arrival of General Kretzmer, the Austrian commander, who joined the I/4th Sachs Infantry Battalion.
The Prussians were more concerned with bringing more troops into the part of the battlefield where the fighting was taking place, and were joined by the I/4 and II/4 Zenda Infantry Battalions.

The Austrians seized an opportunity that presented itself, and rushed the 1st Fiedler Jägers across the bridge and into the buildings on the Prussian side of the river. (This ultimately proved to be the turning point of the action, although this was not clear at the time!)
The Prussians concerned themselves with trying to winkle the 1st Fielder Jägers out of their position, whist continuing to bring more troops (III/4 Zenda Infantry Battalion) forward and to exploit the presence of the 2nd Hentzau Jägers on the Austrian side of the river.

The fighting between the Austrian 1st Fiedler Jägers and the Prussians for control of the bridge continued, whilst elsewhere both sides manoeuvred their troops to gain an advantage.
Turn 9
The fighting near the bridge was turning into a slogging match, with neither side appearing to prevail. In order to break the deadlock, the Prussian commander sought to move more troops (I/4 and II/4 Zenda Infantry Battalions) across the river ford ... just as the Austrians were beginning to reinforce the troops that were containing the 2nd Hentazu Jägers by moving the I/3 Esterhase Infantry Battalion up to support III/3 Esterhase Infantry Battalion.

With Prussian casualties mounting, General von Sapt decided to use the much-depleted 1st Tarlenheim Jägers to assault the building occupied by the Austrian 1st Fiedler Jägers. This proved to be a disastrous decision, and the remnants of 1st Tarlenheim Jägers were withdrawn, utterly broken.
Although the battalions of 4th Zenda Infantry regiment were crossing the river at the ford, the Austrian I/3 and III/3 Esterhase Infantry Battalions were poised to attack them. At the same time, the last remaining Austrian troops (III/4 Sachs Infantry Battalion) arrived to reinforce the Austrian forces.

By this point, the Prussian force was fast approaching its Exhaustion Point, and as the Austrians were too strong to push back across the bridge and they were moving troops forward to intercept the Prussian troops on the Austrian side of the river, General von Sapt realised that his task was impossible, and he sought to withdraw in order to replace his losses so that his command could fight another day.
The Austrians were happy to accept the situation, and allowed the Prussians to withdraw unmolested.
The battle was over ... and the Austrians had won!

This battle provided both of us with well over two hours of fun and enjoyment, and we hope to repeat the exercise as soon as we can, but with our roles reversed.
The game clipped along at a fair rate, and proved yet again that the PORTABLE WARGAME is an ideal system to use to fight online battles. We used Skype throughout the game, and only lost contact once. The break lasted less than a minute, and did not affect the running of the game in any way.
Gary commanded the Austrians, and I was in charge of the Prussians.

The Austrians entered at N2 and the Prussians at A9.
Before the battle

Turn 1The terrain over which the battle was fought.
The Austrian force, led by the 1st Fiedler Jäger Battalion, entered the battlefield, followed by 2nd Mundt Jäger Battalion and the I/3 and II/3 Esterhase Infantry Battalions.
In reply, the Prussians sent forward the 1st Tarlenheim Jäger Battalion, 2nd Hentzau Jäger Battalion, I/3 Strelsau Infantry Battalion, and 1st Strackenz Field Artillery Battery.

Turn 2The situation at the end of Turn 1.
The Austrian force began to advance on its objective, and were joined on the battlefield by III/3 Esterhase Infantry Battalion and 1st Riemeck Field Artillery Battery.
The Prussians also maintained their steady progress towards the bridge.

Turn 3The situation at the end of Turn 2.
Whilst the Jägers managed to rush forward to secure the bridge, the rest of the force (with the exception of I/3 Esterhase Infantry Battalion) continued their steady advance.
Stimulated by the sudden rush forward by the Austrian Jägers, the Prussian 1st Tarlenheim Jägers also moved forward rapidly to prevent any further Austrian movement across the bridge, whilst the 2nd Hentzau Jägers moved to secure the ford over the river. The rest of the force, which had been joined by the II/3 Strelsau Infantry Battalion, continued to move forward.

The situation at the end of Turn 3.

Turn 4Battle is joined in the centre of the battlefield.
Whilst the 1st Feidler and 1st Tarlenheim Jägers fought for control of the bridge, The rest of the Austrian troops began to deploy as best they could in order to secure their end of the bridge.
The Prussians sought to exploit the situation by moving the 2nd Hentzau Jägers so that they could begin to cross the river ford, and bringing forward the III/3 Strelsau Infantry Battalion, which was accompanied by the force commander, General Baron von Sapt.

Turn 5The situation at the end of Turn 4.
The fighting between the opposing Jäger battalions resulted in both being forced to withdraw, but left the Austrians in control of the bridge. The Austrians used the opportunity to begin moves to intercept the 2nd Henzau Jäger Battalion, which had by now crossed the river at the ford and to bring forward the I/4 Sachs Infantry Battalion.
The Prussian commander sought to move his troops into positions where they could assault the bridge and drive off the Austrian forces deployed there.

Turn 6The situation at the end of Turn 5.
Whilst the fighting near the bridge remained inconclusive, both sides tried to bring more troops forward or to deploy those that they had to meet developing threats.
Austrian concerns about the 2nd Henzau Jäger Battalion led to the movement of the III/3 Esterhase Infantry Battalion toward the enemy Jägers in order to cut them off. Matters were helped by the arrival of General Kretzmer, the Austrian commander, who joined the I/4th Sachs Infantry Battalion.
The Prussians were more concerned with bringing more troops into the part of the battlefield where the fighting was taking place, and were joined by the I/4 and II/4 Zenda Infantry Battalions.

Turn 7The situation at the end of Turn 6.
The Austrians seized an opportunity that presented itself, and rushed the 1st Fiedler Jägers across the bridge and into the buildings on the Prussian side of the river. (This ultimately proved to be the turning point of the action, although this was not clear at the time!)
The Prussians concerned themselves with trying to winkle the 1st Fielder Jägers out of their position, whist continuing to bring more troops (III/4 Zenda Infantry Battalion) forward and to exploit the presence of the 2nd Hentzau Jägers on the Austrian side of the river.

Turn 8The situation at the end of Turn 7.
The fighting between the Austrian 1st Fiedler Jägers and the Prussians for control of the bridge continued, whilst elsewhere both sides manoeuvred their troops to gain an advantage.
Turn 9
The fighting near the bridge was turning into a slogging match, with neither side appearing to prevail. In order to break the deadlock, the Prussian commander sought to move more troops (I/4 and II/4 Zenda Infantry Battalions) across the river ford ... just as the Austrians were beginning to reinforce the troops that were containing the 2nd Hentazu Jägers by moving the I/3 Esterhase Infantry Battalion up to support III/3 Esterhase Infantry Battalion.

Turn 10The situation at the end of Turn 9.
With Prussian casualties mounting, General von Sapt decided to use the much-depleted 1st Tarlenheim Jägers to assault the building occupied by the Austrian 1st Fiedler Jägers. This proved to be a disastrous decision, and the remnants of 1st Tarlenheim Jägers were withdrawn, utterly broken.
Although the battalions of 4th Zenda Infantry regiment were crossing the river at the ford, the Austrian I/3 and III/3 Esterhase Infantry Battalions were poised to attack them. At the same time, the last remaining Austrian troops (III/4 Sachs Infantry Battalion) arrived to reinforce the Austrian forces.

Turn 11The situation at the end of Turn 10.
By this point, the Prussian force was fast approaching its Exhaustion Point, and as the Austrians were too strong to push back across the bridge and they were moving troops forward to intercept the Prussian troops on the Austrian side of the river, General von Sapt realised that his task was impossible, and he sought to withdraw in order to replace his losses so that his command could fight another day.
The Austrians were happy to accept the situation, and allowed the Prussians to withdraw unmolested.
The battle was over ... and the Austrians had won!

The situation at the end of Turn 11.
This battle provided both of us with well over two hours of fun and enjoyment, and we hope to repeat the exercise as soon as we can, but with our roles reversed.
The game clipped along at a fair rate, and proved yet again that the PORTABLE WARGAME is an ideal system to use to fight online battles. We used Skype throughout the game, and only lost contact once. The break lasted less than a minute, and did not affect the running of the game in any way.


I agree that your rules are perfect for this type of gaming. The action is easy to follow as a Blog reader, which always nice.
ReplyDeleteSteve J.,
DeleteI’m very pleased that you enjoyed reading this battle report and that you were able to follow the action without any problems.
The numbered, squared grid makes it very easy to both track which unit is where and to give orders to a remote umpire or opponent. The experience has certainly made me reassess my use of hex grids for my solo games.
All the best,
Bob
Good stuff Bob. We played a Skype Portable Wargame last night, I'll blog it at some point.
ReplyDeleteI've been through a few labelling system for hexes, the one which seems to work is labels on major features (hills, towns) and doing a label for each hex row and with spaced numbered columns. So A3, B3, C3... then A7, B7, C7, etc You don't need to label every hex.
For Operation Goodwood I just labelled hex rows (A, B, C etc) as the table was only 5x7 and was covered in villages and towns.
Martin Rapier,
DeleteI look forward to reading about your Skype wargame in the near future.
I’ve looked at various hex labelling systems, but I have yet to find one that is easy to use. Even with a simple numbered, squared grid, people can get confused ... and unless I can find a foolproof one for a hexed grid, I’ll stick with what works.
All the best,
Bob
Hi Bob,
ReplyDeleteI think you had a good chance of winning as Prussian -if the Battle went on a few more turns- the Prussians still look strong in the final caption. Alternately I'd be tempted to call it a 'Draw'. Stay well there in London. Cheers. KEV.
Kev Robertson (Kev),
DeleteThe Prussians were very close to their Exhaustion Point, whereas the Austrians had suffered very low losses. There was very little chance that the Prussians could have won, so withdrawal was the only course open to them.
All the best,
Bob
Great report Bob. Nice to see you managing to get a few games!
ReplyDeleteMaudlin Jack Tar,
DeleteIt was very enjoyable, and I am looking forward to my next online battle.
All the best,
Bob
Interesting write up of your game, thanks.
ReplyDeleteOne of the best things about the PW rules is their freedom to allow players to use their own creativity not just in adapting the system for different periods or scenarios but also in encouraging them to use their imaginations in the development of the playing boards.
Barry Carter,
DeleteI am continually amazed by the ingenuity of the people who use my rules, both with regard to the wars they fight and the terrain they create to fight over.
The one I used for the game featured in my battle report was printed on thin green cardboard using my inkjet printer.
All the best,
Bob
Hurrah for the Austrians! I wonder how they would have done historically had they not adopted the crazy 'stosstaktik?'
ReplyDeleteArchduke Piccolo,
DeleteThanks to really good dice throws, the Austrians had the initiative in far more of the game turns than the Prussians, and exploited that to great advantage. They were able to negate the Prussian Needle-gun advantage, and once they had seized the bridge, they fought hard to retain their grip on it.
All the best,
Bob
Which variant of your PW rules did you use Bob?
ReplyDeleteSimon
Simon,
DeleteI used the rules in the original book with a card-driven activation system.
All the best,
Bob
Excellent report, and good to see the old stalwart Skype hasn't been entirely usurped by Zoom!
ReplyDeleteBig Lee,
DeleteI’m glad that you enjoyed this battle report,
In some ways, Skype is better because it seems easier to use than Zoom. Unless you are using the paid-for version of Zoom, you are limited to forty-five minutes per session, whereas Skype isn’t limited.
All the best,
Bob