Pages

Sunday 30 June 2019

T-26 Light Tank

Yesterday morning Sue and I went shopping as early as we could to avoid being out as it was getting hotter. During our visit to our local shopping mall, I visited Waterstones and bought a copy of T-26 LIGHT TANK: BACKBONE OF THE RED ARMY.


The book is split into five parts:
  • Introduction
  • Development
    • 6-ton Tank Export
    • Improved Firepower
    • Combat Debut in Spain
    • T-26 Export
    • Modernizing the T-26 Tank
    • T-26 Comparative Technical Characteristics
    • T-26 Replacements
    • T-26 Tank Production 1931-41
    • Flamethrower Tanks
    • Robot Tanks
    • Artillery Tanks
    • Engineer Combat Vehicles
  • Combat Record
    • War in the Far East
    • The Polish Campaign, 1939
    • The Russo-Finnish Winter War, 1939-40
    • Soviet Tank Losses in the Winter War, 1939-40
    • Operation Barbarossa
    • T-26 Strength by Military District, 1940-41
    • T-26 Strength in Red Army Mechanized Corps, June 22, 1941
    • The Approaches to Moscow: T-26 Strength on the Western Front
    • Captured T-26 Tanks in Combat
    • The Final Battle: 1945
  • Further Reading
  • Index
I've always had a bit of a soft spot for this particular tank, and knowing that Steven Zaloga had written this book, I knew that it would be worth buying ... and I was not disappointed!

T-26 LIGHT TANK: BACKBONE OF THE RED ARMY was written by Steven J Zaloga, illustrated by Henry Morshead, and published in 2015 by Osprey Publishing (ISBN 978 1 4728 0625 3).

Saturday 29 June 2019

Phew! Scorchio!*

Some years ago, we had our loft converted to create two 'bedrooms' and a shower room. At the time the local building regulations were framed with the assumption that a new ice-age was in the offing, and extensive insulation was installed. Now that the ice-age has become global warming, those top floor rooms become very, very warm when there is anything approaching a heatwave ... which is exactly the situation we find ourselves in today.

The two new 'bedrooms' are my toy/wargame room and the home office I use, and as today is officially the hottest day of the year so far, you can imagine how warm it is on the top floor. Even with all the windows open and a fan going full blast, the temperature in my toy/wargame room (which faces south west and is currently being subject to the full heat of the sun) at 3.00pm is 33.5°C/92.3°F whereas it is only 29.5°C/85.1°F in my office (which faces north east and has been relatively shaded since midday)!

I had plans to do some modelling and writing today ... but as things stand, I don't think that is going to happen. Instead I am going to sit in the coolest room I can find, relax, drink cold drinks, and either watch TV or read.

* Scorchio first came into common usage as a result of the TV comedy show, THE FAST SHOW. Each show included a spoof TV news programme from an unnamed Mediterranean country, which always ended with a weather forecast where – except on one occasion when the weather was described as 'cumulus nimbus' – the weather was always very hot or ‘scorchio’.

Friday 28 June 2019

I have been to ... Bristol

At least once a year, Sue and I go to Bristol so that I can attend a Masonic meeting at the famous Bristol Masonic Centre in Park Street. (The Masonic ritual used in Bristol has many unique aspects, some of which may be due to the city's long connection with America.) We were supposed to pay a visit earlier in the year, but had to cancel at short notice when I came down with a case of Norovirus.

The hotel where we had booked and paid for a night's stay is located in the Clifton area of the city, and the management kindly offered us the opportunity to book a room at a reduced rate later in the year, and we decided to take them up on this offer. As we wanted to see a bit more of Bristol than we had on previous visits, we booked a two-night stay.

Tuesday 25th June

We left home at 11.30am, and drove around the M25 until we reached the interchange with the M4. We turned off onto the westbound carriageway, and by 2.30pm we had reached Leigh Delamere Services. We stopped there for a comfort break and a snack lunch, and despite a slight navigational glitch (the car's satnav tried to direct us towards the wrong Victoria Square!) we arrived at our hotel at 4.00pm.

The Victoria Square Hotel, Clifton.
Once we had unpacked and made ourselves comfortable, we had a rest until it was time to get ready for dinner. We had a pre-dinner drink in the hotel's bar before walking into the centre of Clifton Village, where we met up with an old friend and Bristolian for dinner. We ate in 'Fishers', a small fish restaurant in the Village, ...

Fishers Restaurant, Clifton.
... where the food was excellent and the service attentive without being intrusive. We did not leave until 10.00pm, and after saying our goodbyes, we walked back to our hotel.

The weather was very humid, and even with the window open, both of us felt uncomfortable. We tried reading for a while before going to sleep, but neither of us had a particularly good night's sleep.

Wednesday 26th June

We were both awake by 7.30am, and after taking our time to get ready, we went down to the hotel's restaurant for breakfast. Neither of us was very hungry, so we ate quite a small meal. Once that was over, we returned to our room to get ready for our day of sightseeing.

We left the hotel at 9.45am to drive the short distance to the location of the SS Great Britain ... but Bristol's confusing traffic system, lack of adequate road signage, and numerous roadworks took its toll, and we didn't arrive at the venue's car park until well after 10.15am!

The cost of parking near the Great Britain is interesting. It operates on a 'Pay and Display' system, and if you pay for two hours, it costs £2.00. If – on the other hand – you pay £5.00 for five hours parking, you are refunded £3.00 when you buy a ticket to enter the museum. It certainly discourages people from parking there and not visiting the museum!

The entrance to the SS Great Britain and its associated museum.
The cost of entry was £15.00 each (we both qualified for an age– related discount) and the entry ticket is valid for twelve months ... so we can go back again, and it won't cost us a penny more! The staff were extremely helpful and very knowledgeable, and nothing like many of the warding staff one finds in more traditional museums.

The stern of the SS Great Britain.
The bow and figurehead of the SS Great Britain.
The SS Great Britain's bow, as seen from above the waterline.
We began by going down into the dry dock so that we could see the hull of the ship. The space between the ship's side and the dock is glassed in, and is covered in a thin layer of running water. From below it gives you the impression you are walking underwater and – in my opinion – is better than the pure glass roof used around the Cutty Sark in Greenwich.

The SS Great Britain's bow as seen from below the waterline.
Above and below: The replica of the ship's original propeller.

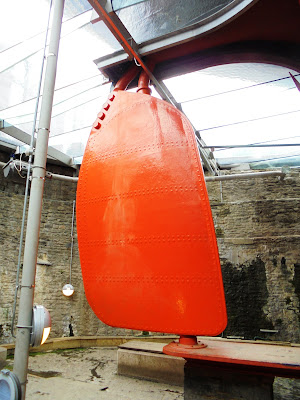
The replica of the SS Great Britain's balanced rudder.
We then went up to the above water part of the ship, passing through the very interesting museum that tells the story of the ship backwards from the time of her return to the UK until her building in Bristol in the very dock she now occupies.

The Dockside Museum. The SS Great Britain's original balanced rudder can be seen just behind the replica of the ship's second propeller to the left of the photograph. This propeller was designed to be lifted out of the water so that it did not interfere with the ship's movement when she was moving solely under sail power.
We started by walking around the upper deck, ...

The upper deck, looking aft.
The ship's bridge. It is a very simple raised platform that runs from side to side across the deck near the funnel.
The ship's main steering position. Thanks to the balanced rudder, it normally only needed one or two men to operate the ship's wheel.
The upper deck, looking forward.
... and the went below to the passenger accommodation. The interior of the ship has been recreated, and examples of the various types of cabin and public areas have been included. Other than the sumptuous First-class Dining Saloon (which doubled up as a meeting place and recreation area for the First-class passengers) most of the cabin spaces were very cramped, especially in the area occupied by the Steerage-class passengers.

The captain's cabin.
Above and below: Examples of the passenger cabins.


Another example of a passenger cabin. This one contained four berths, but did have washing facilities.

The Promenade Saloon. Some of the passenger cabins were located along each side of the saloon.
The First-class Dining Saloon. The tram-style seating was fixed to the floor but could be reversed so that the area could be used for entertainment as well as for eating.
The First-class passengers certainly seemed to have eaten well.
The ship's galley was surprisingly large (and badly lit!), ...

The galley's food preparation area.
Part of the galley's pantry and storage area.
... and the engine room was very impressive.


(The engine was designed by Thomas Guppy and Brunel, and had four 88-inch diameter cylinders arranged in a V-formation, with two on either side at an angle of 33 degrees to the vertical. It produced 1,000hp, and the cylinders drove a crankshaft with an 18' 3" diameter toothed chain wheel. Four chains, which weighed a total of seven tons, were used to transfer power from the chain wheel to the propeller shaft. The engine turned the crankshaft at 18 rpm, and the chain wheel and chains converted this by a ratio of 2.95:1 so that the propeller shaft turned at 53 rpm. This gave the ship a maximum speed of 12 knots when under steam power.)

Going back ashore, we had a quick drink in one of the museum's cafes before looking around the building dedicated to telling the life story of Isambard Kingdom Brunel.


It contained some very rare artefacts and a model of the SS Great Britain ...

The Brunel family dining table.
Example of Brunel's plans and notebooks are on display.
Above and below: A model of the SS Great Britain as built.

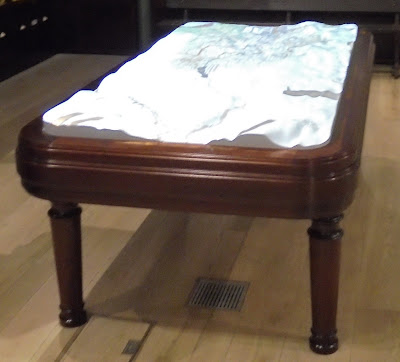
... as well as some state-of-the-art displays, one of which tells the story of the building of the Great Western Railway using a projected animation onto a 3D map.

The animated map is projected onto a terrain model of the land between London and Bristol.
By 1.30pm Sue was beginning to suffer from information overload, and we made our way back to the car. we then drove to Cribb's Causeway, which is a large out-of-town retail park and shopping mall, where she was able to revitalise herself with some retail therapy. The latter included a very nice lunch in the cafeteria in the branch of John Lewis and Partners.

We were back at the hotel by just after 4.00pm, and Sue and I spent the next couple of hours relaxing in our room. (I slept for the best part of two hours whilst Sue read and dozed.) We then got ready to go out to dinner in a nearby pizzeria.

We had returned to our hotel by 10.00pm, and by 11.00pm we were both fast asleep.

Thursday 27th June

After sleeping better than we had expected, we were dressed, packed, and ready to eat breakfast in the hotel’s restaurant. Sue and I then settled our bill, loaded our luggage in the car, and were ready to set off for home by 9.00am.

I drove across the Clifton Suspension Bridge and then northwards towards the M5 in order to avoid having to drive through the centre of Bristol. The eastbound M5 was not too crowded, and by 9.30am we had joined the London-bound carriageway of the M4 and were on our way towards Swindon.

By 11.00am we had reached Reading Services, where we stopped for a comfort break and to buy some food in the onsite branch of Marks and Spencer Simply Food.

Rather than travel all the way into London on the M4, we turned off onto the southern loop of the M25. The traffic was heavy in places, but there were no major holdups and we arrived home a few minutes before 1.00pm.

Thursday 27 June 2019

Playing around with a possible divisional organisation for my World War II armies

Now I have the basing sorted out, I have begun to play around with ideas for possible ways to organise the figures and vehicles in my collection of World War II figures and vehicles into armies.

My first, tentative steps have been to look at creating a generic organisation for the main type of formation field by armies during World War II, the Infantry Division. As I am intending to use my armies with my HEXBLITZ and/or a modified version of my PORTABLE WARGAME rules, each base will represent a regiment/brigade-sized unit or a battalion-sized unit. The former will have two figures on each base and the latter will have one figure. In addition, each Division will have a Command stand that will represent the Divisional Commander, his staff, and the numerous small ancillary units that make up the strength of an Infantry Division.

The resulting structure looks like this:


This generic Infantry Division will therefore have:
  • 1 x Command Base (with one or two figures and/or a vehicle)
  • 3 x Infantry Regiments Bases (with two figures on each base)
  • 1 x Artillery Regiment (with two figures and a field gun or howitzer)
  • 1 x Anti-tank Battalion (with one figure and an anti-tank gun)
Please note that I may well be adding additional bases for Reconnaissance and Transport and/or Supply units.

This will no doubt be an anathema to many wargamers, but it is the only way that I can see that I can utilise my existing collection of World War II figures and vehicles to fight operational-level wargames. Whatever the outcome, I'm going to give it a go. If it works, fine; if it doesn't ... well I'll just have to try something else.

Wednesday 26 June 2019

Playing around with bases

Further to my recent blog entry about organising my collection of World War II figures and vehicles into armies, I've bought some suitable laser cut 3mm-thick MDF bases from Warbases, and have playing around with where to place the 7mm D6 die holder that I will be using to record each bases Strength Points.

There seem to be two options. I can either place the dice holder in either the right-hand or left-hand rear corner of the base ...


... or in the centre of the back edge of the base.


Both seem to work, and it strikes me that I could use whichever is most appropriate for the figures and vehicles I am basing.

Tuesday 25 June 2019

A Winter-ish War

Lulu.com have printed my copy of A WINTER-ISH WAR, and it was delivered yesterday.


I must admit that it looks even better than I had hoped that it would (the colour photographs really do improve the whole thing!), and I am very pleased to add it to my bookshelves.

Since I announced that I was creating this book for my own amusement, I've been contacted by several wargamers who have expressed a wish to buy a copy for themselves. I am therefore looking at the possibility of publishing the book properly, and when I do, I'll let my regular blog readers know.

Monday 24 June 2019

Other people's Portable Wargame battle reports: American Civil War ... in 2mm-scale!

Martin Smith recently added a short battle report to the PORTABLE WARGAME page on Facebook, and he has given me permission to quote from it and to use some of his photographs.

Battle of Evansville Crossroads was set during the American Civil War and was fought using figures from Martin's 2mm-scale armies. He used a 'standard' 8 x 8 squared grid (i.e. a chessboard) as his battlefield ...


... and the Late Nineteenth Century rules from THE PORTABLE WARGAME. He chose to fight the battle using the ‘Two Kills’ option and the ‘Going Solo’ card driven activation system.

The forces involved were:
  • Union
    • 1 x Commander (General Mike Welland)
    • 6 x Infantry regiments with muskets
    • 1 x Zouave regiment with rifles
    • 1 x smoothbore artillery battery
    • (SP 18, Exhaustion Point 9)
  • Confederates
    • 1 x Commander (General Joe Chappell)
    • 6 x Infantry regiments with muskets
    • 1 x cavalry regiment with carbines
    • 1 x smoothbore artillery battery
    • (SP 18, Exhaustion Point 9)

The battle report can be read in full on Facebook, so I will not repeat it here. However, Martin did pose a question that is worth repeating, as is my answer.

Question: How do you rule on moving into/through town squares/Built-up Areas? e.g. are they treated much like woods, with movement reduced to one grid square per activation? Do you permit road bonus moves through them (if a road passes through). (And if a road goes through a wood, is the wood restriction still used?)

Answer: I've not written a specific rule regarding roads passing through Built-up Areas and woods BUT my suggestion is that if a unit is moving along a road, it trumps any the effect of moving through a Built-up Area or wood. However, unless the unit is moving along the road, the Built-up Area or wood will affect the unit's movement. This is to stop units moving through a Built-up Area or wood that has a road running through it and claiming the bonus for the road even though the road isn't being used.

Please note that the photographs featured above are © Martin Smith.

Sunday 23 June 2019

WD, COW, and me

In a fortnight's time, COW2019 (this year's Conference of Wargamers) will be half over, and I will already be planning for COW2020 ... which will be the fortieth conference!

Wargame Developments was the result of a conference organised by the late Dr Paddy Griffith in 1980. It came after the demise of Donald Featherstone's WARGAMER'S NEWSLETTER, and brought together people who had contributed to it or who had achieved prominence in the hobby within the UK. At the end of the conference it was decided to set up Wargame Developments to run further conferences and to publish a regular journal, which was called THE NUGGET. I was elected to be the Treasurer and Membership Secretary ... and I've been doing it ever since (along with a stint as editor of THE NUGGET and helping to organise the conference!).

At the end of the first COW, Paddy Griffith wrote the following statement or manifesto:
Our Objectives will be to spread the philosophy of realistic wargaming THROUGH the hobby (“better realism and better game structures”), and to explore the subjects already discussed at the conference. Many aspects of wargaming have been raised, but due to a lack of time few have been investigated in depth. We should therefore study and develop them more fully. We should not, however, attempt to produce any set of ‘official’ wargames rules, as that might lead to the creation of another mainstream.

Our other main objective is to put like-minded ‘realistic’ wargamers in touch with each other, so that they can more easily exchange ideas and rules. We noticed at Moor Park that many members did find some ideas which were new to them, but others regarded such ideas as commonplace. Also, in some cases the same idea was reached independently by two people. Cross-fertilisation is therefore very desirable.

It is not part of our objectives to ‘lay down the law’ about wargaming to anyone, or to set up in ‘opposition’ to anyone in the hobby. We are simply pursuing and sharing our ideas of how games can be made, for us, more realistic, playable, and satisfying.

In general, we foresee most of the activities and study undertaken by members of WARGAME DEVELOPMENTS will be done locally on the initiative of individuals or small groups, without reference to the society’s committee (although short final reports would be welcome for our journal). A great deal of decentralisation is seen as the key to progress and productivity in this field. We will come together centrally only at the annual conference.

The society will stand or fall on the enthusiasm and imagination of its individual members. The central organisation exists primarily to reassure those who share our view, that they are not alone.
Please note that the use of underlining and upper-case lettering in certain parts of the statement were deliberate choices made by Paddy Griffith to emphasis what he considered to be the most important aspects of the statement of objectives.

Despite the occasional ups and downs, the members of WD have been striving to fulfil 'our manifesto' ever since. Looking back, it seems to me that quite a lot has been achieved by the members (my underlining for emphasis this time!), and that THE NUGGET and COW have helped to make those achievements possible.

Next year COW will be 40 and I will be 70! ... and I would have been a member of WD for somewhat longer than I haven't. Being an active member has helped keep my interest in wargaming alive ... and I hope that it will do for many years to come.

THE NUGGET is so-called because it was expected to contain lots of wargaming ideas (or little 'nuggets') and because it was what Paddy called D20s.

WARGAME DEVELOPMENTS was the name I suggested to the first conference as it summed up the group's objectives and because it lent itself to a simple logo design based upon that used by the old War Department. Hence the logo includes the letters W and D as well as a stylised version of the old War Department mark or 'nick' as Kipling called it.

Saturday 22 June 2019

Creating a scenario generator

Sixteen years ago (Yes! Sixteen years ago!) I wrote a set of Colonial wargame rules entitled RESTLESS NATIVES. In fact, they were demonstrated at SALUTE2003 by my old friend Tony Hawkins and me.


The rules included a scenario and army 'generator' for battles in the Sudan, and during a recent computer 'tidy up' (part of my attempt to break out of my current state on ennui) I found the rules, and realised that the system had – after a bit of tweaking – potential for use with my PORTABLE COLONIAL WARGAME rules. The original text from that section of the RESTLESS NATIVES rules follows.

SCENARIOS: THE SUDAN

BASELINE ARMIES USED IN THE SCENARIOS

The two baseline armies from which the various units used in the following scenarios were drawn are as follows:

British Troops
  • 1 British Infantry Battalion (4 stands)
  • 2 Egyptian Infantry Battalions (4 stands each)
  • 2 Sudanese Infantry Battalions (4 stands each)
  • 1 Egyptian Lancer Regiment (1 stand)
  • 1 Egyptian Cavalry Squadron (4 stands)
  • 1 Egyptian Artillery Battery (1 stand)
  • 1 Egyptian Gatling Gun Battery (1 stand)
  • 1 British Supply Column (3 stands)
  • 1 Egyptian Supply Column (3 stands)
Natives Troops
  • 1 Warband of Jihadia Riflemen (5 stands)
  • 1 Large Warband of Baggara Spearmen (6 stands)
  • 1 Warband of Hadendowah Riflemen (4 stands)
  • 2 Large Warbands of Hadendowah Spearmen (6 stands each)
  • 2 Small Warbands of Hadendowah Spearmen (4 stands each)
  • 1 Warband of Baggara Cavalry (4 stands)
  • 1 Warband of Baggara Camelry (3 stands)
  • 1 Dervish Artillery Battery (1 stand)
SCENARIO AND ARMY GENERATOR

Before the battle commences the C-in-Cs each throw a D6, and their individual score determines what units will be available to them (Basic Army plus additional units). The two D6 scores added together determine which scenario will be recreated on the battlefield.


ARMIES FOR SCENARIOS

Basic British Army (used in all scenarios)
  • 1 British Infantry Battalion
  • 1 Sudanese Infantry Battalion
  • 1 Egyptian Artillery Battery
  • 1 Egyptian Supply Column
Dice score = 1 adds the following units to the Basic British Army
  • 1 Egyptian Infantry Battalion
  • 1 Egyptian Gatling Gun Battery
  • 1 Egyptian Cavalry Squadron
Dice score = 2 adds the following units to the Basic British Army
  • 1 Sudanese Infantry Battalion
  • 1 Egyptian Lancer Regiment
  • 1 Egyptian Gatling Gun Battery
Dice score = 3 adds the following units to the Basic British Army
  • 1 Egyptian Infantry Battalion
  • 1 Sudanese Infantry Battalion
  • 1 Egyptian Gatling Gun Battery
Dice score = 4 adds the following units to the Basic British Army
  • 1 Egyptian Infantry Battalion
  • 1 Sudanese Infantry Battalion
  • 1 Egyptian Lancer Regiment
Dice score = 5 adds the following units to the Basic British Army
  • 1 Egyptian Infantry Battalion
  • 1 Egyptian Cavalry Squadron
  • 1 Egyptian Lancer Regiment
Dice score = 6 adds the following units to the Basic British Army
  • 2 Egyptian Infantry Battalions
  • 1 Sudanese Infantry Battalion
  • 1 Egyptian Lancer Regiment
  • 1 Egyptian Cavalry Squadron
  • 1 Egyptian Gatling Gun Battery
  • 1 British Supply Column
Basic Native Army (used in all scenarios)
  • 1 Warband of Jihadia Riflemen
  • 1 Large Warband of Hadendowah Spearmen
  • 1 Warband of Baggara Cavalry
Dice score = 1 adds the following units to the Basic Native Army
  • 1 Large Warband of Hadendowah Spearmen
  • 1 Small Warband of Hadendowah Spearmen
  • 1 Warband of Baggara Camelry
Dice score = 2 adds the following units to the Basic Native Army
  • 1 Large Warband of Hadendowah Spearmen
  • 1 Warband of Hadendowah Riflemen
  • 1 Warband of Baggara Camelry
Dice score = 3 adds the following units to the Basic Native Army
  • 1 Large Warband of Hadendowah Spearmen
  • 1 Warband of Hadendowah Riflemen
  • 1 Dervish Artillery Battery
Dice score = 4 adds the following units to the Basic Native Army
  • 1 Large Warband of Baggara Spearmen
  • 2 Small Warbands of Hadendowah Spearmen
  • 1 Warband of Hadendowah Riflemen
Dice Score = 5 adds the following units to the Basic Native Army
  • 1 Warband of Hadendowah Riflemen
  • 1 Warband of Baggara Camelry
  • 1 Dervish Artillery Battery
Dice Score = 6 adds the following units to the Basic Native Army
  • 1 Large Warband of Baggara Spearmen
  • 1 Large Warband of Hadendowah Spearmen
  • 2 Small Warbands of Hadendowah Spearmen
  • 1 Warband of Hadendowah Riflemen
  • 1 Warband of Baggara Camelry
  • 1 Dervish Artillery Battery
SCENARIOS

SCENARIO A – THE BRITISH ATTACK A FORTIFIED VILLAGE

  • The British troops must enter from the bottom right corner of the map.
  • The Mahdist troops may deploy anywhere on the map.
  • The British win if they capture the village by the end of the battle.
  • The Mahdists win if they still hold the village at the end of the battle.
SCENARIO B – THE MAHDISTS ATTACK A FORTIFIED VILLAGE

  • The Mahdist troops must enter from the bottom right corner of the map.
  • The British troops may deploy anywhere in the top row of grid squares.
  • The Mahdists win if they capture the village by the end of the battle.
  • The British win if they still hold the village at the end of the battle.
SCENARIO C - THE LONG PATROL

  • The British troops must enter from the bottom left corner of the map.
  • The Mahdist troops may deploy anywhere on the map.
  • The British win if over 50% of their troops reach the exit point by the end of the battle.
  • The Mahdists win if they prevent more than 50% of the British troops from reaching the exit point by the end of the battle.
SCENARIO D – A MEETING ENGAGEMENT

  • The British troops must enter from the top left corner of the map.
  • The Mahdist troops must enter from the middle of the right side of the map.
  • The British win if 50% or more of their troops remain on the battlefield by the end of the battle.
  • The Mahdists win if 50% or more of their troops remain on the battlefield by the end of the battle.
SCENARIO E – CLEARING THE HILLS

  • The British troops must enter from the middle of the left side of the map.
  • The Mahdist troops may deploy anywhere on the hills or behind them.
  • The British win if they occupy two of the hills by the end of the battle.
  • The Mahdists win if they still hold two of the hills at the end of the battle.
SCENARIO F – A SET-PIECE BATTLE

  • The British troops must enter from the middle of the left side of the map.
  • The Mahdist troops must deploy between the hills.
  • The British win if 50% or more of their troops remain on the battlefield by the end of the battle.
  • The Mahdists win if 50% or more of their troops remain on the battlefield by the end of the battle.

The system is very simple to use, and can be tailored to suit whatever size armies the players have available. For example, Player A (the British) throws a 2 and Player B (the Mahdist) throws a 5. By checking these dice scores against the Scenario and Army Generator we find that they scenario will be SCENARIO A – THE BRITISH ATTACK A FORTIFIED VILLAGE.

The British force will comprise:
  • 1 British Infantry Battalion
  • 1 Sudanese Infantry Battalion
  • 1 Egyptian Artillery Battery
  • 1 Egyptian Supply Column plus
  • 1 Sudanese Infantry Battalion
  • 1 Egyptian Lancer Regiment
  • 1 Egyptian Gatling Gun Battery
The Mahdist force will comprise:
  • 1 Warband of Jihadia Riflemen
  • 1 Large Warband of Hadendowah Spearmen
  • 1 Warband of Baggara Cavalry plus
  • 1 Warband of Hadendowah Riflemen
  • 1 Warband of Baggara Camelry
  • 1 Dervish Artillery Battery
Both sides have quite a bit of firepower at their disposal, although the British have the edge in that department. However, the Mahdists make up for it by having a 2:1 advantage when it comes to mounted troops.

Had the scores been 5 and 1 respectively, the scenario would have been SCENARIO B – THE MAHDISTS ATTACK A FORTIFIED VILLAGE and the armies would have been as follows:

British force
  • 1 British Infantry Battalion
  • 1 Sudanese Infantry Battalion
  • 1 Egyptian Artillery Battery
  • 1 Egyptian Supply Column plus
  • 1 Egyptian Infantry Battalion
  • 1 Egyptian Cavalry Squadron
  • 1 Egyptian Lancer Regiment
Mahdist force
  • 1 Warband of Jiadia Riflemen
  • 1 Large Warband of Hadendowah Spearmen
  • 1 Warband of Baggara Cavalry plus
  • 1 Large Warband of Hadendowah Spearmen
  • 1 Small Warband of Hadendowah Spearmen
  • 1 Warband of Baggara Camelry

I think that this system has potential for development, and if I can maintain my enthusiasm, I may do some more work on the concept over the next month or so.