This solo play-test was devised to test some of the ideas that have been included in the most recent draft of these rules including:
- The use of 2D6s for European troops and D12 for Native troops to simulate the asymmetry between the rigid and predictable European style of warfare and the more fluid and unpredictable Native style of warfare
- Making the number of stands a Commander can activate each turn depend upon their ability as well a their dice score
- Changes to the Combat system, particularly the difference between Fire and Close Combat, the effect of firing into the rear or flank of an enemy stand, and what happens when a stand recoils as a result of Combat
SetupA fairly open battlefield was set up, with the Mahdist baseline being a line of rocky hills separated by two narrow gorges through which the Mahdists would deploy.

The battlefield.
The British and the Mahdists each threw 8D6s to determine the size of the force they would command, and both threw a total of 32.
The British Commander selected six stands of British Regular Infantry, a British Rifled Field Artillery stand, a British Machine Gun stand, and a Pack Transport stand. The Commander then threw a D6 to determine his ability. The score was 5, and his ability was rated as being ‘Average’.
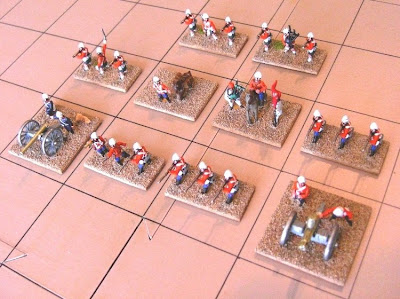
The British force. The Infantry stands are drawn from English and Scottish Line Regiments, as is the Machine Gun stand. The Royal Artillery are represented by a stand of Rifled Field Artillery.
The Mahdist Commander selected four stands of Jihadia Infantry, eight stands of Mahdist Spearmen, three stands of Mahdist Cavalry, and a Mahdist Smoothbore Field Artillery stand. The Mahdist Commander then threw a D6 to determine his ability. The score was 1, and his ability was rated as being ‘Poor’.

The Mahdist force consisted mainly of Mahdist Spearmen, with some Jihadia Infantry, Mahdist Cavalry, and Smoothbore Field Artillery.
Both sides then threw a D6 to determine how many squares in from their baseline they could deploy. The British threw 5 and the Mahdists threw 4.
Turn 1Both sides threw for initiative; the British scored 7 with their 2D6 and the Mahdists scored 1 with their D12.
The British threw 2D6 to determine how many stands they could activate. The score was 11, to which was added 2 to reflect the ability of the Commander. The total score was 13, which allowed the British to activate all their stands.
The British Rifled Field Artillery stand moved forward two squares and opened fire on the Mahdist Smoothbore Field Artillery stand. The British Rifled Field Artillery threw 2D6 and scored 5; when the necessary additions and subtractions were made, the final score was 8 (5+3). The Mahdist Smoothbore Field Artillery threw a D12 and scored 4; when the necessary additions and subtractions were made, the final score was 7 (4+2+1). The Mahdist Smoothbore Field Artillery stand was forced to recoil up to two squares, which it did.
The rest of the British force advanced two squares forwards and deployed into Square. Because they were out of range they did not engage the enemy.

The British Square with the Machine Gun stand and Rifled Field Artillery stand forming the two foremost corners.
The Mahdists threw a D12 to determine how many stands they could activate. The score was 7, to which was added 1 to reflect the ability of the Commander. The total score was 8.
The Mahdist Commander decided that the best course of action was to engage the British as soon as possible. As a result he moved his three Mahdist Cavalry stands forward and deployed them into a line facing the right-hand corner of the British Square. He also moved five stands of Mahdist Spearmen forward to threaten the left-hand corner of the British Square.

The Mahdists advance.
Turn 2Both sides threw for initiative; the British scored 8 with their 2D6 and the Mahdists scored 2 with their D12.
The British threw 2D6 to determine how many stands they could activate. The score was 8, to which was added 2 to reflect the ability of the Commander. The total score was 10, which allowed the British to activate all their stands.
The British Rifled Field Artillery stand opened fire on the central Mahdist Cavalry stand. The British Rifled Field Artillery threw 2D6 and scored 9; when the necessary additions and subtractions were made, the final score was 14 (9+3+2). The Mahdist Cavalry threw a D12 and scored 3; when the necessary additions and subtractions were made, the final score was 5 (3+2). The Mahdist Cavalry stand was destroyed. British Rifled Field Artillery did not move after it had fired.
The British Commander decided not to activate any more of his stands, and the British force remained in Square and awaited the forthcoming Mahdist attack.
The Mahdists threw a D12 to determine how many stands they could activate. The score was 6, to which was added 1 to reflect the ability of the Commander. The total score was 7.
The Mahdist Commander decided to continue the advance on the British Square. He first moved the remaining two Mahdist Cavalry stands forward so that they could engage the right-hand corner of the British Square in close combat.
The first Mahdist Cavalry stand was able to attack the British Rifled Field Artillery stand in the flank. The Mahdist Cavalry threw D12 and scored 10; when the necessary additions and subtractions were made, the final score was 14 (10+2+2). The British Rifled Field Artillery threw 2D6 and scored 4; when the necessary additions and subtractions were made, the final score was 7 (4+3). The British Rifled Field Artillery stand was destroyed.
Note: As presently written the fact that the British Rifled Field Artillery stand formed the corner of the British Square did not protect it from being flanked. This has made me realise that I need to include a rule that ensures that stands that form part of an unbroken Square cannot be flanked.The second Mahdist Cavalry stand was able to attack the leading right-hand British Regular Infantry stand. The Mahdist Cavalry threw D12 and scored 3; when the necessary additions and subtractions were made, the final score was 5 (3+2). The British Regular Infantry threw 2D6and scored 6; when the necessary additions and subtractions were made, the final score was 13 (6+3+2+2). The Close Combat had proved to be indecisive, although both sides remained in contact.
Note: The result of this Close Combat has made me realise that a stand can initiate a Close Combat, lose it, and suffer little or no consequence as a result. I will therefore have to amend the Close Combat results to ensure that this does not happen in future battles.The Mahdist Commander then moved forward, accompanied by the Mahdist Smoothbore Field Artillery stand and the three remaining stands of Mahdist Spearmen.

The initial Mahdist attack destroyed the British Rifled Field Artillery stand.
Turn ThreeBoth sides threw for initiative; the British scored 3 with their 2D6 and the Mahdists scored 1 with their D12.
The Mahdists threw a D12 to determine how many stands they could activate. The score was 8, to which was added 1 to reflect the ability of the Commander. The total score was 9.
The Mahdist Commander moved the Mahdist Cavalry stand that had destroyed the British Rifled Field Artillery stand during the last move forward into the flank of the right-hand British Regular Infantry stand. The Mahdist Cavalry threw D12 and scored 9; when the necessary additions and subtractions were made, the final score was 13 (9+2+2). The British Regular Infantry threw 2D6 and scored 12; when the necessary additions and subtractions were made, the final score was 20 (12+3+3+2). The Close Combat had proved to be indecisive, although both sides remained in contact.
The Mahdist Commander then used the remaining Mahdist Cavalry stand to attack the right-hand British Regular Infantry stand. The Mahdist Cavalry threw D12 and scored 9; when the necessary additions and subtractions were made, the final score was 11 (9+2). The British Infantry threw 2D6 and scored 7; when the necessary additions and subtractions were made, the final score was 14 (7+3+2+2). The Close Combat had proved to be indecisive, although both sides remained in contact.
Note: Yet again the stands that lost the Close Combats suffered no ill effect and confirmed my decision to address this situation in the next draft of the rules.The Mahdist Commander then moved the Mahdist Smoothbore Field Artillery stand forward, along with Command stand and five stands of Mahdist Spearmen.

The Mahdist Spearmen threatened the British square.
The British threw 2D6 to determine how many stands they could activate. The score was 5, to which was added 2 to reflect the ability of the Commander. The total score was 7.
The British Commander swung the British Regular Infantry stand that formed the right-hand side of the Square through 90° so that they could fire into the flank of the Mahdist Cavalry stand that was next to them. The British Regular Infantry threw 2D6 and scored 12; when the necessary additions and subtractions were made, the final score was 17 (12+3+2). The Mahdist Cavalry threw a D12 and scored 5; when the necessary additions and subtractions were made, the final score was 7 (5+2). The Mahdist Cavalry stand was destroyed.
The right-hand British Regular Infantry stand then engaged the remaining Mahdist Cavalry stand. The British Regular Infantry threw 2D6 and scored 8; when the necessary additions and subtractions were made, the final score was 11 (8+3). The Mahdist Cavalry threw a D12 and scored 2; when the necessary additions and subtractions were made, the final score was 4 (2+2). The final Mahdist Cavalry stand was destroyed.
The left-hand British Regular Infantry stand then engaged the stand of Mahdist Spearmen directly to their front. The British Regular Infantry threw 2D6 and scored 8; when the necessary additions and subtractions were made, the final score was 11 (8+3). The Mahdist Spearmen threw a D12 and scored 3; when the necessary additions and subtractions were made, the final score was 5 (3+2). The leading stand of Mahdist Spearmen was destroyed.
The British Machine Gun stand then engaged the stand of Mahdist Spearmen directly to their front. The British Machine Gun threw 2D6 and scored 7; when the necessary additions and subtractions were made, the final score was 9 (7+2). The Mahdist Spearmen threw a D12 and scored 3; when the necessary additions and subtractions were made, the final score was 5 (3+2). The leading stand of Mahdist Spearmen should have recoiled into the square behind but because they were sharing a square with another stand of Mahdist Spearmen, they were destroyed.
The British Commander chose not to activate any more of his units.

The Empire strikes back! British firepower began to have a major impact on the course of the battle.
Turn 4Both sides threw for initiative; the British scored 8 with their 2D6 and the Mahdists scored 10 with their D12.
The Mahdists threw a D12 to determine how many stands they could activate. The score was 9, to which was added 1 to reflect the ability of the Commander. The total score was 10.
The Mahdist Commander moved the stand of Mahdist Spearmen opposite the British Machine Gun stand into contact with British Machine Gun stand and engaged it in Close Combat. The Mahdist Spearmen threw D12 and scored 7; when the necessary additions and subtractions were made, the final score was 10 (7+2+1). The British Machine Gun threw 2D6 and scored 7; when the necessary additions and subtractions were made, the final score was 11 (7+2+2). The Close Combat had proved to be indecisive, although both sides remained in contact.
The Mahdist Commander then moved the stand of Mahdist Spearmen in the square behind the Mahdist Spearmen opposite the left-hand British Regular Infantry stand through the leading stand of Mahdist Spearmen so that they could engage the British Regular Infantry stand. The Mahdist Spearmen threw D12 and scored 4; when the necessary additions and subtractions were made, the final score was 8 (4+2+2). The British Infantry threw 2D6 and scored 7; when the necessary additions and subtractions were made, the final score was 14 (7+3+2+2). The Close Combat had proved to be indecisive, although both sides remained in contact.
The stand of Mahdist Spearmen that had been passed through then moved forward to engage the right-hand British Regular Infantry stand. The Mahdist Spearmen threw D12 and scored 9; when the necessary additions and subtractions were made, the final score was 12 (9+2+1). The British Infantry threw 2D6 and scored 8; when the necessary additions and subtractions were made, the final score was 15 (8+3+2+2). The Close Combat had proved to be indecisive, although both sides remained in contact.
The Mahdist Commander then activated and moved forward his Command stand, the Mahdist Smoothbore Field Artillery stand, the remaining three stands of Mahdist Spearmen, and two stands of Jihadia Infantry.

Despite their growing casualties, the Mahdists continued to threaten the British Square.
The British threw 2D6 to determine how many stands they could activate. The score was 12, to which was added 2 to reflect the ability of the Commander. The total score was 14, which allowed the British to activate all their stands.
The British Commander swung the British Regular Infantry stand that had formed the right-hand side of the Square back through 90° so that the Square was reinstated.
The British Commander the ordered the British Machine Gun stand to engaged the Mahdist Spearmen to their front in Close Combat. The British Machine Gun stand threw 2D6 and scored 7; when the necessary additions and subtractions were made, the final score was 11 (7+2+2). The Mahdist Spearmen threw a D12 and scored 4; when the necessary additions and subtractions were made, the final score was 7 (4+2+1). The stand of Mahdist Spearmen recoiled one square to their rear.
The left-hand British Regular Infantry stand then engaged the stand of Mahdist Spearmen to their front in Close Combat. The British Regular Infantry stand threw 2D6 and scored 9; when the necessary additions and subtractions were made, the final score was 16 (9+3+2+2). The Mahdist Spearmen threw a D12 and scored 1; when the necessary additions and subtractions were made, the final score was 4 (1+2+1). The stand of Mahdist Spearmen was destroyed.
The right-hand British Regular Infantry stand then engaged the stand of Mahdist Spearmen to their front in Close Combat. The British Regular Infantry stand threw 2D6 and scored 10; when the necessary additions and subtractions were made, the final score was 17 (10+3+2+2). The Mahdist Spearmen threw a D12 and scored 4; when the necessary additions and subtractions were made, the final score was 7 (4+2+1). The stand of Mahdist Spearmen was destroyed.

The British drove the Mahdists back again.
Turn 5Both sides threw for initiative; the British scored 7 with their 2D6 and the Mahdists scored 2 with their D12.
The British threw 2D6 to determine how many stands they could activate. The score was 6, to which was added 2 to reflect the ability of the Commander. The total score was 8.
The British Commander the ordered the British Machine Gun stand to open fire on the Mahdist Spearmen to their front. The British Machine Gun stand threw 2D6 and scored 9; when the necessary additions and subtractions were made, the final score was 11 (9+2). The Mahdist Spearmen threw a D12 and scored 3; when the necessary additions and subtractions were made, the final score was 5 (3+2). The stand of Mahdist Spearmen was destroyed.
At this point the Mahdists force was reduced to 50% of its original vale (less the value of the Command stand), which would require them to retreat as soon as possible.
The left-hand British Regular Infantry stand then opened fire on the stand of Mahdist Spearmen to their front. The British Regular Infantry stand threw 2D6 and scored 7; when the necessary additions and subtractions were made, the final score was 10 (7+3). The Mahdist Spearmen threw a D12 and scored 5; when the necessary additions and subtractions were made, the final score was 7 (5+2). The stand of Mahdist Spearmen recoiled one square to its rear.
The right-hand British Regular Infantry stand then opened fire on the Mahdist Command stand to their front. The British Regular Infantry stand threw 2D6 and scored 4; when the necessary additions and subtractions were made, the final score was 7 (4+3). The Mahdist Spearmen threw a D12 and scored 9; when the necessary additions and subtractions were made, the final score was 10 (9+1). The gunfire had been ineffective.
The British Commander chose not to activate any further units.

A close-up view of the Mahdist Spearmen. They are just in range of the British magazine rifles and Machine Gun.

The Mahdists cannot muster enough strength to mount yet another attack on the British Square and prepare to withdraw from the battlefield.
The Mahdists threw a D12 to determine how many stands they could activate. The score was 8, to which was added 1 to reflect the ability of the Commander. The total score was 9.
The Mahdist Commander began the enforced withdrawal, which continued for the next two moves. The British, fearing that they could easily be drawn into a trap, cautiously followed the retreating Mahdists, but were unable to inflict further casualties.
The battle was adjudged to be a ‘Decisive’ British victory!
CommentsThis play-test threw up several instances where the ability of stands to flank stands that were forming part of an unbroken Square was unrealistic, as were some of the combat results. I have been redrafting the rules in parallel with this play-test, and these anomalies have now been dealt with.


.jpeg)


