Pages

Friday, 22 October 2010

Memoir of Battle at Sea: The latest draft

MEMOIR OF BATTLE AT SEA
Turn Sequence
At the beginning of each turn both sides throw a D6 die. The side with the lowest score moves first that turn. During each turn both sides fire – guns first and then torpedoes – and then move their ships. Gunfire is deemed to be simultaneous, and a ship that has been hit and sunk may fire its guns and/or torpedoes that turn – as it sinks – if a suitable target is in range.

Ship Data
Firing Dice
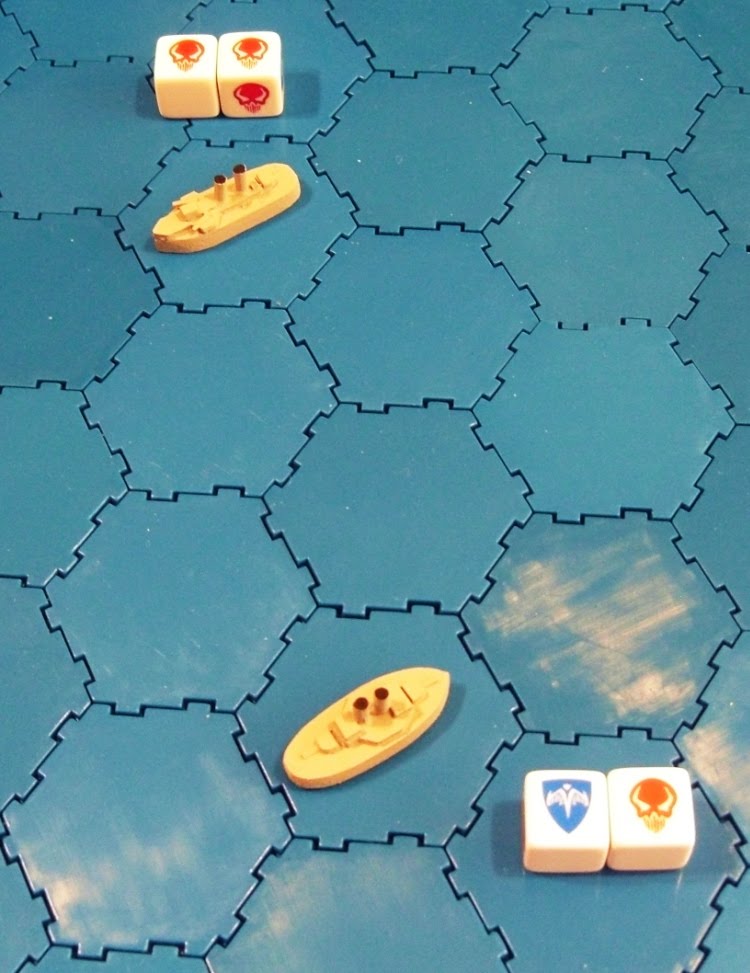
The six faces of the D6 firing dice are marked as follows:
  • 1 x Major hit (worth two Flotation Value points) = White
  • 2 x Minor hit (worth one Flotation Value point) = Blue
  • 3 x Miss = Red
Firing Guns
If the target ship is not ahead or astern of the firing ship (i.e. it is in a hex that is not wholly in a hex that is within a sixty degree arc either side of the hex ahead or astern of the firing ship), the firing ship may ‘fire’ with full effect. The number of dice thrown is reduced by one for every hex the target ship is distant from the firing ship.
For example, a modern pre-dreadnought firing at a target ship that is abeam of it ‘fires’ by throwing eight dice. The number of dice thrown depends upon the range, and is counted down as follows: 8-7-6-5-4-3-2-1. Therefore if a target is at point-blank range (i.e. one hex) she 'fires' (or throws) eight dice, but if it is five hexes away, the pre-dreadnought ‘fires’ (or throws) four dice.
If the target ship is ahead or astern of the firing ship (i.e. it is in a hex that is wholly within a sixty degree arc either side of the hex ahead or astern of the firing ship), the firing ship may ‘fire’ with half effect (i.e. it only throws half the number of dice it may normally throw). The number of dice thrown is reduced by one for every two hexes the target ship is distant from the firing ship.
For example, a modern pre-dreadnought firing at a target ship that is ahead of it ‘fires’ by throwing four dice. The number of dice thrown depends upon the range, and is counted down as follows: 4-4-3-3-2-2-1-1. Therefore if a target is at point-blank range (i.e. one hex) she 'fires' (or throws) four dice, but if it is five hexes away, the pre-dreadnought ‘fires’ (or throws) two dice.
Firing Torpedoes
Only ships equipped to fire torpedoes may do so. No ship may fire more than one torpedo each turn and a maximum of four torpedoes during a battle. Ships larger than destroyers are only able to fire torpedoes directly ahead, astern, or abeam (i.e. at ninety degrees to the ship’s side). Destroyers and torpedo boats with trainable torpedo tubes are allowed to fire at targets that are anywhere that is abeam of them (Only destroyers and torpedo boats with fixed bow tubes are also allowed to fire ahead).

Torpedoes have a range of 3 hexes and throw three dice regardless of the number of hexes the target ship is distant from the firing ship.
For example, a destroyer fires a torpedo at a target ship that is three hexes away (the maximum range for torpedoes). It throws three dice and scores one ‘white’, one, ‘blue’, and one ‘red’. The torpedo has therefore caused three points of damage to the target ship.
Damage and Sinking
All hits are cumulative. When a ship’s Flotation Value reaches the Critical Point, the ship must break off from battle. When a ship's Flotation Value is reached, it sinks.
For example, a light cruiser has suffered three points of damages, and its Flotation Value has been reduced to three. It is hit again by gunfire and suffers a ‘Minor’ hit. As a result its Flotation Value is reduced to two, which is the ship’s Critical Point. Next move it must break off from the battle it is taking part in and sail to safety … if it can.
Movement
Movement is measured in hexes. Ships may turn sixty degrees after moving forward one hex, the turn 'costing' one hex of movement.
For example, a destroyer has a movement rate of five hexes. It can move forward one hex, turn sixty degrees (= one hex of movement), move forward another one hex, turn sixty degrees again (= one more hex of movement), and move forward a third hex.

Thursday, 21 October 2010

Memoir of Battle at Sea: Play-test 2

My second play-test again pitted Greek and Turkish ships against one another. This time, however, I chose to field the Greek Armoured Cruiser Giorgios Averoff against the Turkish Light Cruisers Hamidieh and Medjidieh.

Giorgios Averoff
Hamidieh
Medjidieh
Turn 1
The two sides started in the same relative positions to one another as they had in the first play-test, with the Turkish squadron being led by the Hamidieh.

Both sides threw a D6 die to determine which side would move first. The Greeks threw a 4 and the Turks a 3, so the Turks moved first.

As neither side was in range of the other, the Turkish ships moved. Hamidieh moved forward and then turned towards Giorgios Averoff whilst the Medjidieh continued on her original course. It seemed that the Turkish tactic was to try to force the Giorgios Averoff to deal with two threats at the same time in the hope that one of the light cruisers could close enough to torpedo her before being put out of action. In reply, Giorgios Averoff continued sailing on her existing course.

Turn 2
Both sides threw a D6 die to determine which side would move first. The Greeks threw a 1 and the Turks a 6, so the Greeks moved first.

None of the ship was in range of each other, so the Giorgios Averoff continued moving forward on her existing course, as did the Hamidieh. The Medjidieh sail forward and then turned so that she too was following the same course as Hamidieh.

Turn 3
Both sides threw a D6 die to determine which side would move first. The Greeks threw a 2 and the Turks a 5, so the Greeks moved first.

In their rush to close with Giorgios Averoff, the Hamidieh had now moved into range of Giorgios Averoff’s broadside whilst she could only return fire with her forward guns. Giorgios Averoff threw three dice and the Hamidieh threw one dice because the range was four hexes.

Despite the disparity in firepower, the Turks inflicted exactly the same damage on the Greek ship as they themselves suffered (Giorgios Averoff threw one ‘white’ and two ‘red’, thus causing two points of damage and the Hamidieh threw one ‘white’, also causing two points of damage).

As the Giorgios Averoff was out of range of Medjidieh’s guns, the latter did not fire.

Giorgios Averoff moved forward and then turned to starboard. Hamidieh also followed a similar course of action – thus bringing her abeam of the Giorgios Averoff - and the Medjidieh moved forward and turned to starboard so that she was head-on to Giorgios Averoff.

Turn 4
Both sides threw a D6 die to determine which side would move first. The Greeks threw a 3 and the Turks a 1, so the Turks moved first.

Giorgios Averoff opened fire on Hamidieh and threw four dice – one ‘white’, two ‘blue’, and one ‘red’ - because the range was three hexes, and caused four more points of damage, as a result of which the Hamidieh sank … but before she did, she fired back at the Giorgios Averoff with two dice (one’ blue’ and one ‘red’). Medjidieh also engaged the Giorgios Averoff, threw one dice (a ‘white’) thus bringing the damage caused to Giorgios Averoff to three points this turn. This meant that Giorgios Averoff had suffered a total loss of five damage points, and any further damage would sink her.

Before she sank, Hamidieh fired a torpedo at Giorgios Averoff. Of the three dice thrown, one was a ‘blue’ and two were ‘red’. This caused Giorgios Averoff’s total damage to reach six ... and she sank.

Comments
As was the case with the first play-test, I was pleased with the way the rules worked. In particular, the newly added torpedo rules gave the smaller ships some real ‘clout’ at a distance where their guns were less effective than those of their larger opponent.

I am now of the opinion that I have a set of basic naval wargames rules that work. They still require some further development, and I am of the opinion that the points values allotted to each ship type may need to be adjusted upward so as to give smaller ship types a bit more survivability. I am also considering forcing ships to undertake some sort of test once they reach two thirds of their original points value or a pre-set ‘tipping point’ to see if they will continue to fight on or will break off from the battle.

Wednesday, 20 October 2010

Memoir of Battle at Sea: Torpedo rules

Whilst working on a minor re-draft of my MEMOIR OF BATTLE AT SEA naval wargames rules, I decided to add some simple rules for torpedoes. In the revised turn sequence, these are fired after gunfire take place and before ships move.

Firing Torpedoes
Only ships equipped to fire torpedoes may do so. No ship may fire more than one torpedo each turn and a maximum of four torpedoes during a battle. Ships larger than destroyers are only able to fire torpedoes directly ahead, astern, or abeam (i.e. at ninety degrees to the ship’s side). Destroyers and torpedo boats with trainable torpedo tubes are allowed to fire at targets that are anywhere that is abeam of them. Only destroyers and torpedo boats with fixed bow tubes are also allowed to fire ahead.

Torpedoes have a range of 3 hexes and throw three dice regardless of the number of hexes the target ship is distant from the firing ship.

Monday, 18 October 2010

Memoir of Battle at Sea: A minor change

My recent play-test showed that the main mechanisms used in the current draft of my MEMOIR OF BATTLE AT SEA naval wargames rules work, but some of the comments made have prompted me to re-think one aspect of the rules ... which side should move its ships first each turn.

At present the rules state:
'At the beginning of each battle both sides throw a D6 die. The side with the highest score moves first each turn.'

As it stands, the side that moves first does not have the initiative during any turn as the side that moves second can react to any move made by the side that moves first. I intend to replace the existing rule with a new rule that states:
'At the beginning of each turn both sides throw a D6 die. The side with the highest score moves second that turn.'

This should make the battles a little less predictable, a bit more interesting, and hopefully make them slightly less one-sided as well.

Sunday, 17 October 2010

Memoir of Battle at Sea: Play-test 1

Despite having had a rather busy weekend, I managed to run a play-test of my MEMOIR OF BATTLE AT SEA naval wargames rules.

I decide to pitch two late nineteenth/early twentieth century coastal defence ships against each other, the Greek Psara and Turkish Messudieh.

Psara
Messudieh
These two ships were evenly matched, and might have faced each other in battle had the circumstances arisen.

Turn 1
Both ships began in opposite corners of the battle area.

As soon as they saw each other, they turned so that they were directly heading for each other.

Turn 2
Both ships maintained their current course, and the distance between them began to close.

Turn 3
For the second turn running, neither ship changed its course.

Turn 4
Simultaneously, both ships turned towards each other, and the distance between them closed so that they were almost in range of each other.

Turn 5
They both turned again as they came into range of each other so that they could engage each other with broadsides.

Turn 6
Both ships fired at each other. The Psara threw two 'reds' (i.e. misses) but the Messudieh threw a 'red' (i.e. a miss) and a 'blue' (i.e. a minor hit that cause one point of damage of the Psara).

Both ships then moved forward and turned sixty degrees so that they could still each fire at the other.

Turn 7
Again both ships fired at each other. The Psara's gunfire missed yet again, but the Messudieh threw a 'blue' (a minor hit) and a 'white' (a major hit) which cause the Psara a further three points of damage.

Both ships continued to turn so that they remained broadside on to each other.

Turn 8
This was the decisive turn. Psara fired at the Messudieh and caused her some damage ('white' inflicted a major hit which was worth two points of damage), but in reply, Messudieh threw a 'white' and a 'blue', which caused Psara to suffer a further three points of damage. As she had only had two points of her original six remaining, she sank.

I was pleased with the way the rules worked. In particular, firing before moving rather than the more traditional 'move then fire' approach seemed to work well. I hope to play-test a somewhat more complex scenario next time (possibly two weaker ships against a single stronger ship) before I look at ways of introducing rules that allow ships to fire torpedoes at each other.

Saturday, 16 October 2010

Operazione C3/Hercules

Before he died, Paddy Griffith had planned to run a multi-player wargame about the projected Italo-German invasion of Malta at the Imperial War Museum, Duxford. Several of the regular attendees at Paddy's previous wargames at Duxford – led by Tim Gow and John Drewienkiewicz – decided to run the projected wargame in his memory, and I was lucky enough to be able to take part in it today.

I was given the role of CRA (Commander, Royal Artillery) on Malta, which meant that I was responsible for co-ordinating the island's anti-aircraft and coastal defence artillery. I worked directly under the CIC Malta Command (Michael Brett-Pitt) and alongside Martin Davis, who was Staff Officer, Malta Command. I also had to liaise closely with Paul Elton and Paul Goddard (who controlled the Royal Navy), and Dave Townsend (RAF).

Chris Hall (our liaison umpire) supplied us with an excellent and very detailed map that showed the Malta defences, and we positioned our units on the situation map and awaited developments.

Chris Hall briefing the Allied players.
We had expected an airborne assault on the main airfields by the German Fallschirmjagers to mark the beginning of the invasion, closely followed by an Italian seaborne landing in the north of the island.

Michael Brett-Pitt (CIC Malta Command) makes his point.
In fact we were wrong ... the assault began with an airborne landing by the Italian Folgore Division on the Hal Far airfield and Fort Benghisa, a nearby coastal defence fortress. This was followed by what appeared to be a major airborne landing in the north of the island.

Bernard Ganley (Lord Gort, Governor General of Malta) discusses the situation with the Allied team.
Whilst Allied forces were deployed to 'pinch out' these invaders, there were two seaborne invasions in the south and north. The invasion fleets were engaged by the coastal defence artillery, the Royal Navy flotilla based in Malta, and as many squadrons of the RAF as they could muster. Although it was not apparent at the time, the northern invasion fleet was unable to land all the units it had planned to put ashore as many of the landing vessels were damaged or sunk. It also appears that several of the Italian Navy's larger ships were also damaged or sunk.

The southern landings were more successful and managed to capture a landing field intact. Shortly afterwards, large numbers of Axis transport aircraft began to arrive over Malta and prepare to land on the airfield ... but the RAF and anti-aircraft artillery shot down many of them before they were able to do so, and those they did land safely were fired at by heavy coastal artillery batteries that were capable of engaging inland targets.

The southern invasion fleet was eventually driven off after suffering serious losses, leaving the invaders cut off from further supplies. The Allies were gradually closing in around them, and it was only a matter of time before they were driven back into the sea or forced to surrender. The northern invasion force was also contained by the Allied defenders, and the unless the Axis were able to re-supply them, they would also eventually have to surrender or be evacuated.

It was at this point that the wargame ended, and we all attended a very interesting and informative de-briefing.

Tim Gow (on the left) and Jerry Elsmore (the Game Control Umpire) lead the post-game debriefing.
John Drewienkiewicz (better known a just plain 'DZ') who took on the role of Commanding Generalissimo explains what happened from the Italian point of view.
Bernard Ganley (Lord Gort, Governor General of Malta) explains how the Allies reacted to the invasion.
Jim Wallman, who was the Map Control Umpire, tells everyone what really happened.
My thanks go to everyone who helped to organise this event, and I look forward to taking part in future wargames at Duxford.

Friday, 15 October 2010

Memoir of Battle at Sea (MOB@S): Move then fire or fire then move?

After I wrote my earlier blog entry about my draft version of MEMOIR OF BATTLE AT SEA, I did some thinking about the game sequence. In the version I wrote earlier today, ships moved and then fired ... but one of the things that I liked about Joseph Morschauser's 'Frontier' wargames rules was the fact that artillery fired before units moved.

As a result, I have redrafted the rules so that ships fire and then move, and this is the version that I will hopefully play-test sometime this weekend.

MEMOIR OF BATTLE AT SEA

At the beginning of each battle both sides throw a D6 die. The side with the highest score moves first each turn.

During each turn both sides fire and then move their ships. Gunfire is deemed to be simultaneous, and a ship that has been hit and sunk may fire its guns that turn – as it sinks – if a suitable target is in range.

Ship Data
Firing Dice
The six faces of the D6 firing dice are marked as follows:
  • 1 x Major hit (worth two points)
  • 2 x Minor hit (worth one point)
  • 3 x Miss
Firing
If the target ship is not ahead or astern of the firing ship (i.e. it is in a hex that is not wholly in a hex that is within a sixty degree arc either side of the hex ahead or astern of the firing ship), the firing ship may ‘fire’ with full effect. The number of dice thrown is reduced by one for every hex the target ship is distant from the firing ship.
For example, a modern pre-dreadnought firing at a target ship that is abeam of it ‘fires’ by throwing eight dice. The number of dice thrown depends upon the range, and is counted down as follows: 8-7-6-5-4-3-2-1. Therefore if a target is at point-blank range (i.e. one hex) she 'fires' (or throws) eight dice, but if it is five hexes away, the pre-dreadnought ‘fires’ four dice.
If the target ship is ahead or astern of the firing ship (i.e. it is in a hex that is wholly in a hex that is within a sixty degree arc either side of the hex ahead or astern of the firing ship), the firing ship may ‘fire’ with half effect (i.e. it only throws half the number of dice it may normally throw). The number of dice thrown is reduced by one for every two hexes the target ship is distant from the firing ship.
For example, a modern pre-dreadnought firing at a target ship that is ahead of it ‘fires’ by throwing four dice. The number of dice thrown depends upon the range, and is counted down as follows: 4-4-3-3-2-2-1-1. Therefore if a target is at point-blank range (i.e. one hex) she 'fires' (or throws) four dice, but if it is five hexes away, the pre-dreadnought ‘fires’ two dice.
Sinking
All hits are cumulative, and when a ship's point’s value is reached, it sinks.

Movement
Movement is measured in hexes. Ships may turn sixty degrees after moving forward one hex, the turn 'costing' one hex of movement.
For example, a destroyer has a movement rate of five hexes. It can move forward one hex, turn sixty degrees (= one hex of movement), move forward another one hex, turn sixty degrees again (= one more hex of movement), and move forward a third hex.

Memoir of Battle at Sea (MOB@S)

Over lunch today I managed to put some ideas for my version of MEMOIR OF BATTLE AT SEA (MOB@S for short) down on paper. They are as follows:

MEMOIR OF BATTLE AT SEA

At the beginning of each battle both sides throw a D6 die. The side with the highest score moves first each turn.

During each turn both sides move all their ships and then both sides fire. Gunfire is deemed to be simultaneous, and a ship that has been hit and sunk may fire its guns that turn as it sinks if a suitable target is in range.

Movement is measured in hexes. Ships may turn sixty degrees after moving forward one hex, the turn 'costing' one hex of movement.
For example, a destroyer has a movement rate of five hexes. It can move forward one hex, turn sixty degrees (= one hex of movement), move forward another one hex, turn sixty degrees again (= one more hex of movement), and move forward a third hex.
The six faces of the firing dice are marked as follows:
  • 1 x Major hit (worth two points)
  • 2 x Minor hit (worth one point)
  • 3 x Miss
If the target ship is not ahead or astern of the firing ship (i.e. it is in a hex that is not wholly in a hex that is within a sixty degree arc either side of the hex ahead or astern of the firing ship), the firing ship may ‘fire’ with full effect. The number of dice thrown is reduced by one for every hex the target ship is distant from the firing ship.
For example, a modern pre-dreadnought firing at a target ship that is abeam of it ‘fires’ by throwing eight dice. The number of dice thrown depends upon the range, and is counted down as follows: 8-7-6-5-4-3-2-1. Therefore if a target is at point-blank range (i.e. one hex) she 'fires' (or throws) eight dice, but if it is five hexes away, the pre-dreadnought ‘fires’ four dice.
If the target ship is ahead or astern of the firing ship (i.e. it is in a hex that is wholly in a hex that is within a sixty degree arc either side of the hex ahead or astern of the firing ship), the firing ship may ‘fire’ with half effect (i.e. it only throws half the number of dice it may normally throw). The number of dice thrown is reduced by one for every two hexes the target ship is distant from the firing ship.
For example, a modern pre-dreadnought firing at a target ship that is ahead of it ‘fires’ by throwing four dice. The number of dice thrown depends upon the range, and is counted down as follows: 4-4-3-3-2-2-1-1. Therefore if a target is at point-blank range (i.e. one hex) she 'fires' (or throws) four dice, but if it is five hexes away, the pre-dreadnought ‘fires’ two dice.
All hits are cumulative, and when a ship's point’s value is reached, it sinks.

Thursday, 14 October 2010

Nugget 238

I have collected the latest issue of THE NUGGET from the printers, and hope to post it either tomorrow or Saturday morning. It should be with full members of Wargame Developments by early next week.


I have also uploaded the PDF versions of THE NUGGET and THE NUGGET COLOUR SUPPLEMENT to the Wargame Developments website as well, and these will be available for full members and e-members of Wargame Developments to download and read as soon as they receive the new password. This will be posted out to full and e-members at the same time as THE NUGGET.

Running to stand still ... but gradually getting somewhere!

The last few days seem to have been very long ones. Besides doing our normal teaching, I and the rest of the staff have had to be at work after hours so that the school can remain open for Open Evening. These are for potential students and their families to look around the building and to ask questions about what is taught.

As a result I have not got home much before 8.30pm, having left for work at 7.30am ... and I live fairly close to where I work. Other staff live much further away than I do, and it is little wonder that everyone is now feeling very tired. We are looking forward to the half-term holiday in less than two-weeks time. It cannot come soon enough.

It seems like an age since I did any serious thinking about wargaming ... but the reality is that it is probably just two days. In that time Ogrefencer has sent me a draft copy of his version of MEMOIR OF BATTLE AT SEA naval wargames rules. Now that I have had time to have a proper look at them, they look very interesting indeed, and although he has approached the solution from a slightly different direction than I have done, I can see that our respective versions of the rules are likely to cross-fertilise each other.

He hopes to mount a play-test at some time over the weekend, and if I get a chance I hope to follow suit.