When I awoke this morning the sun was shining ... but within an hour all that had changed and the weather forecast predicted heavy rain for the rest of the day. So what was I to do? The answer came back ... do something wargamey!
(I am not sure whether such a word exists in the English language, but 'wargamey' sounds like it should do!)
I therefore set to work on a couple of things that I have been thinking about doing. The first was to glue some painted metal 20mm-scale Russian World War II figures to some bases. I have had these figures for a long time, and had just never got around to basing them. I had actually forgotten about them until my big clear-out earlier this year, when I found them in a box inside a large storage crate with a lot of other stuff. I decided to base the figures on individual bases, and as I had a large bag of new copper-covered steel pennies available, I used them.
Once the superglue had 'cured', I painted the bases with some matt grey enamel paint. This acted as an undercoat and gave the next coat of paint (the top coat) something to adhere to.
Whilst the undercoat was drying, I started on my second project for the day. This arose from a conversation I had earlier in the week with Ian Drury. Ian introduced me to the benefits of area movement back in 1998 when he staged a session at
COW (the
Conference of Wargamers) about an American invasion of a Japanese-held island. The island (New Stanhall) was actually a map of Jersey divided up into different-sized and shaped areas, and the individual figures represented a company on Infantry. The rules were simple to learn and easy to use, but the scenario made it a very interesting battle to fight.
In our recent conversation Ian outlined some ideas he had for an operational-level wargame that used area movement, figures/models, and a simple combat system based on that used in
MEGABLITZ. This has struck a chord with me, and it seemed like I had an ideal opportunity today to play around with the concept.
My starting point was reading the report in
THE NUGGET of the 1998 session at
COW (the
Conference of Wargamers). I realised that what Ian proposed needed a higher level of resolution (Regiment/Brigade at least, and more likely Divisional-level) and I wondered how I could achieve that.
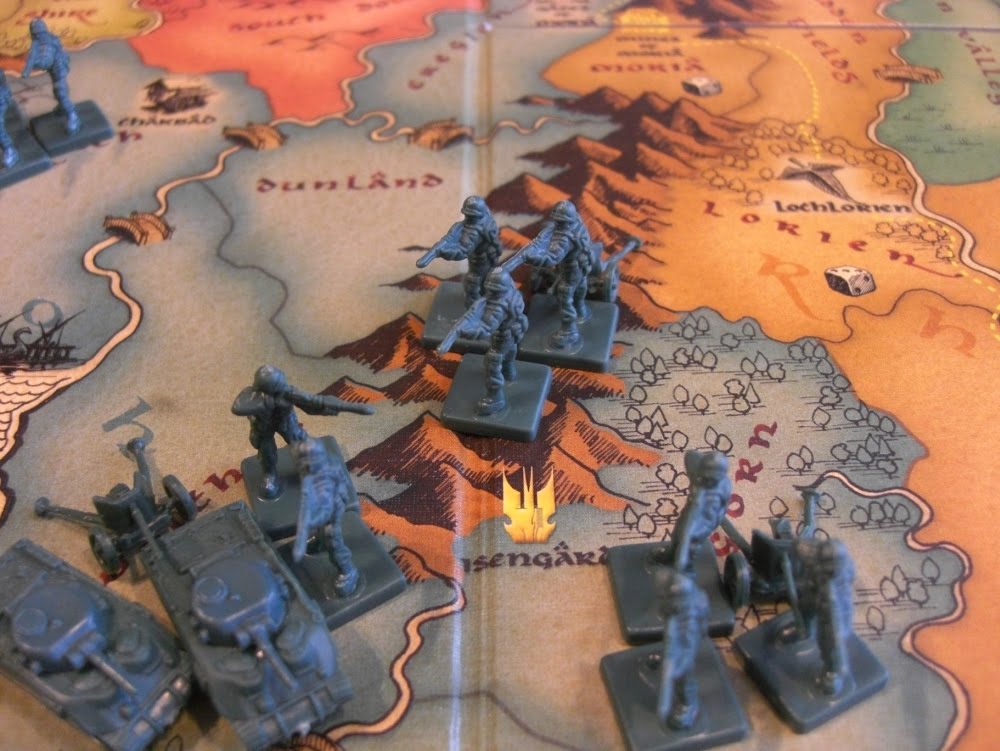
I therefore decided to experiment with figures and other playing pieces from my
MEMOIR '44 wargame and a suitable map. Finding a suitable map was actually easier than I thought it might be (I had visions of drawing my own on a large piece of paper). A glance through my small collection of boardgames soon produced a likely candidate ...
Risk: Lord of the Rings edition!
Before I could start, however, I needed to cobble together some rules.
RULES
Units
- Each Infantry figure, Gun, or Tank represents a Regiment of that type.
- An Infantry Regiment costs 1 point to create and throws 1 Combat Dice.
- An Artillery Regiment costs 2 points to create and throws 2 Combat Dice.
- A Tank Regiment costs 3 points to create and throws 3 Combat Dice.
- An Infantry Division has 2 to 4 Infantry Regiments and 1 or 2 Artillery Regiments.
- A Tank Division has 2 to 3 Tank Regiments, 1 or 2 Infantry Regiments, and 1 or 2 Artillery Regiments.
Turn Sequence
- Both sides throw a D6 die; side with the highest score moves first.
- The side moving first (Side A) throws a D6 die; this determines the number of Divisions or individual Regiments they can move.
- Side A moves each Division or separate Regiment they wish to move in turn, resolving any combats as they occur.
- Once Side A has moved the number of Divisions or separate Regiments it is allowed to move, Side B may them throw a D6 dice and follows the same move and combat resolution procedure.
- Both sides throw two D6 dice. This determines how many points they may spend to 'build' new Regiments and Divisions. (This is an optional rules to be used in a longer game.)
Move Distances and rules
- Infantry Regiments and Divisions: 1 map area per turn.
- Tank Regiments and Divisions: 2 map areas per turn.
- Only Infantry Regiments and Divisions may pass through mountains. They take one turn to enter the mountains and one to leave.
- Tank Divisions reduce their movement to 1 map area per turn in woods, forests, marshes etc.
Combat
- Combat is resolved using Combat Dice marked as per MEMOIR '44
- Each Division throws a Combat Dice for every point the Division is worth (i.e How much it cost to create. For example, an Infantry Division with 3 Infantry Regiments and 1 Artillery Regiment is cost 5 points = 5 Combat Dice).
- Each separate Regiment throws a Combat Dice for every point the Regiment is worth (i.e. how much it cost to create. For example, a Tank Regiment cost 3 points = 3 Combat Dice).
- Two Infantry symbols 'kills' an Infantry Regiment.
- Two Grenade symbols 'kills' an Artillery Regiment.
- Two Tank symbols 'kill' a Tank Regiment.
- Two Flag symbols forces a separate Regiment to retreat.
- Three Flag symbols forces a Division to retreat.
Now that I had some rules, I needed a small war to try them out!
THE INVASION OF ROHAN
For some months the situation on the border between Rohan and Gondor had been tense. Both sides were claiming that the other was encroaching upon their territory, and despite diplomatic efforts by the other nations of Middenheim, war became inevitable.
The two sides mobilised the following armies:
- Rohan: A Tank Division (with two Tank Regiments, two Infantry Regiments, and an Artillery Regiment), Three Infantry Divisions (each with three Infantry Regiments and an Artillery Regiment), and Three separate Infantry Regiments.
- Gondor: Two Tank Divisions (each with two Tank Regiments, two Infantry Regiments, and an Artillery Regiment), Three Infantry Divisions (each with three Infantry Regiments and an Artillery Regiment), and Two separate Infantry Regiments.
Starting Positions
Not wishing to be seen to be escalating the situation, Rohan screened the border area with her separate Infantry Regiments whilst holding her Divisions in the middle and north of the country. Gondor, on the other hand, moved her mobile forces up to the border in preparation for an attack.
Turn 1
Gondor began the war by attacking Rohan! They threw a 2 on their D6 dice, and could move two units.
One of Gondor's Tank Division's pushed across the border and obliterated the single Rohanic Infantry Regiment protecting the area.
At the other end of the border the second Gondorian Tank Division destroyed both the Rohanic Infantry Regiments defending the border.
Rohan threw 4 on its D6 and decided to move thee units. One of the Rohanic Infantry Divisions attacked a Gondorian Tank Division, and almost forced it to retreat.
This was followed by Rohan's only Tank Division taking on one of its Gondorian opposite numbers ... and considerably reducing its effectiveness!
Rohan's final move was to bring one of its two uncommitted Infantry Divisions forward to support its Tank Division.
Turn 2
Rohan won the right to move first this turn. The Rohan side was permitted to move three units.
The Rohanic Tank Division immediately attacked a Gondorian Tank Division ... and reduced it to a single Tank Regiment!
This was then attacked by one of Rohans Infantry Divisions, but they were unable to cause it any further casualties.
Rohan also moved one of its Infantry Divisions into the Mountains.
The Gondorians were permitted to move four units. They began by attacking the Rohanic Tank Division with the remnant of one of its own Tank Divisions ... and managed to destroy one of its Tank Regiments.
They followed this up with a second attack on the Rohanic Tank Division by the other Gondorian Tank Division, but this had no effect.
The Gondorians also began moving Infantry Divisions forward on their right ...
... and left flanks.
Turn 3
Rohan was again able to move its units first. They threw 5 on their D6 die and could therefore move five units.
First its Tank Division mounted another attack on a Gondorian Tank Division ... and wiped it out!
One of the Rohanic Infantry Divisions then attacked the remaining Gondorian Tank Regiment and forced it to retreat back into Gondor.
Finally Rohan moved both its other Infantry Divisions forward.
At this point the Gondorians had been force back behind their own frontiers and their army had been reduced to almost half its initial strength. The government of Gondor felt that it had no alternative but to seek a ceasefire, which Rohan was only to pleased to agree to as their government had no wish to invade and conquer Gondor.
CONCLUSIONS
For such a hurriedly designed set of rules they actually functioned quite well. I don't think that I have designed a game that is anything like the one Ian Drury envisaged ... but it was a simple and fun way to spend part of a wet Saturday in July, and you never know, I might revisit this again in the future!
PS. Everything that I used to fight this battle was stuff that I already had on my shelves. All I did was to use the various bits and pieces in ways that its original designers had not though to use them.
PPS. It is still raining!




.jpg)