Pages

Thursday, 17 October 2013

Miniature Wargames with Battlegames Issue 367

The latest issue of MINIATURE WARGAMES WITH BATTLEGAMES magazine arrived in the post this morning.


The articles included in this issue are:
  • Briefing (i.e. the editorial) by Henry Hyde
  • Forward observer by Neil Shuck
  • Quay to success: The continuing tales of a wargames widow by Diane Sutherland
  • Fantasy Facts: Focusing on figures by John Treadaway
  • First in the field: Don Featherstone's place in wargame history by John Curry
  • Salamanca's siren call: Part 3: organising our units by Henry Hyde
  • Command challenge: Attack on Popadopoli Island October 1918 by Rob Broom
  • Send three and fourpence by Conrad Kinch
  • The importance of imagi-nation: World-building for wargamers in a nutshell by Matt Moran
  • Plenty of Weigle room: "Are they Prussians?" by Tim Beresford and Mike Siggins
  • Wiener Planspielregeln: Combined Arms Wargaming 1940 – 1970: Part 2 by Franz Ehart
  • An onslaught of spears: Gaming the Danish invasion of England by Jeffrey James
  • Recce
  • The Battlegames Combat Stress Appeal report by Henry Hyde
  • The Secret Eye Candy Pages: Colours 2013 by Henry Hyde

The second article about the Wiener Planspielregeln covered the advanced rules and included a scenario for the Battle of Mortain, and Jeffrey James' piece about wargaming the Danish invasion of England included a detailed description of Richard Brooks' MIDDLE AGED SPREAD wargames rules.

Yet another good issue with plenty to interest most wargamers.

Wednesday, 16 October 2013

A play-test ... of sorts!

I have finally managed to set up and fight a small play-test battle using my Itchy and Scratchy rules ... for which I MUST find a better name as soon as possible!

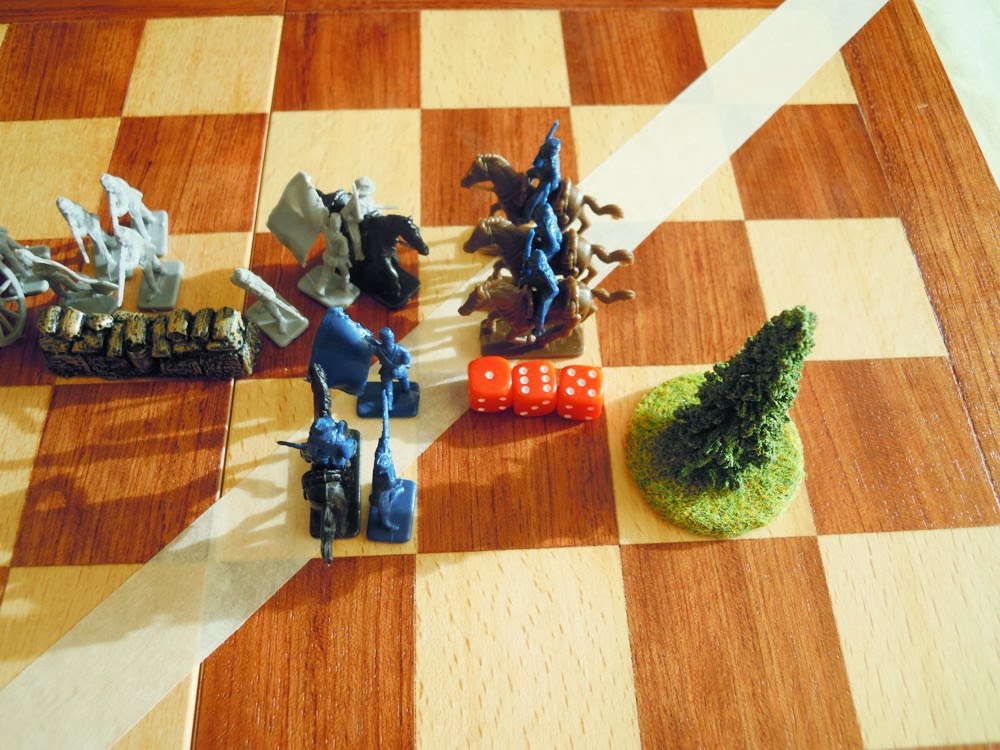
After some deliberation I decided to use a scenario based on that used in 'Game Number Three' in the 'Three Basic Battles' chapter of Donald Featherstone's BATTLES WITH MODEL SOLDIERS. I used a wooden chessboard (bought in John Lewis) for my gridded battlefield (as well as some masking tape, a Hovels wall, and a couple of individually-based trees) and figures from my copy of Eagle Games' THE AMERICAN CIVIL WAR boxed wargame. Both sides had two Infantry units, a Cavalry unit, an Artillery unit, and a General.

The starting positions were as follows:


Turn 1
The Confederates won the dice throw and moved first. As none of their units were in firing range of the Union forces, no combat took place.


The Union troops then moved.


As the Union Artillery unit was in range of the Confederate Infantry unit that was behind the wall, it opened fire on the Confederate. The dice scores were 5 and 6, which meant that they did not hit the Confederate unit.


Turn 2
The Union side won the dice throw to see which side moved and fired first. Their units moved forward and opened fire on any Confederate units that were in range.


The right-hand union Infantry unit threw 5, 1, and 1 (and thus caused no casualties) and the artillery unit threw 6, 4, 3, and 2 (also causing no casualties).


In reply the Confederates moved their Cavalry unit forward and attacked the left-hand Union Infantry unit. It threw 5, 4, 3, and 1 and inflicted no casualties.

The Confederate Infantry unit that was not behind the wall fired with the Union Infantry unit directly in front of it, but its dices scores were only 6 and 1 and therefore caused no casualties.


Turn 3
The Union won the initiative dice throw again and moved first. the Union Cavalry unit moved onto the flank of the Confederate Infantry unit that was not behind the wall, and its dice scores of 6, 6, 5, and 1 destroyed one of the Infantry units Strength Points.


The same Confederate infantry unit was then attacked by the right-hand Union Infantry unit, whose dice scores of 6, 6, 3, 2, and 2 destroyed yet another Confederate Strength Point.


The Union Artillery unit then fired at the Confederate Cavalry unit ... and its dice scores of 6, 5, 4, 2, 2, and 1 destroyed one of the Cavalry unit's Strength Points.


The left-hand Union Infantry unit also engaged the Confederate Cavalry unit, and scored 4, 3, 3, and 2 ... thus destroyed yet another of the Cavalry Unit's Strength Points.


It was now the turn of the Confederates to fight back, and despite its 50% losses the Infantry unit that was not behind the wall attempted to drive off the Union Cavalry unit that was on its flank. Unfortunately its dices scores were 6, 5, 1, and 1, and it therefore caused no casualties.


The same was not true for the Confederate Infantry unit that was behind the wall. They fired at the nearby Union Infantry unit, and their dices scores (5, 5, 2, 2, and 1) were enough to destroy one of the Union Infantry unit's Strength Points.


The Confederate Artillery unit engaged in some counter-battery fire against its opposite number ... and its dice scores (1 and 1) were enough to ensure the destruction of one of the Union Artillery unit's Strength Points.


Confederate Cavalry then attacked the Union Infantry unit that they had been fighting since Turn 2. Despite its depleted strength, the Confederate Cavalry unit's dice scores of 6, 4, and 4 destroyed one of the Union Infantry unit's Strength Points.


Turn 4
This was likely to be the crucial turn of the battle. Both sides had lost Strength Points (the Union had lost 3 Strength Points, and the Confederates 4 Strength Points) and it was possible that one of them would reach their Exhaustion Level (the loss of 7 Strength Points) very soon.

The Confederates won the initiative ... and their General moved over to support the Confederate Infantry unit that was being attacked on two sides.


This Confederate Infantry unit then attacked the Union Infantry unit to its front, and its dice scores of 6, 6, 3, 3, and 1 destroyed one of the Union unit's Strength Points.


The Confederate Artillery unit fired again at its opposite number ... and its dice scores (2, 1, 1, and 1) ensured the Union Artillery unit's destruction!


The Confederate Infantry unit that was behind the wall fired at the nearby Union Infantry unit, but its dice scores were 6, 3, 2, and 1, and these failed to cause any casualties.

The same was not true for the Confederate cavalry unit, which threw dice scores of 4, 4, and 3. These inflicted the loss of a Strength Point on the Union Infantry unit it was fighting.


At this point the Union had lost 6 Strength Points, and only had to lose one more before reaching their Exhaustion Level.

It was the Union side's turn to move and fight, and they started with an attack by their Cavalry unit on the Confederate Infantry unit that was supported by the Confederate General. Their dice scores were 6, 5, and 1 ... and they failed to inflict any casualties on the Confederates.


The right-hand Union Infantry unit was somewhat more successful, and the support of their General obviously swung things in their favour. Their dice scores were 6, 5, 5, 3, and 2, thus inflicting the loss of a Strength Point on the Confederate unit they were fighting.


The left-hand Union Infantry unit was far less successful, and its dice scores of 6, 5, 4, and 1 failed to destroy the Confederate Cavalry unit.


Turn 5
Both sides were dangerously close to their Exhaustion Levels and it was likely that the winner of the initiative would win the overall battle.

The Union won the initiative and immediately went on the attack. Their Cavalry unit attacked the remains of the Confederate Infantry unit that was being supported by the Confederate General ... but their dice scores of 6, 4, and 2 meant that they caused the Confederate Infantry no loss of Strength Points.


The right-hand Union Infantry unit was much more successful, and its dice scores of 6, 6, 6, 4, and 4 would have destroyed two Confederate Infantry Strength Points ... had the Confederate Infantry unit had more than one to lose. As it was, the Confederate Infantry unit was destroyed, but the Confederate General escaped unscathed.


On the other side of the battlefield the Union Infantry unit continued its fight with the Confederate Cavalry unit ... and its dice scores of 3, 3, 3, and 4 were enough to ensure the destruction of the Cavalry unit's final Strength Point.


At this point in the battle the Confederates had reached their Exhaustion Level and were incapable of further offensive movement ... BUT they still had not fought this turn and now did so.

Firstly their unscathed General moved back to support the Confederate Infantry unit that was still behind the wall.


His support proved decisive as the Confederate Infantry unit's dice scores were devastating. They scored 6, 6, 3, 1, and 1 ... thus causing the Union Infantry unit to lose a Strength Point AND destroying the Union General!


The Union side had now also reached their Exhaustion Level ... and the Confederate Artillery unit still had not fired. When it did it scored 5, 2, 2, and 1, and thus had no effect upon the remnants of the left-hand Union Infantry unit.


The battle was now over. Both sides were exhausted, but the Confederates must be adjudged to have won as the Union side had lost more Strength Points than the Confederates AND lost their General.


Comments
The rules work ... and Archduke Piccolo's D6 dice combat system was very easy to use ...

... BUT one area of the rules jarred with me almost from the start of the play-test, and that was the inability of units that were being attacked by enemy units in adjacent grid areas to fight back until it was their turn. There was also no means by which an attacking or defending unit could 'drive off' an enemy unit that was in an adjacent grid area.

Rectifying this will require a bit of thought, but I do have one or two ideas that I want to think about before committing them to paper. Once I have done so I will write a blog entry that includes an updated draft of the rules.

Tuesday, 15 October 2013

Getting my ducks in a row

Thanks to some slightly better weather I managed to do a bit more work today on my 'great garden tidy-up' project. I even had time to sneak a look inside the shed ... and saw that there are at least twenty large plastic crates inside as well as what looks like the large wooden box that contained my ancient O-gauge Hornby train set! If the latter is still in there it may well be a bit rusty ... but FUNNY LITTLE WARS wargaming possibilities suddenly filled my mind and gave me even greater enthusiasm for my project!

I think that I might have enough time tomorrow to schedule a small play-test battle featuring my Itchy and Scratchy wargames rules. If I do, I will certainly write a detailed blog entry about it,

Monday, 14 October 2013

Drip, drip, dry ... for a bit!

Despite my plans I did not do much reading this morning. Something cropped up that required my immediate attention ... and a drive of about twenty miles into the area where London ends and Essex begins.

This took me slightly longer than expected due to the usual traffic jam that built up at the toll booths at the Dartford Crossing. Once I had returned home – and eaten lunch – the weather seemed to have taken a turn for the better, and I decided to do some more work in the garden. Unfortunately I had only been out there for about thirty minutes – and was halfway through cutting down one of the larger trunks of one of the laurel bushes – when the skies opened and the rain began to fall heavily yet again. Luckily the branches of the laurel bushes gave me some shelter from the rain, and I carried on with what I was doing for another thirty minutes. It was only when I had finished that I realised how wet (and filthy dirty) I had got.

I have just got out of the shower, and although I seem to ache all over I do feel as if I have not wasted any time today. Furthermore I can now look forward to sitting and doing the reading that I did not do this morning. On top of that the weather forecast for tomorrow is very encouraging, and I might manage to get some more work done on my 'great garden tidy-up' project.

Not quite what I expect to do today, but satisfying nonetheless!

Drip, drip, drip

I had hoped to spend part of this morning on my 'great garden tidy-up' project ... but like yesterday the weather is conspiring against me. It is raining ... and not that fine, misty rain that is annoying but in which one can work if one is wearing wet weather gear; it is that sort of heavy rain where each drop seems to penetrate whatever you are wearing so that you feel soaking wet within a matter of minutes.

An added problem is the mud. Over the past few days the soil around the laurel bushes has become saturated with rain, and has turned into a sticky mass of mud. Not only does it seem to stick to everything, but it also makes standing on the one-in-ten slope of our garden quite difficult ... and it seems to be quite impossible to saw the branches with ones feet sliding about.

Hopefully the rain will ease as the day goes on, and I might actually manage to get out into the garden to do some work, but until it does I am in a sort of limbo. I don't want to start anything - like my much postponed play-test of my Itchy and Scratchy rules - that I cannot stop doing very quickly. So in the meantime I am going to do some reading whilst I wait.

Things are looking better already!

Sunday, 13 October 2013

I did not go to the SELWG show this year

The SELWG (South East London Wargames Group) show took place today ... and I did not go. This may seem a little odd as the venue – Crystal Palace – is not that far from where I live and the show is one of the biggest wargames shows held in the UK. I usually go … but this year I decided not to.

My reasons for not going are as follows:
  • I have been very busy over the past week or so doing non-wargaming things ... and I feel very tired;
  • I am finding the large wargames shows like SELWG and SALUTE are usually too crowded to be comfortable and many of the people who attend are not mindful of the needs of other attendees;
  • I like to spend time at wargames shows looking at what is on show, talking to the traders and people who are putting on games, and chatting with my many wargaming friends … and this does not seem to be very easy to do at the bigger shows;
  • Most of the traders I am thinking of buying stuff from do not attend SELWG or SALUTE (the reasons being that the traders are either small one man operations who cannot afford to pay for tables at the bigger shows and/or are based in the northern part of the UK).
I am sure that SELWG was a great show, and that I probably missed out by not going … but I don’t regret my decision one bit.

Saturday, 12 October 2013

Saw, trim, shred ... saw, trim shred ...

Despite having been so busy over the last week or so following my other pastime – Freemasonry – I have still been working on the 'great garden tidy-up' project. So far my 'excavations' around our existing shed have revealed the fact that it has a much larger concrete base than expected. In fact the base is almost twice the size of the existing shed and means that when I come to replace it, I will be able to put up a replacement that has a floor area of six foot x four foot.

This is not big enough to 'convert' into a full-time wargames shed (or 'shed-quarters' as I have seen it called elsewhere!) as the largest table I would be able to get in there (and still have room to get in myself) would be three foot x three foot. Whilst this would be adequate for solo wargames using something like my PORTABLE WARGAMES rules, I could hardly invite other wargamers around to take part in a battle.

Before I can remove the existing shed I must clear it, and before I can do that I need to remove all the extra earth that has been washed down our garden and built up around the shed. The problem is that to remove the earth I also need to cut back the laurel bushes that overhang the area around the shed ... hence the title of this blog entry. Every morning I spend at least an hour sawing off branches, trimming off the leafy stems, and them shredding the lot using the heavy-duty garden shredder my brother and I inherited from our father.

At the current rate of progress I should have removed enough of the branches from the laurel bushes by the middle of next week so as to enable me to begin the process of clearing the earth off the concrete base. Weather permitting I should then be able to begin the process of clearing the existing shed. After that ... who knows?

Friday, 11 October 2013

Back blogging ... with British Battleships!

After several days of enforced abstinence, I am back blogging!

Yesterday's post included a copy of R A Burt's recently published revised edition of BRITISH BATTLESHIPS 1889 – 1904 (published by Seaforth Publishing [ISBN 978 1 84832 173 1]). I already have the other two books in this series (BRITISH BATTLESHIPS OF WORLD WAR I and BRITISH BATTLESHIPS 1919 – 1945) and this completes the set.


This very well-illustrated book contains chapters of the following British Battleships:
  • The Royal Sovereign-class (1889 Estimates)
  • HMS Hood (1889 Estimates)
  • HMS Centurion and HMS Barfleur (1890 Estimates)
  • HMS Renown (1892 Estimates)
  • The Majestic-class (1893 Estimates)
  • The Canopus-class (1896/7 Estimates)
  • The Formidable-class (1897 Estimates)
  • The Bulwark-class (1898 Estimates)
  • The Duncan-class (1898/9 Estimates)
  • The Queen-class (1900 Estimates)
  • The King Edward VII-class (1901/2/3 Estimates)
  • HMS Swiftsure and HMS Triumph (Purchased from Chile)
  • The Lord Nelson-class (1904/5 Estimates)
In its introduction the book also covers the development of the Battleship, and has sections about:
  • The Devastation-class (Laid down 1869)
  • HMS Dreadnought (Laid down 1870)
  • HMS Temeraire (Laid down 1873)
  • HMS Superb (Laid down 1873)
  • HMS Alexandra (Laid down 1873)
  • HMS Inflexible (Laid down 1874)
  • HMS Neptune (Laid down 1874)
  • The Ajax-class (Laid down 1876)
  • The Colossus-class (Laid down 1879)
  • HMS Collingwood (Laid down 1880)
  • HMS Benbow (Laid down 1882)
  • The Admiral-class (Laid down 1882/3)
  • The Victoria-class (Laid down 1885)
  • The Trafalgar-class (Laid down 1886)
This is a most welcome addition to my library of naval books, and I suspect that I shall be consulting it frequently.

Monday, 7 October 2013

Too busy to wargame!

I must admit for the first time in a very long time, I am actually too busy to wargame!

The fine weather has meant that my wife and I have been trying to get as much of the 'great garden tidy-up' done as we can before the winter sets in. This has included cutting down more of our very large laurel hedge ... and today we began to excavate the earth wall that has built up over the years in front of the garden shed. We removed enough earth to get the door open today ... but I need to move quite a bit more before it will open to its full extent and we can begin to see what is in there. At times it is almost like taking part in an episode of TIME TEAM! For example I discovered two paving slabs in front of the shed that used to form part of the garden path. They were buried under six inches of earth that had, over the years, been washed down the garden. (Our garden is one the side of a hill and has a one-in-ten slope.)

My Freemasonry is also occupying quite a lot of my time. Last Friday I attended a meeting in Radlett, Hertfordshire, of the Research Lodge of which I am a member. We installed the Lodge's new Worshipful Master, and he then delivered a very interesting lecture about certain aspects of the design of King Solomon's Temple in Jerusalem. This afternoon I am off to a meeting of the London Lodge of which I am a member (and Mentor), and on Tuesday I will be part of the Provincial Escort at a meeting in Cheshunt, Hertfordshire. This will be the first time I will have acted as Provincial Grand Standard Bearer and it will hopefully be the first of many such duties that I will perform over the next year. On Thursday I am going to Sheffield (with a fellow wargamer who is also a Mason) to see a mutual wargaming friend of ours Initiated into Freemasonry. Masonically speaking, I have never, ever been so busy!

As to wargaming ... well that has to take a back-seat for the moment ... but no doubt I will be discussing aspects of the hobby quite a bit on my drive to and from Sheffield.

Sunday, 6 October 2013

The Balkan Wars: Army Lists

I am not a great lover of Army Lists, but I understand that quite a lot of wargamers like them. When I wrote my BALKAN WARS wargames rules I originally included a set of Army Lists, and for the sake of completeness I have reproduced them below.


THE BALKAN WARS
A SET OF ARMY LISTS FOR THE FIRST AND SECOND BALKAN WARS

THE FIRST BALKAN WAR (1912)

Bulgaria
Organised into two or three division-sized ‘armies’.
  • Troop type: No. of stands / Classification / Notes
  • Infantry: 3 / Veteran / Royal Guards
  • Infantry: 6 / Trained / -
  • Infantry: 6 / Trained / Reserve
  • Infantry: 6 / Green / Militia
  • Machine Guns: 3 / Trained / -
  • Cavalry: 1 / Veteran / Royal Guards
  • Cavalry: 2 / Trained / -
  • Cavalry: 2 / Green / Reserve
  • Field Artillery: 1 / Veteran / Royal Guards
  • Field Artillery: 4 / Trained / -
  • Medium Artillery: 1 / Trained / Siege Artillery
  • Heavy Artillery: 1 / Trained / Siege Artillery
  • Transport: 5 / - / -
  • Generals: 1 / Good / -
  • Generals: 2 / Average / -
  • Generals: 1 / Poor / -
Greece
Organised into one division-sized ‘army’.
  • Troop type: No. of stands / Classification / Notes
  • Infantry: 1 / Veteran / Royal Guards
  • Infantry: 2 / Trained / -
  • Infantry: 1 / Trained / Reserve
  • Infantry: 2 / Green / Militia
  • Machine Guns: 1 / Trained / -
  • Cavalry: 1 / Trained / -
  • Mountain Artillery: 1 / Trained / -
  • Field Artillery: 1 / Trained / -
  • Transport: 2 / - / -
  • Generals: 1 / Average / -
  • Generals: 1 / Poor / -
Montenegro
Organised into one division-sized ‘army’.
  • Troop type: No. of stands / Classification / Notes
  • Infantry: 1 / Veteran / Royal Guards
  • Infantry: 1 / Trained / Reserve
  • Infantry: 2 / Green / Militia
  • Mountain Artillery: 1 / Trained / -
  • Transport: 1 / - / Pack Animals
  • Generals: 1 / Average / -
Serbia
Organised into one or two division-sized ‘armies’.
  • Troop type: No. of stands / Classification / Notes
  • Infantry: 1 / Veteran / Royal Guards
  • Infantry: 2 / Trained / -
  • Infantry: 3 / Trained / Reserve
  • Infantry: 3 / Green / Militia
  • Machine Guns: 1 / Trained / -
  • Cavalry: 1 / Trained / -
  • Mountain Artillery: 1 / Trained / -
  • Field Artillery: 2 / Trained / -
  • Heavy Artillery: 1 / Trained / Siege Artillery
  • Transport: 3 / - / -
  • Generals: 1 / Good / -
  • Generals: 2 / Average / -
Turkey
Organised into three or four division-sized ‘armies’.
  • Troop type: No. of stands / Classification / Notes
  • Infantry: 6 / Veteran / -
  • Infantry: 6 / Trained / -
  • Infantry: 10 / Trained / Reserve
  • Infantry: 12 / Green / Militia
  • Cavalry: 2 / Trained / -
  • Cavalry: 4 / Green / Militia
  • Mountain Artillery: 2 / Trained / -
  • Field Artillery: 4 / Trained / -
  • Medium Artillery: 2 / Trained / Siege Artillery
  • Heavy Artillery: 1 / Trained / Siege Artillery
  • Transport: 7 / - / -
  • Generals: 1 / Good / -
  • Generals: 2 / Average / -
  • Generals: 3 / Poor / -
THE SECOND BALKAN WAR (1912)

Bulgaria
Organised into two or three division-sized ‘armies’.
  • Troop type: No. of stands / Classification / Notes
  • Infantry: 3 / Veteran / Royal Guards
  • Infantry: 6 / Veteran / -
  • Infantry: 12 / Trained / Reserve & Militia
  • Machine Guns: 3 / Trained / -
  • Cavalry: 1 / Veteran / Royal Guards
  • Cavalry: 4 / Trained / -
  • Field Artillery: 1 / Veteran / Royal Guards
  • Field Artillery: 4 / Trained / -
  • Medium Artillery: 1 / Trained / Siege Artillery
  • Heavy Artillery: 1 / Trained / Siege Artillery
  • Transport: 5 / - / -
  • Generals: 1 / Good / -
  • Generals: 2 / Average / -
  • Generals: 1 / Poor / -
Greece
Organised into one division-sized ‘army’.
  • Troop type: No. of stands / Classification / Notes
  • Infantry: 1 / Veteran / Royal Guards
  • Infantry: 2 / Veteran / -
  • Infantry: 3 / Trained / Reserve & Militia
  • Machine Guns: 1 / Trained / -
  • Cavalry: 1 / Trained / -
  • Mountain Artillery: 1 / Trained / -
  • Field Artillery: 1 / Trained / -
  • Transport: 2 / - / -
  • Generals: 2 / Average / -
Montenegro
Organised into one division-sized ‘army’.
  • Troop type: No. of stands / Classification / Notes
  • Infantry: 1 / Veteran / Royal Guards
  • Infantry: 1 / Veteran / Reserve
  • Infantry: 2 / Trained / Militia
  • Mountain Artillery: 1 / Trained / -
  • Transport: 1 / - / Pack Animals
  • Generals: 1 / Average / -
Rumania
Organised into two or three division-sized ‘armies’.
  • Troop type: No. of stands / Classification / Notes
  • Infantry: 3 / Veteran / Royal Guards
  • Infantry: 6 / Trained / -
  • Infantry: 5 / Trained / Reserve
  • Infantry: 5 / Green / Militia
  • Machine Guns: 2 / Trained / -
  • Cavalry: 1 / Veteran / Royal Guards
  • Cavalry: 2 / Trained / -
  • Mountain Artillery: 2 / Trained / -
  • Field Artillery: 4 / Trained / -
  • Medium Artillery: 1 / Trained / Siege Artillery
  • Heavy Artillery: 1 / Trained / Siege Artillery
  • Transport: 4 / - / -
  • Generals: 1 / Good / -
  • Generals: 2 / Average / -
  • Generals: 1 / Poor / -
Serbia
Organised into one or two division-sized ‘armies’.
  • Troop type: No. of stands / Classification / Notes
  • Infantry: 1 / Veteran / Royal Guards
  • Infantry: 2 / Veteran / -
  • Infantry: 6 / Trained / Reserve & Militia
  • Machine Guns: 1 / Trained / -
  • Cavalry: 1 / Trained / -
  • Mountain Artillery: 1 / Trained / -
  • Field Artillery: 2 / Trained / -
  • Heavy Artillery: 1 / Trained / Siege Artillery
  • Transport: 3 / - / -
  • Generals: 1 / Good / -
  • Generals: 2 / Average / -
Turkey
Organised into two or three division-sized ‘armies’.
  • Troop type: No. of stands / Classification / Notes
  • Infantry: 4 / Veteran / -
  • Infantry: 4 / Trained / -
  • Infantry: 5 / Trained / Reserve
  • Infantry: 5 / Green / Militia
  • Machine Guns: 2 / Trained / -
  • Cavalry: 1 / Veteran / -
  • Cavalry: 2 / Trained / -
  • Mountain Artillery: 2 / Trained / -
  • Field Artillery: 4 / Trained / -
  • Medium Artillery: 2 / Trained / Siege Artillery
  • Heavy Artillery: 1 / Trained / Siege Artillery
  • Transport: 4 / - / -
  • Generals: 1 / Good / -
  • Generals: 2 / Average / -
  • Generals: 1 / Poor / -