First, a caveat. The following draft terrain generator for my proposed simple campaign system has been designed to work with my PORTABLE WARGAME rules (i.e. an 8 x 8 square or 9 x 8 hexed grid). The ideas contained herein are probably transferable to other sizes of gridded tabletop (or even to non-gridded tabletops) but they may require some additional work in order for them to do so.
When two opposing forces arrive in the same campaign grid area and prepare to fight, they will need to have some sort of terrain to fight over. This draft terrain generator will hopefully produce a terrain map that can be duplicated on the tabletop.
1: RIVERS
The campaign grid square should give some indication as to whether or not there is a river on the battlefield. If there is a river, then start here. If not, then move on to 2: ROADS AND TRACKS.
1.1: Direction
Unless the direction the river is passing through the battlefield is very obvious, its entry and exit positions can be determined by the use of a D6 die being thrown twice (the first throw for the entry point and the second throw for the exit point) and reference to the following diagram. The first D6 die score is read starting from 1, 2 on the top edge of the grid, and going clockwise (i.e. 1, 2, then 6, then 3, 4, then 5, then 1, 2 ... and so on). The second D6 die score is read starting from the the location determined by the first D6 die score, continuing clockwise.

Example 1: Reading clockwise from 1, 2 on the top edge of the grid, a D6 die score of 3 means that the river will enter the grid on the right-hand edge of the grid, and reading clockwise from 3, 4, a second D6 die score of 2 means that the river will exit the grid on the bottom edge of the grid.
1.2: Location
If the river enters or exits the grid along one of the edges of the grid, its exact entry and exit positions can be determined by the use of a D6 die being thrown twice (the first throw for the entry point and the second throw for the exit point) and reference to the following diagrams.


1.3: Width
Unless the width of the river is passing through the battlefield is very obvious, its width can be determined by the use of a D6 die and the following table:
A river enters the grid from the top right-hand corner of the grid (D6 die score = 6) and exits on the bottom edge of the grid (D6 die score = 2). It is not necessary to determine where the river enters the grid, but it exits towards the left-hand side of the bottom edge of the grid (D6 die score = 4). A D6 die score of 1 means that the river will be one grid area wide.
When applied to an 8 x 8 square or 9 x 8 hexed grid, the result is as follows.


The campaign grid square should give some indication as to whether or not there is a road or track on the battlefield. If there is a road or track, then start here. If not, then move on to 3: HILLS AND MOUNTAINS.
2.1: Direction
Unless the direction the road or track is passing through the battlefield is very obvious, its entry and exit positions can be determined by the use of a D6 die being thrown twice (the first throw for the entry point and the second throw for the exit point) in exactly the same was as the direction of a river is determined in Stage 1.
2.2: Location
The method used to locate roads and tracks is the same as that used to locate rivers. See 1.2 above.
2.3: Width
All roads or tracks are deemed to be no wider than a single grid area.
2.4: Roads and tracks crossing rivers
If a road or track crosses a river, it will do so by either a bridge or a ford. This can be determined by the use of a D6 die and the following table:
A road enters a grid from the top edge of the grid (D6 die score = 2) and exits on the right-hand edge of the grid (D6 die score = 3). It enters towards the left-hand side of the top edge of the grid (D6 die score = 3) and exits towards the bottom of the right-hand edge of the grid (D6 die score = 6).
Because the road crosses the river, a D6 die score is used to determine the type of river crossing. It is a ford (D6 die score = 2).
When applied to the previous example of an 8 x 8 square or a 9 x 8 hexed grid, the result is as follows.


The campaign grid square should give some indication as to whether or not there are any hills and mountains on the battlefield. (It is worth noting that there are relatively few battlefields that are totally flat and where there is no higher ground.) If there are any hills and mountains, then start here. If not, then move on to 4: TREES, WOODS, AND FORESTS.
3.1: How many hills or mountains?
Unless the number and type of hills and mountains there are on the battlefield is very obvious, this can be determined by the use of a D6 die being thrown and the results read from the relevant terrain type table. Unless otherwise determined by the rules, hills are one contour high and mountains are not climbable.
Open/Flat Terrain
The location of the first hill is be determined in by:


Once all the hills have been located, any mountains can be located using the same method, counting from the location of the last hill placed on the tabletop.
If there is already something in a grid area, the hill (or mountain) is located in the next unoccupied grid area.
3.3: Example
The terrain is undulating. A D6 die is thrown, and it score of 6 determines that there are five hills on the tabletop. An additional D6 die is thrown for each hill, and the scores = 1, 4, 5, 1, and 6. This determines that the third and fifth hills will be two contours high.
To determine where the first hill will be located, a D6 die is thrown, and the score is 2. The starting point on the left-hand side of the grid is therefore row 2.
Three D6 dice are thrown and the dice scores (1, 3, and 6) are totalled (10). This means that the first hill will be locate ten grid areas from left-hand side of the grid, counting along row 2.
When applied to the previous example of an 8 x 8 square or a 9 x 8 hexed grid, the result is as follows.


When applied to the previous example of an 8 x 8 square or a 9 x 8 hexed grid, the result is as follows.


When applied to the previous example of an 8 x 8 square or a 9 x 8 hexed grid, the result is as follows.


When applied to the previous example of an 8 x 8 square or a 9 x 8 hexed grid, the result is as follows.


When applied to the previous example of an 8 x 8 square or a 9 x 8 hexed grid, the result is as follows.


The campaign grid square should give some indication as to whether or not there are any trees, woods, or forests on the battlefield. (It is worth noting that there are relatively few battlefields where there are no trees.) If there are some trees, then start here. If not, then move on to 5: HABITATION.
They type of tree (e.g. palm trees, coniferous/evergreen trees, and deciduous trees) will depend upon the geography and climate of the area the campaign is being fought over.
Unless the number of trees there are on the battlefield is very obvious, this can be determined by the use of a D6 die being thrown and the results read from the relevant terrain type table.
Desert Terrain
The method used to locate trees is the same as that used to locate hills and mountains. See 3.2 above.
Groups of trees can be placed on hills, but not on any other terrain feature.
4.3: Example
The terrain is undulating. A D6 die is thrown, and it score of 5 determines that there are four trees on the tabletop.
To determine where the first group of trees will be located, a D6 die is thrown, and the score is 3. The starting point on the left-hand side of the grid is therefore row 3.
Subsequent 3D6 dice throws are:


The campaign grid square should give some indication as to whether or not there are inhabited places on the battlefield. If there are, then start here.
They density and number of inhabited places will depend upon the geography of the area the campaign is being fought over:
Unless the number and size of inhabited places that are on the battlefield is very obvious, this can be determined by the use of a D6 die being thrown and the results read from the relevant terrain area table.
Desert, Mountainous, and Forested areas
The method used to locate inhabited places is the same as that used to locate hills and mountains. See 3.2 above.
If there is already something in a grid area, the inhabited place is located in the next unoccupied grid area, subject to the following exceptions:
Because towns occupy more that one grid area, and the grid areas that form the town have to be contiguous, the first town grid area that is located forms the starting point for the location of the second of the town's grid areas. The location of the town's second grid area can be determined by throwing a D6 die.

In both of the above instances, if there is already something in that grid area, the second of the town's grid areas is located in the next unoccupied grid area going clockwise.
5.3: Example
The terrain is cultivated and rural. A D6 die is thrown, and it score of 4 determines that there are three settlements and a village on the tabletop.
To determine where the first settlement will be located, a D6 die is thrown, and the score is 2. The starting point on the left-hand side of the grid is therefore row 2.
Subsequent 3D6 dice throws are:


Some thoughts about the terrain generator
The system outlined above looks far more complicated that it actually is to use ... once you get the hang of it. It isn't perfect by any means, and still need some polishing ... but as the two worked examples show, the system does produce gridded terrain maps that can be reproduced on the tabletop without too much trouble.
There are some people who might ask why I located the rivers first, and then the roads, when in the real world the hills will generally affect where rivers run, and roads are built. My answer is a simple one; I'm not trying to devise a system that shows how the terrain influences rivers and roads; I'm designing a system for generating terrain maps for wargamers, and as most armies use roads and rivers as their main axes of advance, it made sense to place them on the map first.
The choice to use D6 dice to randomise the locations of the various terrain features was made after I had experimented with using D8 dice to generate coordinates on my 8 x 8 square grid. Using D8 dice worked ... but for some reason the resulting maps looked wrong. Furthermore, I could not find a simple way to generate a ninth coordinate for my 9 x 8 hexed grid. (I could have used a D10 and ignored the 0, but it seemed like an extra complication that didn't add much to the system.) In the end, the choice of D6 dice made sense, and as the resulting examples show, it seems to have worked.
One interesting point has emerged from the examples. The final 8 x 8 square and 9 x 8 hexed maps look very different from each other. That is a result of the impact of having an additional eight grid areas on the latter and the way that the grid areas on the maps tessellate with each other. I have yet to try the system with an offset square grid as I don't tend to use one, but it is something that other wargamers might wish to play around with.
When two opposing forces arrive in the same campaign grid area and prepare to fight, they will need to have some sort of terrain to fight over. This draft terrain generator will hopefully produce a terrain map that can be duplicated on the tabletop.
1: RIVERS
The campaign grid square should give some indication as to whether or not there is a river on the battlefield. If there is a river, then start here. If not, then move on to 2: ROADS AND TRACKS.
1.1: Direction
Unless the direction the river is passing through the battlefield is very obvious, its entry and exit positions can be determined by the use of a D6 die being thrown twice (the first throw for the entry point and the second throw for the exit point) and reference to the following diagram. The first D6 die score is read starting from 1, 2 on the top edge of the grid, and going clockwise (i.e. 1, 2, then 6, then 3, 4, then 5, then 1, 2 ... and so on). The second D6 die score is read starting from the the location determined by the first D6 die score, continuing clockwise.

Example 1: Reading clockwise from 1, 2 on the top edge of the grid, a D6 die score of 3 means that the river will enter the grid on the right-hand edge of the grid, and reading clockwise from 3, 4, a second D6 die score of 2 means that the river will exit the grid on the bottom edge of the grid.
1.2: Location
If the river enters or exits the grid along one of the edges of the grid, its exact entry and exit positions can be determined by the use of a D6 die being thrown twice (the first throw for the entry point and the second throw for the exit point) and reference to the following diagrams.

River entry/exit points on the top and bottom edges of the grid .

Example 2: In the previous example, the river will enter the grid on the right-hand edge of the grid and will exit the grid on the bottom edge of the grid. A D6 die score of 4 means that the river will enter the grid towards the top right-hand edge of the grid, and a second D6 die score of 1 means that the river will exit the grid in the middle the bottom edge of the grid.River entry/exit points on the left-hand and right-hand edges of the grid .
1.3: Width
Unless the width of the river is passing through the battlefield is very obvious, its width can be determined by the use of a D6 die and the following table:
- D6 die score is 1, 2, 3, or 4 = the width of the river is one grid area.
- D6 die score is 5 or 6 = the width of the river is two grid areas.
A river enters the grid from the top right-hand corner of the grid (D6 die score = 6) and exits on the bottom edge of the grid (D6 die score = 2). It is not necessary to determine where the river enters the grid, but it exits towards the left-hand side of the bottom edge of the grid (D6 die score = 4). A D6 die score of 1 means that the river will be one grid area wide.
When applied to an 8 x 8 square or 9 x 8 hexed grid, the result is as follows.

The river on the example 8 x 8 square grid .

2: ROADS AND TRACKSThe river on the example 9 x 8 hexed grid .
The campaign grid square should give some indication as to whether or not there is a road or track on the battlefield. If there is a road or track, then start here. If not, then move on to 3: HILLS AND MOUNTAINS.
2.1: Direction
Unless the direction the road or track is passing through the battlefield is very obvious, its entry and exit positions can be determined by the use of a D6 die being thrown twice (the first throw for the entry point and the second throw for the exit point) in exactly the same was as the direction of a river is determined in Stage 1.
2.2: Location
The method used to locate roads and tracks is the same as that used to locate rivers. See 1.2 above.
2.3: Width
All roads or tracks are deemed to be no wider than a single grid area.
2.4: Roads and tracks crossing rivers
If a road or track crosses a river, it will do so by either a bridge or a ford. This can be determined by the use of a D6 die and the following table:
- D6 die score is 1, 2, 3, or 4 = the river crossing is a ford.
- D6 die score is 5 or 6 = the river crossing is a bridge.
A road enters a grid from the top edge of the grid (D6 die score = 2) and exits on the right-hand edge of the grid (D6 die score = 3). It enters towards the left-hand side of the top edge of the grid (D6 die score = 3) and exits towards the bottom of the right-hand edge of the grid (D6 die score = 6).
Because the road crosses the river, a D6 die score is used to determine the type of river crossing. It is a ford (D6 die score = 2).
When applied to the previous example of an 8 x 8 square or a 9 x 8 hexed grid, the result is as follows.
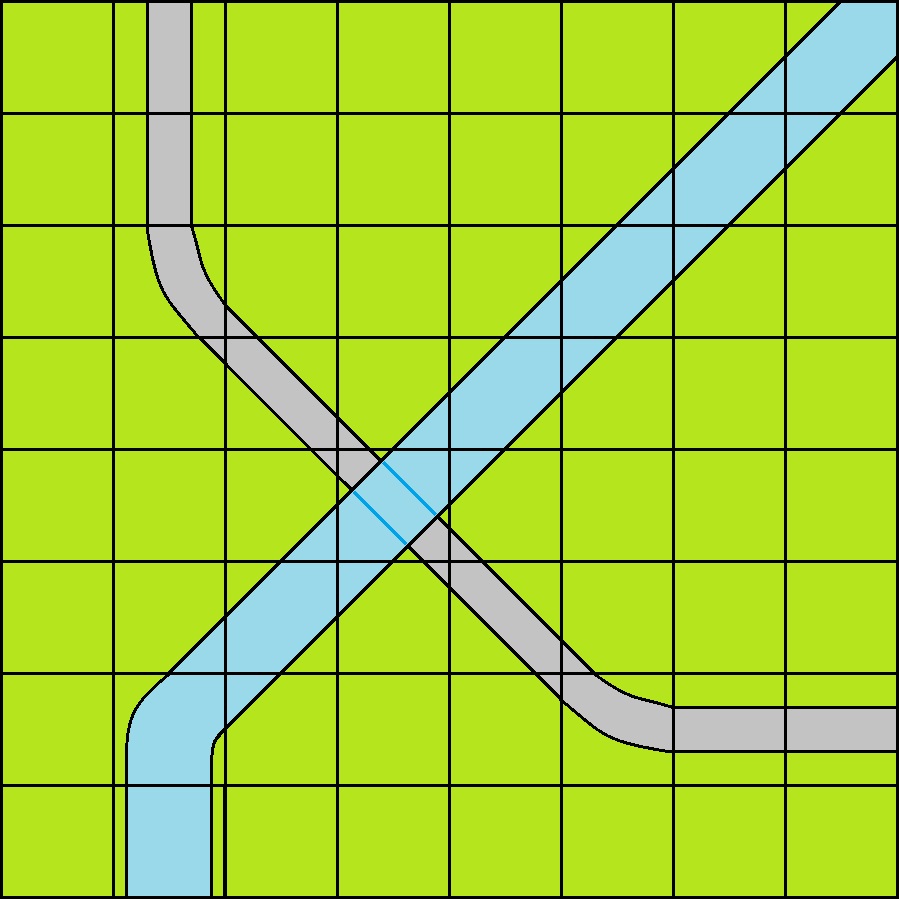
The road on the example 8 x 8 square grid .

3: HILLS AND MOUNTAINSThe road on the example 9 x 8 hexed grid .
The campaign grid square should give some indication as to whether or not there are any hills and mountains on the battlefield. (It is worth noting that there are relatively few battlefields that are totally flat and where there is no higher ground.) If there are any hills and mountains, then start here. If not, then move on to 4: TREES, WOODS, AND FORESTS.
3.1: How many hills or mountains?
Unless the number and type of hills and mountains there are on the battlefield is very obvious, this can be determined by the use of a D6 die being thrown and the results read from the relevant terrain type table. Unless otherwise determined by the rules, hills are one contour high and mountains are not climbable.
Open/Flat Terrain
- D6 die score is 1 = no hills.
- D6 die score is 2 = one hill.
- D6 die score is 3 or 4 = two hills.
- D6 die score is 5 or 6 = three hills.
- D6 die score is 1 or 2 = one hill.
- D6 die score is 3 or 4 = three hills.
- D6 die score is 5 or 6 = five hills.
- Throw an additional D6 die for each hill.
- If the additional D6 die score for a hill = 5 or 6, the hill is two contours high.
- D6 die score is 1 = two hills.
- D6 die score is 2 or 3 = four hills.
- D6 die score is 4 or 5 = six hills.
- D6 die score is 6 = eight hills.
- Throw an additional D6 die for each hill.
- If the additional D6 die score for a hill = 5 or 6, the hill is two contours high.
- D6 die score is 1 = two hills and one mountain.
- D6 die score is 2 = three hills and one mountain.
- D6 die score is 3 = four hills and two mountains.
- D6 die score is 4 = five hills and two mountains.
- D6 die score is 5 = six hills and three mountains.
- D6 die score is 6 = seven hills and three mountains.
- Throw an additional D6 die for each hill.
- If the additional D6 die score for a hill = 3 or 4, the hill is two contours high.
- If the additional D6 die score for a hill = 5 or 6, the hill becomes a mountain.
The location of the first hill is be determined in by:
- The use of a D6 die to determine the starting point on the left-hand side of the grid which will in turn determine where the first hill is located and


- Three D6 dice being thrown and their scores totalled to determine how many grid areas along that row from the starting point the hill will be located, counting along the row and then down and onto the second row if necessary.

Counting along a row and down to the next row on an 8 x 8 square grid .

The second hill is located 3D6 grid areas from the first hill, counting along the row and then down and onto the second row if necessary as before. The third hill is located 3D6 grid areas from the second hill, and this use of totalled 3D6 dices scores continues until all the hills have been located.Counting along a row and down to the next row on a 9 x 8 hexed grid .
Once all the hills have been located, any mountains can be located using the same method, counting from the location of the last hill placed on the tabletop.
If there is already something in a grid area, the hill (or mountain) is located in the next unoccupied grid area.
3.3: Example
The terrain is undulating. A D6 die is thrown, and it score of 6 determines that there are five hills on the tabletop. An additional D6 die is thrown for each hill, and the scores = 1, 4, 5, 1, and 6. This determines that the third and fifth hills will be two contours high.
To determine where the first hill will be located, a D6 die is thrown, and the score is 2. The starting point on the left-hand side of the grid is therefore row 2.
Three D6 dice are thrown and the dice scores (1, 3, and 6) are totalled (10). This means that the first hill will be locate ten grid areas from left-hand side of the grid, counting along row 2.
When applied to the previous example of an 8 x 8 square or a 9 x 8 hexed grid, the result is as follows.

The first hill on the example 8 x 8 square grid. Because there was already something in the tenth, eleventh, and twelfth grid squares (i.e. the river), the hill was located in thirteenth grid square from the start point .

To determine where the second hill will be located, three D6 dice are thrown and the dice scores (2, 3, and 4) are totalled (9). This means that the second hill will be located nine grid areas from the first hill, counting along the row and then down and onto the next row if necessary.The first hill on the example 9 x 8 hexed grid .
When applied to the previous example of an 8 x 8 square or a 9 x 8 hexed grid, the result is as follows.

The second hill on the 8 x 8 square grid. Because there was already something in the ninth grid square (i.e. the river), the second hill was located in tenth grid square from the first hill .

To determine where the third hill will be located, three D6 dice are thrown and the dice scores (1, 1, and 5) are totalled (7). This means that the third hill will be located seven grid areas from the second hill, counting along the row and then down and onto the next row if necessary. (Note that the third hill is two contours high.)The second hill on the example 9 x 8 hexed grid .
When applied to the previous example of an 8 x 8 square or a 9 x 8 hexed grid, the result is as follows.

The third hill on the 8 x 8 square grid. Because there was already something in the seventh grid square (i.e. the river and the road), the hill was located in eighth grid square from the second hill .

To determine where the fourth hill will be located, three D6 dice are thrown and the dice scores (2, 2, and 2) are totalled (6). This means that the fourth hill will be located six grid areas from the third hill, counting along the row and then down and onto the next row if necessary.The third hill on the example 9 x 8 hexed grid .
When applied to the previous example of an 8 x 8 square or a 9 x 8 hexed grid, the result is as follows.

The fourth hill on the example 8 x 8 square grid. Because there was already something in the sixth and seventh grid squares (i.e. the road), the hill was located in the eighth grid square from the third hill .

To determine where the fifth (and last) hill will be located, three D6 dice are thrown and the dice scores (3, 4, and 5) are totalled (12). This means that the fifth hill will be located twelve grid areas from the fourth hill, counting along the row and then down and onto the next row if necessary. (Note that the fifth hill is two contours high.)The fourth hill on the example 9 x 8 hexed grid .
When applied to the previous example of an 8 x 8 square or a 9 x 8 hexed grid, the result is as follows.
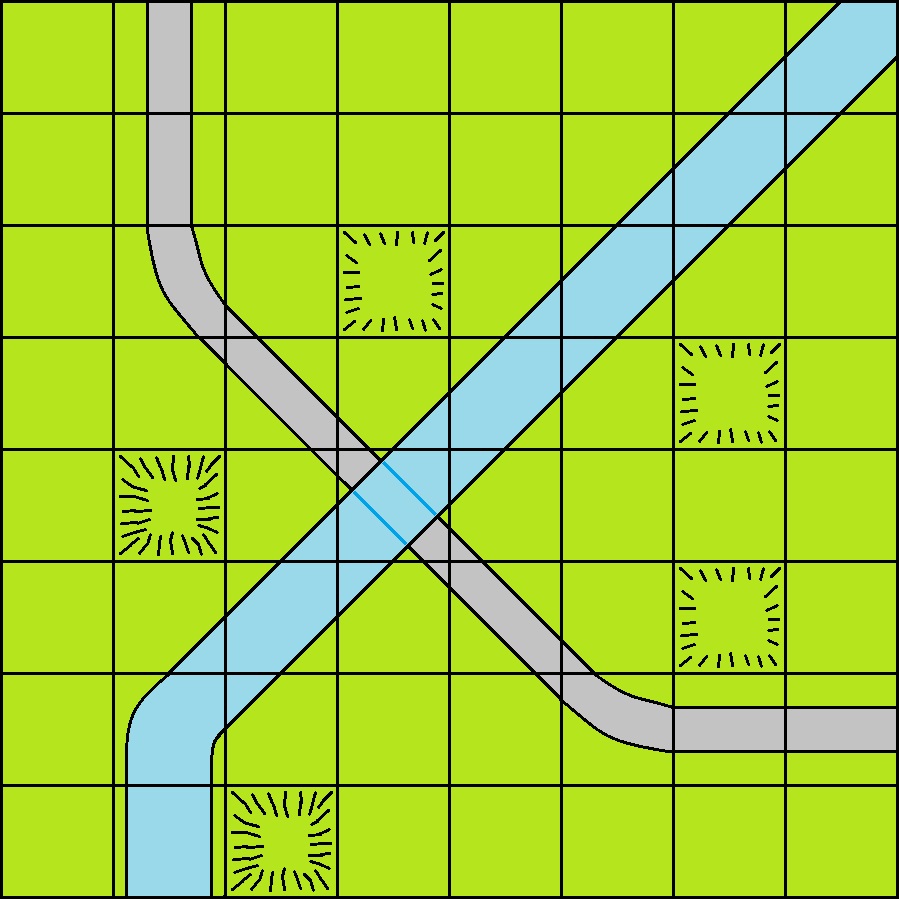
The fifth hill on the example 8 x 8 square grid.

STEP 4: TREES, WOODS, AND FORESTSThe fifth hill on the example 9 x 8 hexed grid. Because there was already something in the twelfth and thirteenth hexes (i.e. the road), the hill was located in the fourteenth hex from the fourth hill.
The campaign grid square should give some indication as to whether or not there are any trees, woods, or forests on the battlefield. (It is worth noting that there are relatively few battlefields where there are no trees.) If there are some trees, then start here. If not, then move on to 5: HABITATION.
They type of tree (e.g. palm trees, coniferous/evergreen trees, and deciduous trees) will depend upon the geography and climate of the area the campaign is being fought over.
- Palm trees: Usually found in tropical, subtropical, warm temperate, and hot climates.
- Coniferous/evergreen trees: Usually found in areas where there are cool or cold winters and warm summers, with well-defined seasons and at least four to six frost-free months.
- Deciduous trees: Usually found in temperate regions where there are cold winters and warm summers, or subtropical and tropical regions where temperatures do not differ greatly throughout the year, but where there is a pattern of seasonal heavy rainfall and periods of drought.
Unless the number of trees there are on the battlefield is very obvious, this can be determined by the use of a D6 die being thrown and the results read from the relevant terrain type table.
Desert Terrain
- D6 die score is 1 = no trees.
- D6 die score is 2 or 3 = one group of trees.
- D6 die score is 4 or 5 = two groups of trees.
- D6 die score is 6 = three groups of trees.
- D6 die score is 1 or 2 = two groups of trees.
- D6 die score is 3 or 4 = three groups of trees.
- D6 die score is 5 or 6 = four groups of trees.
- D6 die score is 1 = two groups of trees.
- D6 die score is 2 or 3 = three groups of trees.
- D6 die score is 4 or 5 = four groups of trees.
- D6 die score is 6 = five groups of trees.
- D6 die score is 1 = three groups of trees.
- D6 die score is 2 or 3 = four groups of trees.
- D6 die score is 4 or 5 = five groups of trees.
- D6 die score is 6 = six groups of trees.
- D6 die score is 1 = four groups of trees.
- D6 die score is 2 = five groups of trees.
- D6 die score is 3 = six groups of trees.
- D6 die score is 4 = seven groups of trees.
- D6 die score is 5 = eight groups of trees.
- D6 die score is 6 = nine groups of trees.
The method used to locate trees is the same as that used to locate hills and mountains. See 3.2 above.
Groups of trees can be placed on hills, but not on any other terrain feature.
4.3: Example
The terrain is undulating. A D6 die is thrown, and it score of 5 determines that there are four trees on the tabletop.
To determine where the first group of trees will be located, a D6 die is thrown, and the score is 3. The starting point on the left-hand side of the grid is therefore row 3.
Subsequent 3D6 dice throws are:
- 1, 2, and 5 = 8
- 2, 3, and 4 = 9
- 1, 2, and 6 = 9
- 2, 4, and 6 = 12

The four groups of trees on the example 8 x 8 square grid. Because there was already something in the twelfth, thirteenth, and fourteenth grid squares (i.e. the road), the fourth group was located in the fifteenth grid square.

5: HABITATIONThe four groups of trees on the example 9 x 8 hexed grid.
The campaign grid square should give some indication as to whether or not there are inhabited places on the battlefield. If there are, then start here.
They density and number of inhabited places will depend upon the geography of the area the campaign is being fought over:
- Desert, Mountainous, and Forested areas: These areas have few if any inhabited places, and those that do exist tend to be small.
- Cultivated and Rural areas: These areas tend to have a number of small inhabited places that are spread out, although there may be occasional villages or small towns.
- Urban area: These areas have significant inhabited places, some of which may be large.
- Settlements can be single dwellings, small farms, or hamlets. They occupy part of a grid area.
- Villages comprise several dwellings, and often include places where trade takes place (e.g. shops and markets) and one or more places of worship. They occupy a grid area.
- Towns comprise a significant number of dwellings and other buildings, including places where trade takes place, the location of local administration (e.g. town hall), and one or more places of worship. A town will occupy at two contiguous grid areas.
Unless the number and size of inhabited places that are on the battlefield is very obvious, this can be determined by the use of a D6 die being thrown and the results read from the relevant terrain area table.
Desert, Mountainous, and Forested areas
- D6 die score is 1, 2 or 3 = no settlements.
- D6 die score is 4 or 5 = one settlement.
- D6 die score is 6 = two settlements.
- D6 die score is 1 = one settlement.
- D6 die score is 2 = two settlements.
- D6 die score is 3 = two settlements and a village.
- D6 die score is 4 = three settlements and a village.
- D6 die score is 5 = three settlements and two villages.
- D6 die score is 6 = three settlements, two villages, and a town.
- D6 die score is 1 = two villages.
- D6 die score is 2 = two villages and a town.
- D6 die score is 3 = three villages and a town.
- D6 die score is 4 = two villages and two towns.
- D6 die score is 5 or 6 = three towns.
The method used to locate inhabited places is the same as that used to locate hills and mountains. See 3.2 above.
If there is already something in a grid area, the inhabited place is located in the next unoccupied grid area, subject to the following exceptions:
- Settlements can be placed on hills and in any grid area that is is less than 50% occupied by a river or road.
- Villages can be placed in any grid area that is is less than 25% occupied by a river or road.
- One or more of the contiguous grid areas that make up a town can be placed in any grid area that is is less than 25% occupied by a river or road.
Because towns occupy more that one grid area, and the grid areas that form the town have to be contiguous, the first town grid area that is located forms the starting point for the location of the second of the town's grid areas. The location of the town's second grid area can be determined by throwing a D6 die.
- If the grid is a squared grid and the D6 dies score is 5 or 6, the D6 die must be thrown again. Only a D6 die score of 1, 2, 3, or 4 can be used to determine which face of the town's first grid square must abut the town's second grid square in order for the town's grid areas to be contiguous.
- If the grid is a hexed grid, the D6 die score determines which face of the town's first grid hex must abut the town's second grid hex must abut in order for the town's grid areas to be contiguous.

In both of the above instances, if there is already something in that grid area, the second of the town's grid areas is located in the next unoccupied grid area going clockwise.
5.3: Example
The terrain is cultivated and rural. A D6 die is thrown, and it score of 4 determines that there are three settlements and a village on the tabletop.
To determine where the first settlement will be located, a D6 die is thrown, and the score is 2. The starting point on the left-hand side of the grid is therefore row 2.
Subsequent 3D6 dice throws are:
- 5, 6, and 2 = 13
- 1, 3, and 5 = 9
- 4, 6, and 6 = 16
- 1, 3, and 4 = 8 (This determines the location of the village)

The three settlements on the example 8 x 8 square grid.

The three settlements on the example 9 x 8 hexed grid. Because there was already something in the thirteenth and fourteenth hexes (i.e. the river), the first settlement was located in the fifteenth hex from the starting point on the left-hand side of the grid. This, in turn, had a knock-on effect on the locations of the second and third settlements.

The three settlements and a village on the example 8 x 8 square grid.

The three settlements and a village on the example 9 x 8 hexed grid.
Some thoughts about the terrain generator
The system outlined above looks far more complicated that it actually is to use ... once you get the hang of it. It isn't perfect by any means, and still need some polishing ... but as the two worked examples show, the system does produce gridded terrain maps that can be reproduced on the tabletop without too much trouble.
There are some people who might ask why I located the rivers first, and then the roads, when in the real world the hills will generally affect where rivers run, and roads are built. My answer is a simple one; I'm not trying to devise a system that shows how the terrain influences rivers and roads; I'm designing a system for generating terrain maps for wargamers, and as most armies use roads and rivers as their main axes of advance, it made sense to place them on the map first.
The choice to use D6 dice to randomise the locations of the various terrain features was made after I had experimented with using D8 dice to generate coordinates on my 8 x 8 square grid. Using D8 dice worked ... but for some reason the resulting maps looked wrong. Furthermore, I could not find a simple way to generate a ninth coordinate for my 9 x 8 hexed grid. (I could have used a D10 and ignored the 0, but it seemed like an extra complication that didn't add much to the system.) In the end, the choice of D6 dice made sense, and as the resulting examples show, it seems to have worked.
One interesting point has emerged from the examples. The final 8 x 8 square and 9 x 8 hexed maps look very different from each other. That is a result of the impact of having an additional eight grid areas on the latter and the way that the grid areas on the maps tessellate with each other. I have yet to try the system with an offset square grid as I don't tend to use one, but it is something that other wargamers might wish to play around with.


Hi Bob,
ReplyDeleteI'm pleased to see you are making a large impact on the huge task of designing a Terrain Generator for Wargames- and glad your enjoying it- certainly a healthy mind exercise and with the prospect of publishing the results it is all good. I've Posted my Toy Battleship NAVAL Battle on my Blog- thought you'd be interested in seeing it. Printing up my Naval Rules to-night. Best Wishes. KEV.
Kev Robertson (Kev),
DeleteIt took a lot of work (and many pages of scribbled notes and diagrams) to get it to this stage, and although it isn't perfect, it's getting there,
I'll look at your blog ASAP as I'm very interested to see how your battle went,
All the best,
Bob
Hi Bob,
DeleteThanks for looking at my Toy Naval Battle that was posted to-day- I appreciate your comments. I'll endeavor to post up my simple Naval Rules -probably after another Naval Battle. Cheers. KEV.
Kev Robertson (Kev),
DeleteIt was an interesting battle report, and I look forward to seeing your next battle report and rules.
All the best,
Bob
Hi Bob,
DeleteI've posted up my simple NAVAL Battle Rules on my Blog- thought you'd be interested to read them. Have a great day. Cheers. KEV.
Kev Robertson (Kev),
DeleteThanks for doing that. Ill take a look at them later today.
All the best,
Bob
Bob (or Kev),
ReplyDeleteWhere can I find his blog? It might well be a blog I already follow, but I can't place it.
Thanks,
Chris
Chris,
DeleteThe blog can be found at https://dwarfenrealm.blogspot.com .
All the best,
Bob
Bob
ReplyDeleteWell that's all rather interesting and clever. I loathe putting terrain together into a reasonable battlefield because, regardless of what approach I take, it always seems to look 'wrong' - frequently disappointingly sparse or far too 'busy'.
I don't use grids in my games but I do use terrain tiles which are sixteen inches square - frequently in a three by four or three by five configuration. It occurs to me that if I treat each of these tiles as four 8 by 8 inch squares then I can probably use this system to generate some tables.
So I think I'll give that a go and see what comes up for me and whether it looks better than the stuff I normally manage to produce.
Cheers
Andrew
Rumblestrip (Andrew),
DeleteThanks for your very encouraging comments. My terrain generator is by no means perfect, and the more I test it, the better it will become ... I hope!
I think that your proposal to notionally divide your terrain tiles into 8-inch x 8-inch squares so that you can try out my terrain generator is a great idea, and the sort of useage I hoped that wargamers would put it to.
All the best,
Bob
Thanks for sharing your terrain generator covering both square and hex. A lot of effort would having gone into it.
ReplyDeletePeter,
DeleteMany thanks for your kind comment.
It's still a work in progress, but I think that I've got the basics just about right.
All the best,
Bob
I could probably adapt your system easily enough onto my 10x10 square grid table (one simple way is to ignore (except for roads, railways and waterways - and possibly built up areas) the outer rows and columns of squares, or, alternatively, the centre rows and columns of squares.
ReplyDeleteHow about my 15 x 11.5 hex table? Not so easy, methinks. However, as it is not a matter I've thought much about, it ill behoves to prejudge!
Archduke Piccolo,
DeleteI would have thought that the terrain generator should be adaptable to your 10 x 10 square grid without too much trouble by either doing what you have suggested or by adjusting the number of pieces that are generated and using 4D6 to place them. After all, a 10 x 10 grid has a lot more grid areas than an 8 x 8 or 8 x 9 grid (100:64 or 100:72).
One way forward with your 15 x 11.5 hexed tabletop might be to split it into two and use the terrain generator to create two 7.5 x 11.5 'maps' that can be fitted together.
All the best,
Bob
It occurs to me that additional optional terrain 'pieces' might be listed. They could be used or ignored as one suits. I was thinking of orchards, ponds or meres, swamps and enclosures, for each of the first 3 a roll of 5 or 6 might indicate the presence of one; and to determine whether there are enclosed fields, a 4-6 might be required. I also thought that maybe a die roll could indicate size (there being only the one). Tentatively. 1-2 = 1 grid area; 3-4 = 2 g.a.; 5-6 = 3 g.a. The location of the enclosure could be determined before its size revealed, and the extras added as looked reasonable.
ReplyDeleteArchduke Piccolo,
DeleteFunnily enough, yesterday afternoon I staged some more tests of the terrain generator and realised that there were some things that I had missed out (e.g. railways, enclosed fields). The former can be located in the same way that roads and rivers are located, and enclosed fields could be located around farms in the same way that the second element of a town is located. Orchards could be an optional replacement for woods on a Rural tabletop, but I think that I will need to write some additional rules for ponds and swamps.
Its certainly something for me to think about.
All the best,
Bob
Bob
ReplyDeleteInteresting system - I use a similar system not for terrain on my smaller portable hex game boards (which are divided broadly into a 6 x 6 grid to keep with a D6 dice) but to decide at which turn and where reinforcements will arrive and broadly where. It makes for a more random unpredictable game.
Mark, Man of TIN,
DeleteOne of the joys of using a gridded tabletop is the fact that it makes certain aspects of wargaming - especially for solo wargamers - so much easier, as your comments confirms.
I've used something similar in the past, and I know that it not only works, but also brings a level of welcome unpredictability.
All the best,
Bob
I put this system to work to generate a map and ran into a situation not covered (I think). When placing hills on a hex grid, my starting row was low (5) and several of my 3d6 rolls were high, so that after the third of five placements I was at the bottom of the map with two mountains to still place. I've chosen to loop back up to the top of the page to continue counting and placing. Would that be the most in line with your design goals? The only other option would be to drop the last two placements, which seems wrong.
ReplyDeleteThank you for your time,
Patrick Walsh
PatrickW (Patrick Walsh),
DeleteThanks very much for your feedback.
Looping back to the top of the grid is exactly what I had intended users to do, and I need to make that explicit in the next draft.
I hope that you've found my terrain generator useful. I'm currently still working on a second draft, which I hope will be simpler to use and which will include railways, swamps, and marshes.
All the best,
Bob
Bob,
ReplyDeleteI have, very much, and I look forward to seeing later drafts.
Thank you for your time,
Patrick
PatrickW (Patrick),
DeleteThat's great! It's always nice to know that people have found my stuff useful.
All the best,
Bob