The Superstructure
The models superstructure comprised three main parts:

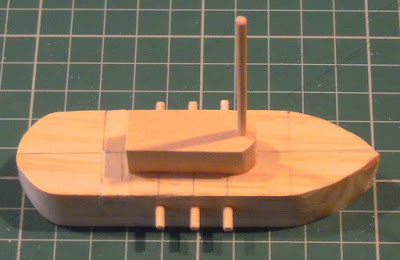
One end of the superstructure block (the end that was under the ship's bridge) was rounded off ...

... and a hole was drilled in the underside of the block half way from either end.

This hole had a short length of bamboo skewer inserted into it to help to fix the superstructure in place on the completed model.

The superstructure block was then glued to the hull, and set aside whilst the glue cured.

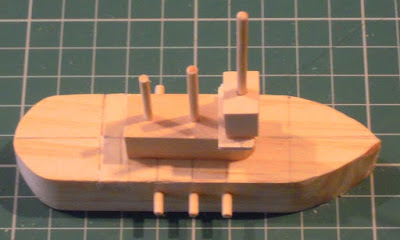
The bridge and mast were constructed from three parts:

A similar hole was drilled into the top of the superstructure, ⅜-inch/10mm in from the front of the ship's superstructure ...

... and the mast was glued into place.
The bridge wings were then carefully placed over the mast, ...

... pushed down, ...

... and glued into place.
The same procedure was used to add the wheelhouse.

The model was then set aside whilst the glue cured.
The funnels were made from:

Two holes were drilled into the top of ship's superstructure. One was ⅝-inch/15mm from the front of the superstructure and the other ½-inch/12.5mm behind it.

A length of bamboo skewer was glued into each hole ...
... and each was used to locate and glue a bobbin/cotton reel in place.
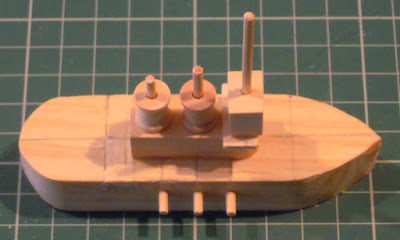
Once the glue was dry, a second bobbin/cotton reel was glued on each skewer.

Final Assembly
All that remained was to drill two location holes for the ship's turrets ...

... and to glue the turrets in place.

Other than having the wood sealed, primed, and painted, the model was complete.
The models superstructure comprised three main parts:
- The body of the superstructure
- The bridge and mast
- The funnels

One end of the superstructure block (the end that was under the ship's bridge) was rounded off ...

... and a hole was drilled in the underside of the block half way from either end.

This hole had a short length of bamboo skewer inserted into it to help to fix the superstructure in place on the completed model.

The superstructure block was then glued to the hull, and set aside whilst the glue cured.

The bridge and mast were constructed from three parts:
- The mast: a 2⅜-inch/60mm length of bamboo skewer
- The bridge wings: a ¾-inch/20mm x ⅜-inch/10mm piece of ⅛-inch thick basswood
- The wheelhouse: a ⅜-inch/10mm section of ½-inch/12.5mm square basswood

A similar hole was drilled into the top of the superstructure, ⅜-inch/10mm in from the front of the ship's superstructure ...

... and the mast was glued into place.

The bridge wings were then carefully placed over the mast, ...

... pushed down, ...

... and glued into place.
The same procedure was used to add the wheelhouse.

The model was then set aside whilst the glue cured.
The funnels were made from:
- Four ½-inch/12.5mm x ⅜-inch/10mm wooden bobbins/cotton reels
- Two 1⅛-inch/30mm lengths of bamboo skewers

Two holes were drilled into the top of ship's superstructure. One was ⅝-inch/15mm from the front of the superstructure and the other ½-inch/12.5mm behind it.

A length of bamboo skewer was glued into each hole ...

... and each was used to locate and glue a bobbin/cotton reel in place.

Once the glue was dry, a second bobbin/cotton reel was glued on each skewer.

Final Assembly
All that remained was to drill two location holes for the ship's turrets ...

... and to glue the turrets in place.

Other than having the wood sealed, primed, and painted, the model was complete.


You make it look so easy BOB - though you have put a lot of planning into your design- glad your going for Grey schemes. Regards. KEV.
ReplyDeleteKev,
DeleteI am hoping that blog readers who give my method a try will find it easy to follow and copy. As to the amount of planning involved ... well I have been doing this sort of thing for so long that it takes me no time at all to work out the various stages I need to break the process down into.
I am hoping that the ships will look impressive when painted grey, although I may repaint them in Victorian livery in due course.
All the best,
Bob
Lovely work Robert champion effort!
ReplyDeleteThanks for the full build details with pictures, definitely worth a try building some of these!
Captain Darling,
DeleteI am very pleased to read that you have enjoyed this series of blog entries. I do hope that you give my method a go and build your own model ships.
All the best,
Bob