Pages

Friday, 5 November 2010

Memoir of Battle at Sea: An American Civil War variant

I recently received an email form one of my regular Italian blog readers, who expressed a particular interest in my blog entries about the Colonial and American Civil War periods.

This set me thinking. At the moment my MEMOIR OF BATTLE AT SEA naval wargames rules are aimed squarely at re-fighting battles from about 1880 to 1910, but it would not take a major re-write to modify the rules for a slightly earlier period ... and so I have begun to do just that.

With a bit of luck I should be able to publish them as a blog entry sometime over the next day or so ... but play-testing might take a little longer as I will have to make the models I will need to use!

Thursday, 4 November 2010

Memoir of Battle: Getting the 'look' right on Hexon II hexes

When I got home from work today I found that I had a bit of spare time that I had not expected to have. I therefore used it to see how different sized MEMOIR OF BATTLE units would look on my Hexon II hexes terrain.

I started with some 15mm-scale Colonial figures. What surprised me was that the 'standard' four individual figure infantry unit did not look 'lost' in the larger-sized hex.

However, the combined large multi-figure base plus individual figures did look more impressive.

Likewise, the artillery unit which was also a mixture of a large multi-figure base (including a gun) plus individual figures was equally impressive.

I then moved on to some 20mm-scale World War II German figures.

From the start, it was obvious to me that for infantry units, the four individual figure unit worked well, and allowed space for the figures and terrain items to both fit in the same hex.

The same was true for the artillery unit ...

... but the machine gun unit did seem a bit 'lost', as it only had two figures.

It seems to me that in the light of these rather unscientific 'experiments', I need to do some more thinking about how many figures a MEMOIR OF BATTLE unit should have. My first reaction was that a combination of individual figures that can be removed to indicate casualties PLUS either
  • a small multi-figure 'core' unit base (possibly with an officer and another figure mounted on it) for 15mm-scale units or
  • a single figure 'core' unit base (possibly an officer or NCO) for 20mm-scale units
might be the way forward ... but I don't want to make too hasty a decision for the time being.

Wednesday, 3 November 2010

Nugget 239

The latest issue of THE NUGGET (N239) was sent to me by the editor at the weekend, and I hope to take it to the printers later today. With luck, I should be able to collect it on Saturday so that I can post it out next weekend.

I will make the PDF versions of THE NUGGET and THE NUGGET COLOUR SUPPLEMENT available for full and e-members to download from the Wargame Developments website as soon as I can after THE NUGGET has been put into the post.

Tuesday, 2 November 2010

Memoir of Battle: What next?

I have spent the last few days considering what changes I should incorporate in the next draft of my MEMOIR OF BATTLE wargames rules.

I am giving very serious consideration to developing the next draft so that I can use my Hexon II hexed terrain, and this might require some changes to the weapon ranges and – as a result – the number of dice thrown by a unit. I am also thinking about having more than four figures in an infantry unit and three in a cavalry unit. This latter change would primarily be on aesthetic grounds – four or three figures will look a bit 'lost' in the large hexes – although using a combination of single removable figures and multi-figure bases would also mean that units would not have to be totally removed from the battlefield when they became ineffective.

For example, by having three single mounted figures and three mounted figures on a multi-figure base, a cavalry unit would field six figures on the battlefield. As the unit lost strength (i.e. single figures were removed), it would be possible to see how strong a unit was 'at a glance'; when the third figure was removed, the unit would no longer be effective but would still take up 'space' on the table. The latter is one area where the original BATTLE CRY and MEMOIR ’44 were rightly criticised by some people, as units are very rarely totally ‘destroyed’ in real life; their remnants would often remain on the battlefield, either getting in the way or distracting the attention of both friendly and enemy commanders.

Some of the inspiration for these ideas has come from the feedback I have received from regular blog readers, and some from looking afresh at both MEMOIR '44 and MEMOIR '14. These have been especially helpful when I have been thinking about changes to the weapon ranges I may need to make.

Sunday, 31 October 2010

Memoir of Battle: Play-test 1

Scenario
The Maharajah of Kanatuna had been allowing – and possibly even leading – raiding parties that had been attacking native villages across the border in British Chindia. The local British District Commissioner ordered the commander of the British garrison in the area – Colonel Sir Johnny Come-Lately – to mount a punitive expedition against Kanatuna to teach the Maharajah a lesson and to deter future raids.

Colonel Sir Johnny Come-Lately assembled his expeditionary force along the border with Kanatuna. It comprised:
  • An infantry unit each from the Border Guide, the McBean Highlander, and the Cambridgeshire Light Infantry Regiments,
  • A machine gun unit from the Queen’s Own Hertfordshire Regiment (armed with a Gatling Gun), and
  • An artillery unit from the Royal Artillery (armed with rifled artillery).
The Maharajah heard about the punitive expedition from his network of spies and informers inside British Chindia, and also assembled his troops just inside the Chindian-Kanatunan border. His troops comprised:
  • An infantry unit each from the Red, White and Cream Turban Regiments, and
  • Two artillery units (each armed with smooth-bore artillery).
The Maharajah drew his force up so that they commanded the main route into Kanatuna … and then he waited for the British to advance.

Turn 1
Knowing that the Maharajah was likely to set up his main defence line across the obvious line of advance, Colonel Come-Lately deployed his troops in an extended line they moved forward. The Maharajah was wary of the British advantage in firepower – he had heard about the devastating effect of machine gun fire and shells from the newly introduced rifled artillery – and posted most of his units on low hills so that they would gain some advantage from the terrain.

As both sides had artillery that could fire at enemy units, the turn began with an inconclusive artillery duel, where neither side managed to hit an enemy unit.

Both sides then threw a D6 die to see who would move first. The British threw a 2 and the Kanatunans threw a 6; therefore the British moved first.

Colonel Come-Lately decided that the best course of action was to move his artillery up so that they could begin to soften up the enemy at shorter range, prior to an all-out infantry assault. He therefore ordered a general advance toward the Kanatunan positions.

The Maharajah, who felt that the much-feared British artillery was not as good as its reputation had implied, did nothing, and left his troops where they were.

Turn 2
Both sides engaged the other with their artillery, but again it had no effect.

Both sides then threw a D6 die to see who would move first. The British threw a 1 and the Kanatunans threw a 4; therefore the British moved first again.

All the British units advanced, including the artillery (which would now not be able to fire at the beginning of the next turn), and the infantry and machine guns opened fire. Even though the range had been reduced, the British were unable to inflict many casualties on the Kanatunans; however, the rifle fire of the McBean Highlanders did drive one of the Kanatunan artillery units out of its position, thus rendering it unable to fire as it no longer had direct line-of-sight to a British unit.

With the exception of the artillery unit that had been driven back and that used the opportunity to regain their previous position, the Kanatunans remained where they were, and returned fire. Their fire was twice as effective as that of the British, and they inflicted one casualty on each on the Border Guides and the Highlanders, and two on the Cambridgeshire Light Infantry.
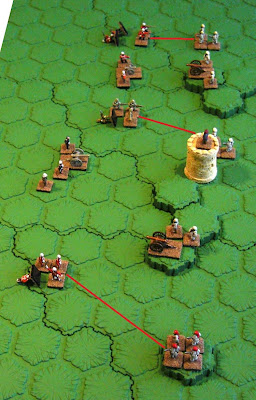
Turn 3
Only one artillery unit could fire – one of the two Kanatunan artillery units – as both the others had moved during the previous turn. It fired at the British machine gun unit … which it hit, causing a single casualty.

Both sides then threw a D6 die to see who would move first. The British threw a 6 and the Kanatunans threw a 2; therefore the Kanatunans moved first.

The Maharajah decided that rather than attack the British – which would justify their claims that he was an aggressor – he would keep his units where they were, and rely upon their rifle fire to defeat the British. All the Kanatunan infantry units fired at the nearest enemy infantry unit … with varying effect. The Border Guides lost a further two men, whereas the McBean Highlanders and Cambridgeshire Light Infantry suffered no casualties at all.

At this point Colonel Come-Lately realised that he had underestimated strength – and effectiveness – of the Maharajah’s army. He therefore decided to withdraw his punitive expeditionary force for the moment, and return at some future date with a much stronger force. The British did not, however, depart with their tails between their legs; theirs was a fighting withdrawal, and any unit that could fire as it moved back, did so. The Cambridgeshire Light Infantry was the only British unit to inflict any casualties on the Katatunans, who’s Cream Turban Infantry suffered the loss of two men.


Comments
The rules certainly worked without a hitch, but I realised that I need to make it clear that an artillery unit that has moved – even if it is a result of being forced to withdraw – cannot fire during the next turn. It is also apparent that the 15mm figures I used in the play-test have bases that are just a bit too large for the Heroscape hexed terrain. This leaves me with several choices:
  • Use my Hexon II hexed terrain. This has possibilities but would take up much more space than the Heroscape terrain and the 15mm figures might look a bit ‘lost’ in the larger hexes.
  • Remount my 15mm figures onto smaller bases. This also has possibilities, but would require time that I currently don’t have and effort that I am unwilling to make.
  • Leave things as they are for the moment, and live with the discrepancy whilst I am play-testing the rules. This is the option that I currently favour … although my next play-test may be set in a slightly later era than this one.

I have been to ... the National Archives in Kew

One of the reasons why I have not yet been able to play-test my new rules – MEMOIR OF BATTLE – is because my wife and I spent most of yesterday at the National Archives, Kew.

We have been going there for over five years – on and off – to undertake a variety of research, most of it genealogical.

Yesterday's visit was mostly concerned with tracking the military service of three individuals during the later half of the eighteenth century. I was looking for a John Haugh and an Alexander Currie/Curry, both members of the 1st Battalion, 1st Regiment of Foot (Marquis of Lorne's/Duke of Argyle's Regiment), and my wife was tracing Maurice/Morris Bayne, a Drummer in the Royal Artillery.

After an exhaustive search of the Regimental Muster Rolls, I discovered that my two soldiers served with their Regiment in Gibraltar until the end of 1776, when the Regiment returned home to Britain. In September 1777, John Haugh deserted whilst stationed in Chatham, and Alexander Currie/Curry followed his example in November 1780 after being imprisoned for over a year beforehand. Unfortunately the Muster Rolls do not record why he was imprisoned, just that he was.

My wife’s search revealed that Maurice/Morris Bayne served in Woolwich – the home base of the Royal Artillery – until he was sent to Port Royal, Jamaica, where he died of Yellow Fever within three months of his arrival.

Part of my research included reading the Establishment Book for the Gibraltar Garrison 1756-57. This laid down the official strength of the eight Infantry Regiments stationed there. It also gave details of the daily rates of pay for each of the ranks, and although this is of little interest to me, I thought that those of my readers who are interested in the military history of the eighteenth century would find it of use:


At the end of the day I had a couple of minutes to undertake some research of my own … and I used the National Archives online catalogue (PROCAT) to search for ‘war game’. The last time I did this search was some years ago, and other than references to the BBC television programme of that name that cause so much controversy during the 1960s, I found the British Army’s 1956 TACTICAL WAR GAME, which is now available from John Curry as part of his HISTORY OF WARGAMING project. This time there were far more references, and the next time I visit the National Archives I hope to spend some time looking at some of them.

Friday, 29 October 2010

Memoir of Battle: First draft of the rules

MEMOIR OF BATTLE
Turn Sequence
Each turn is divided into several distinct phases. These are:
  • Both sides fire their Artillery. (N.B. Artillery fire is deemed to be simultaneous, and an Artillery Unit that has been hit may fire that turn – even if it is destroyed – if a suitable target is in range.)
  • Both sides throw a D6 die. The side with the lowest score moves and fires first that turn.
  • Once they have moved their Units, any of their Units that are within range of enemy Units – with the exception of Artillery Units as they have already had the opportunity to fire that turn – may fire.
  • The other side then moves their Units.
  • Once the other side has moved their Units, any of their Units that are within range of enemy Units – with the exception of Artillery Units as they have already had the opportunity to fire that turn – may fire.
  • Once both sides have had the opportunity to move and fire, the turn is complete and the next turn can commence.
Battle Dice
The six faces of the D6 Battle Dice are marked as follows:
  • 2 x Infantry
  • 1 x Cavalry
  • 1 x Artillery/Machine Gun
  • 1 x General
  • 1 x Retreat Flag
Units
Infantry
  • Four foot figures.
  • Move two hexes or;
  • Move one hex and battle.
  • Range = 4 hexes; four battle dice are thrown: 4-3-2-1.
Machine Guns
  • One machine gun and two crew figures.
  • Move two hexes or;
  • Move one hex and battle.
  • Range = 5 hexes; five battle dice are thrown: 5-4-3-2-1.
Smooth-bore Artillery
  • One gun and two crew figures.
  • Move one hex or battle.
  • Range = 5 hexes; five battle dice are thrown: 5-4-3-2-1.
Rifled Artillery
  • One gun and two crew figures.
  • Move one hex or battle.
  • Range = 6 hexes; three battle dice are thrown: 3-3-2-2-1-1.
Cavalry
  • Three mounted figures.
  • Move three hexes and battle.
  • Range = 1 hex; three battle dice are thrown: 3.
General
  • One foot or mounted figure.
  • Move three hexes.
  • Add one battle dice to Infantry and Cavalry units they are in the same hex with.
Terrain
Wood or Forest hex
  • Units must stop when they enter a wood or forest.
  • Units entering a wood or forest may not battle.
  • When battling a unit that is in a wood or forest, reduce the number of battle dice thrown by one.
  • Woods or forests block line of sight.
Orchard or vineyard hex
  • No movement restrictions.
  • No battle restrictions except that when battling a unit that is in an orchard or vineyard, reduce the number of battle dice thrown by one.
  • Orchards or vineyards do not block line of sight.
Hill hex
  • No movement restrictions.
  • When battling a unit that is on a hill, reduce the number of battle dice thrown by one except when a unit on a hill is battling a unit that is also on a hill; in this case the number of battle dice thrown is as per normal.
  • Artillery firing from a hill increases the range they can fire by one hex (5-4-3-2-1-1 for smooth-bore and 3-3-2-2-1-1-1 for rifled artillery).
  • Hills block line of sight except when units on a hill are looking at units on other hill that are the same height.
Built-up Area hex
  • Units must stop when they enter a built-up area.
  • Units entering a built-up area may not battle.
  • When battling a unit that is in a built-up area, reduce the number of battle dice thrown by two.
  • Built-up areas block line of sight.
River or Stream hex
  • Units must stop when they enter a hex containing a river or stream.
  • Units may only cross rivers or streams in hexes that contain a bridge.
  • Rivers and streams do not block line of sight.
Field hex
  • No movement restrictions except that units in fields containing tall crops may only move one hex.
  • When battling a unit that is in a field containing tall crops, reduce the number of battle dice thrown by one.
  • A field of tall crops block line of sight.
Rough terrain hex
  • Only Infantry may enter rough terrain.
  • No battle restrictions.
  • Rough terrain does not block line of sight.
Fence or Wire hex
  • Units must stop when they enter a hex containing a fence or wire.
  • When battling a unit that is in a hex containing a fence, reduce the number of battle dice thrown by one.
  • When in a hex containing a fence or wire, Infantry either reduce the number of battle dice thrown by one when battling or do not battle and remove the fence or wire.
  • Fences or wire do not block line of sight.
Fieldworks hex
  • No movement restrictions for the fieldworks; other restrictions may apply.
  • When battling a unit that is in a fieldwork, reduce the number of battle dice thrown by two.
  • Units in fieldworks ignore the first ‘flag’ rolled against them.
  • Fieldworks do not block line of sight.
Sand hex
  • Units moving on sand may only move a maximum of two hexes.
  • No battle restrictions.
  • Sand does not block line of sight.
Water hex
  • Units moving on a water may only move a maximum of one hex if they are landing; units may not retreat into water.
  • Units on an water may not battle.
  • Water does not block line of sight.
Firing
The number of Battle Dice thrown by a Unit depends upon:
  • The type of Unit it is.
  • The range at which the Unit is firing.
  • The terrain the firing Unit and target Unit are in.
  • The presence of a General with the Unit
The number of Battle Dice thrown by a Unit does not depend on the number of figures in the Unit.

For each face of the Battle Dice that matches the type of Unit the target Unit is, the target Unit loses a figure.

When all the figures in a Unit have been removed, the Unit is destroyed.

Some more thoughts about a colonial version of Memoir of Battle

As I sat pushing a few colonial figures around on some of my Heroscape hexed terrain this afternoon, it struck me that although I had been thinking about developing a specific version of my MEMOIR OF BATTLE wargames rules for colonial warfare, a generic set of rules would be a much better starting point. These could then be given some specific colonial modifications ... if they need it.

I have therefore begun work on the first draft of MEMOIR OF BATTLE. As it involves a fair amount of cutting and pasting ideas from previous drafts of my modified version of BATTLE CRY and MEMOIR OF BATTLE AT SEA, it should not take me too long to put the draft together.

Some thoughts about a colonial version of Memoir of Battle

So far, all I have done is had a few thoughts about my proposed colonial version of MEMOIR OF BATTLE. They are as follows:
  • I want to keep the idea of all artillery fire taking place before anything else happens each turn. This is something that Joseph Morschauser used in his 'Frontier' wargames rules, and I used it in MEMOIR OF BATTLE AT SEA.
  • I intend to keep the Unit statistics from my modified version of BATTLE CRY.
  • I intend to add Unit statistics for Machine Guns. My first thoughts are to treat them as Smooth-bore Artillery that can move like Infantry (i.e. Move two hexes or move one hex and battle).
  • I intend to keep the Terrain effects (with a few suitable modifications) from my modified version of BATTLE CRY.
  • Units will comprise four foot figures (Infantry), three mounted figures (Cavalry), a gun and two crewmen (Artillery and Machine Guns), or a single foot or mounted figure (General).
These are my preliminary thoughts about the rules … and before anyone mentions it, I am still thinking about whether or not to use Command Cards. I probably will use them for face-to-face games, but as most of my wargaming is done solo, I think that I have to come up with an alternative system. This might include using the system I have already used in MEMOIR OF BATTLE AT SEA (i.e. using a D6 die score to determine which side will move first each turn after the Artillery has fired.

Thursday, 28 October 2010

What next?

Having spent the last few weeks in a rather 'wet' wargaming environment, I am now considering 'going' somewhere a little warmer. Perhaps the Sudan, for example?

I am thinking about working on a colonial version of MEMOIR OF BATTLE, and as I have figures for the Sudan Campaign, it would seem obvious that my next little project could be MEMOIR OF BATTLE IN THE SUDAN (or MOBITS).

It is just a thought at the moment ... but you never know where that thought will lead me!