I have finally managed to set up and fight a small play-test battle using my Itchy and Scratchy rules ... for which I MUST find a better name as soon as possible!
After some deliberation I decided to use a scenario based on that used in 'Game Number Three' in the 'Three Basic Battles' chapter of Donald Featherstone's BATTLES WITH MODEL SOLDIERS. I used a wooden chessboard (bought in John Lewis) for my gridded battlefield (as well as some masking tape, a Hovels wall, and a couple of individually-based trees) and figures from my copy of Eagle Games' THE AMERICAN CIVIL WAR boxed wargame. Both sides had two Infantry units, a Cavalry unit, an Artillery unit, and a General.
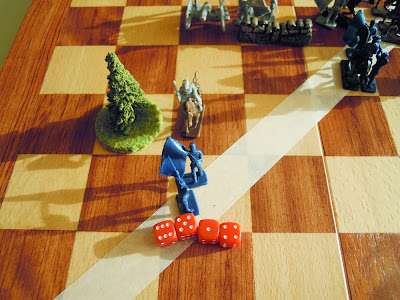
The starting positions were as follows:

Turn 1
The Confederates won the dice throw and moved first. As none of their units were in firing range of the Union forces, no combat took place.

The Union troops then moved.

As the Union Artillery unit was in range of the Confederate Infantry unit that was behind the wall, it opened fire on the Confederate. The dice scores were 5 and 6, which meant that they did not hit the Confederate unit.

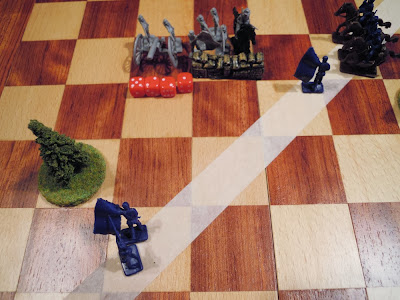
Turn 2
The Union side won the dice throw to see which side moved and fired first. Their units moved forward and opened fire on any Confederate units that were in range.

The right-hand union Infantry unit threw 5, 1, and 1 (and thus caused no casualties) and the artillery unit threw 6, 4, 3, and 2 (also causing no casualties).

In reply the Confederates moved their Cavalry unit forward and attacked the left-hand Union Infantry unit. It threw 5, 4, 3, and 1 and inflicted no casualties.
The Confederate Infantry unit that was not behind the wall fired with the Union Infantry unit directly in front of it, but its dices scores were only 6 and 1 and therefore caused no casualties.

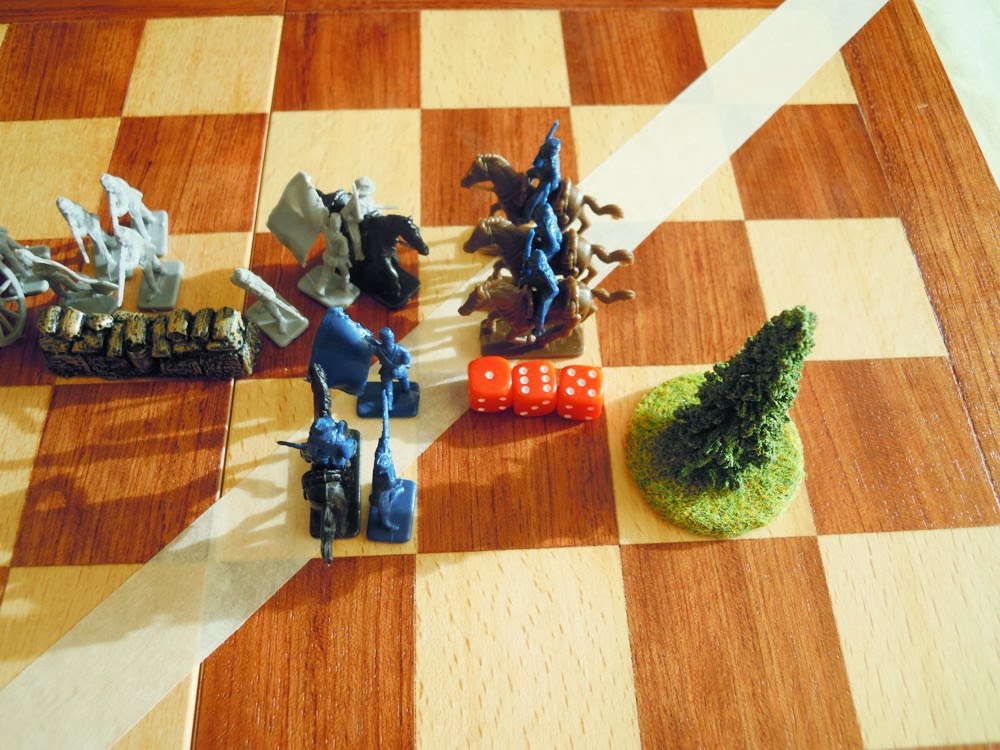
Turn 3
The Union won the initiative dice throw again and moved first. the Union Cavalry unit moved onto the flank of the Confederate Infantry unit that was not behind the wall, and its dice scores of 6, 6, 5, and 1 destroyed one of the Infantry units Strength Points.

The same Confederate infantry unit was then attacked by the right-hand Union Infantry unit, whose dice scores of 6, 6, 3, 2, and 2 destroyed yet another Confederate Strength Point.

The Union Artillery unit then fired at the Confederate Cavalry unit ... and its dice scores of 6, 5, 4, 2, 2, and 1 destroyed one of the Cavalry unit's Strength Points.

The left-hand Union Infantry unit also engaged the Confederate Cavalry unit, and scored 4, 3, 3, and 2 ... thus destroyed yet another of the Cavalry Unit's Strength Points.

It was now the turn of the Confederates to fight back, and despite its 50% losses the Infantry unit that was not behind the wall attempted to drive off the Union Cavalry unit that was on its flank. Unfortunately its dices scores were 6, 5, 1, and 1, and it therefore caused no casualties.

The same was not true for the Confederate Infantry unit that was behind the wall. They fired at the nearby Union Infantry unit, and their dices scores (5, 5, 2, 2, and 1) were enough to destroy one of the Union Infantry unit's Strength Points.

The Confederate Artillery unit engaged in some counter-battery fire against its opposite number ... and its dice scores (1 and 1) were enough to ensure the destruction of one of the Union Artillery unit's Strength Points.

Confederate Cavalry then attacked the Union Infantry unit that they had been fighting since Turn 2. Despite its depleted strength, the Confederate Cavalry unit's dice scores of 6, 4, and 4 destroyed one of the Union Infantry unit's Strength Points.

Turn 4
This was likely to be the crucial turn of the battle. Both sides had lost Strength Points (the Union had lost 3 Strength Points, and the Confederates 4 Strength Points) and it was possible that one of them would reach their Exhaustion Level (the loss of 7 Strength Points) very soon.
The Confederates won the initiative ... and their General moved over to support the Confederate Infantry unit that was being attacked on two sides.

This Confederate Infantry unit then attacked the Union Infantry unit to its front, and its dice scores of 6, 6, 3, 3, and 1 destroyed one of the Union unit's Strength Points.

The Confederate Artillery unit fired again at its opposite number ... and its dice scores (2, 1, 1, and 1) ensured the Union Artillery unit's destruction!

The Confederate Infantry unit that was behind the wall fired at the nearby Union Infantry unit, but its dice scores were 6, 3, 2, and 1, and these failed to cause any casualties.
The same was not true for the Confederate cavalry unit, which threw dice scores of 4, 4, and 3. These inflicted the loss of a Strength Point on the Union Infantry unit it was fighting.

At this point the Union had lost 6 Strength Points, and only had to lose one more before reaching their Exhaustion Level.
It was the Union side's turn to move and fight, and they started with an attack by their Cavalry unit on the Confederate Infantry unit that was supported by the Confederate General. Their dice scores were 6, 5, and 1 ... and they failed to inflict any casualties on the Confederates.

The right-hand Union Infantry unit was somewhat more successful, and the support of their General obviously swung things in their favour. Their dice scores were 6, 5, 5, 3, and 2, thus inflicting the loss of a Strength Point on the Confederate unit they were fighting.

The left-hand Union Infantry unit was far less successful, and its dice scores of 6, 5, 4, and 1 failed to destroy the Confederate Cavalry unit.
Turn 5
Both sides were dangerously close to their Exhaustion Levels and it was likely that the winner of the initiative would win the overall battle.
The Union won the initiative and immediately went on the attack. Their Cavalry unit attacked the remains of the Confederate Infantry unit that was being supported by the Confederate General ... but their dice scores of 6, 4, and 2 meant that they caused the Confederate Infantry no loss of Strength Points.

The right-hand Union Infantry unit was much more successful, and its dice scores of 6, 6, 6, 4, and 4 would have destroyed two Confederate Infantry Strength Points ... had the Confederate Infantry unit had more than one to lose. As it was, the Confederate Infantry unit was destroyed, but the Confederate General escaped unscathed.

On the other side of the battlefield the Union Infantry unit continued its fight with the Confederate Cavalry unit ... and its dice scores of 3, 3, 3, and 4 were enough to ensure the destruction of the Cavalry unit's final Strength Point.

At this point in the battle the Confederates had reached their Exhaustion Level and were incapable of further offensive movement ... BUT they still had not fought this turn and now did so.
Firstly their unscathed General moved back to support the Confederate Infantry unit that was still behind the wall.

His support proved decisive as the Confederate Infantry unit's dice scores were devastating. They scored 6, 6, 3, 1, and 1 ... thus causing the Union Infantry unit to lose a Strength Point AND destroying the Union General!

The Union side had now also reached their Exhaustion Level ... and the Confederate Artillery unit still had not fired. When it did it scored 5, 2, 2, and 1, and thus had no effect upon the remnants of the left-hand Union Infantry unit.
The battle was now over. Both sides were exhausted, but the Confederates must be adjudged to have won as the Union side had lost more Strength Points than the Confederates AND lost their General.

Comments
The rules work ... and Archduke Piccolo's D6 dice combat system was very easy to use ...
... BUT one area of the rules jarred with me almost from the start of the play-test, and that was the inability of units that were being attacked by enemy units in adjacent grid areas to fight back until it was their turn. There was also no means by which an attacking or defending unit could 'drive off' an enemy unit that was in an adjacent grid area.
Rectifying this will require a bit of thought, but I do have one or two ideas that I want to think about before committing them to paper. Once I have done so I will write a blog entry that includes an updated draft of the rules.
After some deliberation I decided to use a scenario based on that used in 'Game Number Three' in the 'Three Basic Battles' chapter of Donald Featherstone's BATTLES WITH MODEL SOLDIERS. I used a wooden chessboard (bought in John Lewis) for my gridded battlefield (as well as some masking tape, a Hovels wall, and a couple of individually-based trees) and figures from my copy of Eagle Games' THE AMERICAN CIVIL WAR boxed wargame. Both sides had two Infantry units, a Cavalry unit, an Artillery unit, and a General.
The starting positions were as follows:

Turn 1
The Confederates won the dice throw and moved first. As none of their units were in firing range of the Union forces, no combat took place.

The Union troops then moved.

As the Union Artillery unit was in range of the Confederate Infantry unit that was behind the wall, it opened fire on the Confederate. The dice scores were 5 and 6, which meant that they did not hit the Confederate unit.

Turn 2
The Union side won the dice throw to see which side moved and fired first. Their units moved forward and opened fire on any Confederate units that were in range.

The right-hand union Infantry unit threw 5, 1, and 1 (and thus caused no casualties) and the artillery unit threw 6, 4, 3, and 2 (also causing no casualties).

In reply the Confederates moved their Cavalry unit forward and attacked the left-hand Union Infantry unit. It threw 5, 4, 3, and 1 and inflicted no casualties.
The Confederate Infantry unit that was not behind the wall fired with the Union Infantry unit directly in front of it, but its dices scores were only 6 and 1 and therefore caused no casualties.

Turn 3
The Union won the initiative dice throw again and moved first. the Union Cavalry unit moved onto the flank of the Confederate Infantry unit that was not behind the wall, and its dice scores of 6, 6, 5, and 1 destroyed one of the Infantry units Strength Points.

The same Confederate infantry unit was then attacked by the right-hand Union Infantry unit, whose dice scores of 6, 6, 3, 2, and 2 destroyed yet another Confederate Strength Point.

The Union Artillery unit then fired at the Confederate Cavalry unit ... and its dice scores of 6, 5, 4, 2, 2, and 1 destroyed one of the Cavalry unit's Strength Points.

The left-hand Union Infantry unit also engaged the Confederate Cavalry unit, and scored 4, 3, 3, and 2 ... thus destroyed yet another of the Cavalry Unit's Strength Points.

It was now the turn of the Confederates to fight back, and despite its 50% losses the Infantry unit that was not behind the wall attempted to drive off the Union Cavalry unit that was on its flank. Unfortunately its dices scores were 6, 5, 1, and 1, and it therefore caused no casualties.

The same was not true for the Confederate Infantry unit that was behind the wall. They fired at the nearby Union Infantry unit, and their dices scores (5, 5, 2, 2, and 1) were enough to destroy one of the Union Infantry unit's Strength Points.

The Confederate Artillery unit engaged in some counter-battery fire against its opposite number ... and its dice scores (1 and 1) were enough to ensure the destruction of one of the Union Artillery unit's Strength Points.

Confederate Cavalry then attacked the Union Infantry unit that they had been fighting since Turn 2. Despite its depleted strength, the Confederate Cavalry unit's dice scores of 6, 4, and 4 destroyed one of the Union Infantry unit's Strength Points.

Turn 4
This was likely to be the crucial turn of the battle. Both sides had lost Strength Points (the Union had lost 3 Strength Points, and the Confederates 4 Strength Points) and it was possible that one of them would reach their Exhaustion Level (the loss of 7 Strength Points) very soon.
The Confederates won the initiative ... and their General moved over to support the Confederate Infantry unit that was being attacked on two sides.

This Confederate Infantry unit then attacked the Union Infantry unit to its front, and its dice scores of 6, 6, 3, 3, and 1 destroyed one of the Union unit's Strength Points.

The Confederate Artillery unit fired again at its opposite number ... and its dice scores (2, 1, 1, and 1) ensured the Union Artillery unit's destruction!

The Confederate Infantry unit that was behind the wall fired at the nearby Union Infantry unit, but its dice scores were 6, 3, 2, and 1, and these failed to cause any casualties.
The same was not true for the Confederate cavalry unit, which threw dice scores of 4, 4, and 3. These inflicted the loss of a Strength Point on the Union Infantry unit it was fighting.

At this point the Union had lost 6 Strength Points, and only had to lose one more before reaching their Exhaustion Level.
It was the Union side's turn to move and fight, and they started with an attack by their Cavalry unit on the Confederate Infantry unit that was supported by the Confederate General. Their dice scores were 6, 5, and 1 ... and they failed to inflict any casualties on the Confederates.
The right-hand Union Infantry unit was somewhat more successful, and the support of their General obviously swung things in their favour. Their dice scores were 6, 5, 5, 3, and 2, thus inflicting the loss of a Strength Point on the Confederate unit they were fighting.

The left-hand Union Infantry unit was far less successful, and its dice scores of 6, 5, 4, and 1 failed to destroy the Confederate Cavalry unit.

Turn 5
Both sides were dangerously close to their Exhaustion Levels and it was likely that the winner of the initiative would win the overall battle.
The Union won the initiative and immediately went on the attack. Their Cavalry unit attacked the remains of the Confederate Infantry unit that was being supported by the Confederate General ... but their dice scores of 6, 4, and 2 meant that they caused the Confederate Infantry no loss of Strength Points.

The right-hand Union Infantry unit was much more successful, and its dice scores of 6, 6, 6, 4, and 4 would have destroyed two Confederate Infantry Strength Points ... had the Confederate Infantry unit had more than one to lose. As it was, the Confederate Infantry unit was destroyed, but the Confederate General escaped unscathed.

On the other side of the battlefield the Union Infantry unit continued its fight with the Confederate Cavalry unit ... and its dice scores of 3, 3, 3, and 4 were enough to ensure the destruction of the Cavalry unit's final Strength Point.

At this point in the battle the Confederates had reached their Exhaustion Level and were incapable of further offensive movement ... BUT they still had not fought this turn and now did so.
Firstly their unscathed General moved back to support the Confederate Infantry unit that was still behind the wall.

His support proved decisive as the Confederate Infantry unit's dice scores were devastating. They scored 6, 6, 3, 1, and 1 ... thus causing the Union Infantry unit to lose a Strength Point AND destroying the Union General!

The Union side had now also reached their Exhaustion Level ... and the Confederate Artillery unit still had not fired. When it did it scored 5, 2, 2, and 1, and thus had no effect upon the remnants of the left-hand Union Infantry unit.

The battle was now over. Both sides were exhausted, but the Confederates must be adjudged to have won as the Union side had lost more Strength Points than the Confederates AND lost their General.

Comments
The rules work ... and Archduke Piccolo's D6 dice combat system was very easy to use ...
... BUT one area of the rules jarred with me almost from the start of the play-test, and that was the inability of units that were being attacked by enemy units in adjacent grid areas to fight back until it was their turn. There was also no means by which an attacking or defending unit could 'drive off' an enemy unit that was in an adjacent grid area.
Rectifying this will require a bit of thought, but I do have one or two ideas that I want to think about before committing them to paper. Once I have done so I will write a blog entry that includes an updated draft of the rules.


.jpg)


Hi Bob,
ReplyDeleteGlad to see you gaming again after what seems like an age of gardening!
Allowing units in adjacent areas to 'battle back' i.e. conduct a combat attack straight after the attacker has done so (as in Command and Colours) would tackle this. You could also incorporate pushback in some way - perhaps allowing the attacker the option when hit of taking the hit or falling back with any subsequent hit taken as a strength point.
Either way it was a exciting little action!
All the best,
DC
David Crook,
ReplyDeleteIt felt like it had been a long time since I had last fought a wargame, and it was great to be back in the saddle again!
Using the 'battle back' concept for close combat (i.e. combat between units in adjacent grid areas) was exactly what I had in mind, but with a simple 'highest aggregate dice score wins the close combat' rule added to it to determine who loses the close combat and is forced to fall back.
I need to get the wording right, but it should make the resulting combat slightly less of a slogging match.
All the best,
Bob
Bob,
ReplyDelete'Battle back' certainly seems the simplest way to resolve that issue. I like the idea of comparing the aggregate dice scores to determine which side has to fall back - this way, the side with the lower casualties can still sometimes win. Perhaps with a rider that a side that has suffered no losses cannot be driven off?
Personally, I don't like wargames where units can be reduced to only a few man, or one man - it just looks too 'gamey' - although removing figures provides an easy way of tracking unit strength without a roster. My compromise would be to have a core unit, which would remain on the table, plus four additional figures, such as officer, colour-bearer and musician, who could be removed to show casualties. Or, you could change the position of the colour bearer within the unit to show losses.
I look forward to reading the revised rules and more battle reports.
Regards,
Arthur
Arthur1815,
ReplyDeleteThe 'battle back' system is tried and tested, and it would easily fit in with the existing rules without requiring a massive re-write.
I came up with the idea that the aggregated dice score should determine the outcome of the close combat for exactly the reasons that you have identified. It is quite possible for the 'winner' of a close combat to suffer more casualties than the 'loser' ... and there are quite a few historical examples where that has happened.
I agree with you that if one is using individual figure removal to track a unit's Strength Points, the aesthetic side of wargaming demands that units need to keep some sort of 'core' that is only removed when the the whole unit is destroyed. I hope to go down that route - or to use 'on base' strength markers as per Megablitz - when I move away from just play-testing the rules.
All the best,
Bob
I finally had a good look at the I-and-S rule set and the play test. Very interesting. Of course, small actions like this are apt to be chancy.
ReplyDeleteI couldn't find in the rules themselves what the effect of cover was - e.g. reduction in dice rolled, and/or range. I infer that it reduced the dice rolled by one.
Some other points you might want to consider.
1. Tying Dice rolled to a unit's SP - reducing by 1 per SP lost. A unit reduced to SP 1 must retreat. If assaulted again and survives, it is automatically pushed back.
2.When the 'phasing' player initiates a combat, the defender fights back simultaneously if it can.
3.If a unit is shot at or assaulted by more than one attacker, it still rolls only the once, but can apply any and all effective outcomes to whichever opponent is appropriate.
Example: Suppose 1st W. Va is attacked/shot at at once by 2nd Ga, 3rd Tx Cav and the 4th La Arty, all at 2 square range.
2nd Ga rolls 4 dice: 6,6,3,2
3rd Tx Cav: 6,2,2,1.
4th La Bty: 4,3,2,1.
As the target is infantry, only 2nd Ga inflicts a loss.
At the same time, 1st W. Va is fighting back and rolls a miracle roll: 5,5,2,2.
Outcome therefore:
1st W.Va loses a SP;
2nd Ga loses a SP;
3rd Tx Cav loses a SP.
[2.a.] In the CSA turn (if it does go next, bearing in mind one can get two moves in a row) as the initiator of attack he can select one opponent, and only that one can 'fight back'.
It will be interesting to see what a large scale game would look like.
Before I go; a Sheldon Cooper moment. The chessboard should be set up such that the bottom right hand square is light coloured. Then your masking tape bend will result in your board being 'chequey argent and sable, a bend (dexter) argent'. Just being pedantic, you understand...
Archduke Piccolo,
ReplyDeleteThanks for the detailed feedback and ideas.
Cover is taken into account in the combat results in the rules, wherein a unit in cover must suffer the correct double and another other double to lose a Strength Point.
I had considered reducing a unit's dice throws by the number of Stength Point's lost, but rejected it because it reduced the range at which Artillery could fire.
I am definitely going to allow units to 'fight back/battle back' when attacked by adjacent enemy units ... and I am planning to allow them to do this against every such attack that may occur during a turn.
Luckily I understood enough of the heraldry terminology to know what you mean ... and that what you state would be the correct way to do it. My only plea in mitigation is that I was in a rush!
All the best,
Bob
Of course: I read that 'second double' thing, then forgot about it when looking for how you deal with cover. Doh! I'm so easily confused...
ReplyDeleteI did wonder about doing artillery a bit differently - more as an augment to the other arms that as a fighting unit in itself.
Before going into my reasoning, I appreciate that although we are reading the dice the same way, our respective game mechanics are very different (and yours has developed a lot further than mine). As I understand it, each unit's combat is handled separately, even when directed at the same target.
The bigger the numbers rolled, the more likely the doubles that will come up. That comes out very well in the effect by range of the various troop types. But suppose they were allowed to accumulate?
There are two possibilities I have in mind. (1) Give the guns a lower fire factor but allowed them to be added to one friendly unit's shooting or close assault.
(2) Combine the factors of all arms directed at the one target. There would have to be some restrictions on the latter at least, to prevent unrealistic concentrations of fire whilst ignoring other relevant targets.
I prefer option (1) myself. As I have a suitable chessboard of my own, I think I might try a few playtests myself... :-)
Archduke Piccolo,
ReplyDeleteIt is interesting to compare our two different approaches to using the same basic mechanism.
Mine is to see it as a way to resolve tactical combat whereas yours is closer to a strategic-level of resolution (i.e. with one figure = one unit = one regiment). Looked at from your perspective, your suggestions make a lot of sense ... and I will be interested to see how you use them in any play-tests that you might stage.
All the best,
Bob