Having seen the effects of Infantry charging guns that were behind fixed defences, I decided to set up a scenario in which I could deploy Cavalry. For some reason, I gravitated towards a situation that was Crimean in origin rather than American, hence the similarity to the events of the 'Charge of the Light Brigade' at Balaclava.
Note: I decided to experiment with a pack of tactical ‘chance cards’ that I had designed, but 'forgot' to use them after the second turn as I got too engrossed in the action. I will probably not use them again.
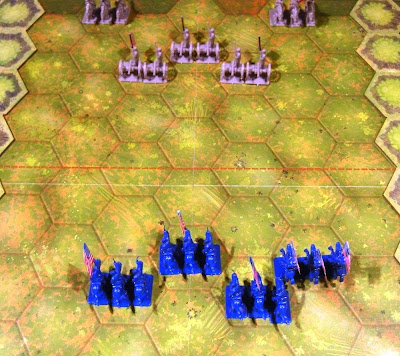
Scenario
A Union force of four Cavalry units (including one made up of generals because I only had nine Union Cavalry figures!) was given the task of taking three Confederate Artillery units that were drawn up at the end of a valley. The Confederate Artillery was supported by two units of Confederate Cavalry.
 Turn 1
The Union Cavalry moved up the valley towards the Confederate position, but initially remained out of range.
 Turn 2
The Union troops continued to move forward, but they were now in range of the Confederate guns, which opened fire.
 The right-hand Confederate Artillery fired at the right-hand Union Cavalry units, and killed one figure as well as forcing the one of the Cavalry units to retreat one hex. (This was as a result of a 'chance card' being drawn that allowed a battery to fire twice in one turn.) The centre Confederate Artillery unit fired at the Union Cavalry unit that was opposite it, and the latter emerged unscathed, unlike the left-hand Cavalry unit that lost a figure to artillery fire from the left-hand Artillery unit.
 Turn 3
The next move brought the Union Cavalry up to the Confederate guns, and the right-hand Cavalry unit engaged the right-hand Confederate Artillery unit. It was so effective that it destroyed one of the Artillery unit's two guns.
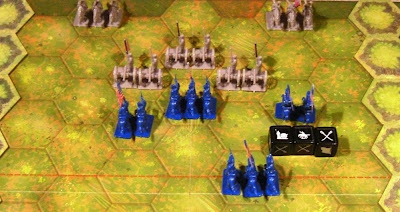 The centre Union Cavalry unit fought hand-to-hand with the Confederate Artillery unit that was opposite it, and it also managed to destroy a Confederate gun.
 The left-hand Cavalry unit was less successful, and made no headway against the left-hand Confederate Artillery unit.
 It was now the Confederate's turn to fire back, and the right-hand Artillery unit inflicted a casualty on the right-hand Union Cavalry unit as well as forcing it to retire one hex.
 The centre Confederate Artillery unit fire at the Union Cavalry unit in front of it, and it also lost a figure and had to withdraw one hex.
 The left-hand Artillery unit fired at the Union troops to their front, and wiped the unit out.
 Turn 4
The Union troops continued to press forward, and the right-hand Cavalry unit destroyed the remains of the right-hand Confederate Artillery unit.
 The Cavalry unit that was now the leftmost Union unit was equally successful in its fight with what had been the central Confederate Artillery unit, and the loss of the second Artillery unit seemed to place the entire Confederate position in jeopardy.
 Despite this, the Confederates were not yet beaten, and the last remaining Artillery unit fired back with deadly effect, wiping out the left-hand Union Cavalry unit.
 The right-hand Confederate Cavalry unit now charged the right-hand Union Cavalry unit ... and swept it into oblivion.
 The left-hand Confederate Cavalry unit followed this example, and charged to last remaining Union Cavalry unit, and inflicted a casualty upon it.
 Turn 5
The Union Cavalry engaged their attackers with vigour, and inflicted two casualties on the Confederate unit opposite it.
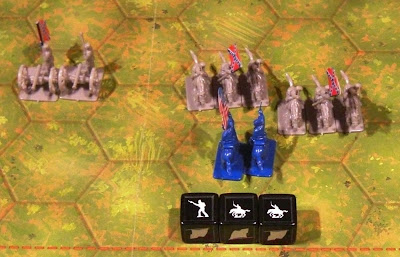 The Confederate Artillery swung round and fired at the Union Cavalry unit ... and missed!
 It was then the turn of the Confederate Cavalry to engage their opponents in hand-to-hand combat. The right-hand Confederate unit killed one figure ...
 ... and the last surviving figure in the Union unit was killed by the second Confederate Cavalry unit.
The battle was over. The Union force had been wiped out, but the Confederates had lost two Artillery units and their Cavalry was somewhat depleted.
 Conclusion
This play-test produced a reasonably realistic and historical result, something that may surprise some people. It was great fun to fight, and it gave me the opportunity to try out the idea of tactical 'chance cards' in a game. The fact that I 'forgot' to use them indicates that they are probably not necessary, but I still have them should I wish to use them again in the future.
Note: I decided to experiment with a pack of tactical ‘chance cards’ that I had designed, but 'forgot' to use them after the second turn as I got too engrossed in the action. I will probably not use them again.
Scenario
A Union force of four Cavalry units (including one made up of generals because I only had nine Union Cavalry figures!) was given the task of taking three Confederate Artillery units that were drawn up at the end of a valley. The Confederate Artillery was supported by two units of Confederate Cavalry.
 Turn 1
The Union Cavalry moved up the valley towards the Confederate position, but initially remained out of range.
 Turn 2
The Union troops continued to move forward, but they were now in range of the Confederate guns, which opened fire.
 The right-hand Confederate Artillery fired at the right-hand Union Cavalry units, and killed one figure as well as forcing the one of the Cavalry units to retreat one hex. (This was as a result of a 'chance card' being drawn that allowed a battery to fire twice in one turn.) The centre Confederate Artillery unit fired at the Union Cavalry unit that was opposite it, and the latter emerged unscathed, unlike the left-hand Cavalry unit that lost a figure to artillery fire from the left-hand Artillery unit.
 Turn 3
The next move brought the Union Cavalry up to the Confederate guns, and the right-hand Cavalry unit engaged the right-hand Confederate Artillery unit. It was so effective that it destroyed one of the Artillery unit's two guns.
 The centre Union Cavalry unit fought hand-to-hand with the Confederate Artillery unit that was opposite it, and it also managed to destroy a Confederate gun.
 The left-hand Cavalry unit was less successful, and made no headway against the left-hand Confederate Artillery unit.
 It was now the Confederate's turn to fire back, and the right-hand Artillery unit inflicted a casualty on the right-hand Union Cavalry unit as well as forcing it to retire one hex.
 The centre Confederate Artillery unit fire at the Union Cavalry unit in front of it, and it also lost a figure and had to withdraw one hex.
 The left-hand Artillery unit fired at the Union troops to their front, and wiped the unit out.
 Turn 4
The Union troops continued to press forward, and the right-hand Cavalry unit destroyed the remains of the right-hand Confederate Artillery unit.
 The Cavalry unit that was now the leftmost Union unit was equally successful in its fight with what had been the central Confederate Artillery unit, and the loss of the second Artillery unit seemed to place the entire Confederate position in jeopardy.
 Despite this, the Confederates were not yet beaten, and the last remaining Artillery unit fired back with deadly effect, wiping out the left-hand Union Cavalry unit.
 The right-hand Confederate Cavalry unit now charged the right-hand Union Cavalry unit ... and swept it into oblivion.
 The left-hand Confederate Cavalry unit followed this example, and charged to last remaining Union Cavalry unit, and inflicted a casualty upon it.
 Turn 5
The Union Cavalry engaged their attackers with vigour, and inflicted two casualties on the Confederate unit opposite it.
 The Confederate Artillery swung round and fired at the Union Cavalry unit ... and missed!
 It was then the turn of the Confederate Cavalry to engage their opponents in hand-to-hand combat. The right-hand Confederate unit killed one figure ...
 ... and the last surviving figure in the Union unit was killed by the second Confederate Cavalry unit.
The battle was over. The Union force had been wiped out, but the Confederates had lost two Artillery units and their Cavalry was somewhat depleted.
 Conclusion
This play-test produced a reasonably realistic and historical result, something that may surprise some people. It was great fun to fight, and it gave me the opportunity to try out the idea of tactical 'chance cards' in a game. The fact that I 'forgot' to use them indicates that they are probably not necessary, but I still have them should I wish to use them again in the future.


Another good report Bob, you are saving me a lot of playtest time.
ReplyDeleteI can get more painting done that way!
Can you tell us more about your tactical 'chance' cards?
Jim
I second that - even if you ended up 'forgetting' them!
ReplyDeleteJim Duncan,
ReplyDeleteIf I get a chance (no joke intended!) I will try to write a blog entry about them later this week.
All the best,
Bob
Interesting set of test games. I'm not surprised to hear that a simple set of result oriented rules gives a reasonable result though.
ReplyDeleteArthur1815,
ReplyDeleteMy most recent blog entry gives some information about my tactical 'chance cards'.
All the best,
Bob
Ross Mac,
ReplyDeleteThe play-test battles were enjoyable to set up and fight through, and by using scenarios that were based on historical events, it me some sort of yardstick to judge how good (or not) the basic rule mechanisms are.
All the best,
Bob
I love reading this blog and especially the reports on hex gaming/playtests. Keep up the great work!
ReplyDeletePaul
Paul Leach,
ReplyDeleteMany thanks for your kind words.
I expect that rules that use hexed (and squared) grids will continue to feature quite heavily in my blog entries for the foreseeable future ... so there should be lots to keep you amused!
All the best,
Bob