Pages

Tuesday 31 March 2015

Nugget 279

The editor of THE NUGGET sent me the draft of the latest issue on Sunday evening, but thanks to some domestic problems (i.e. dealing with the aftermath of a damaged garden fence!) I was not able to print the original copy until this morning. I plan to take it to the printer later today and I should be able to collect it from them on Tuesday of next week. I hope to be able to post it out to members of Wargame Developments on that Tuesday or on the following Wednesday.

This particular issue contains details of the various sessions that will be taking place at COW2015 (this year's annual Conference of Wargamers) in July. It also explains the current situation with regard to booking for COW2015 (i.e. all the residential places have now gone and only non-residential places are now available).

IMPORTANT: Please note that this is the sixth issue of THE NUGGET to be published for the 2014-2015 subscription year, and that members who have not already re-subscribed should do so as soon as possible. This can be done by visiting the relevant page on the Wargame Developments website.

The password to open the online PDF version of THE NUGGET and THE NUGGET COLOUR SUPPLEMENT will be sent by post and email to members when they re-subscribe.

Monday 30 March 2015

When the wind blows ...

... the fencing will rock ... and then fall over!

One of the advantages of living on top of one of the highest points around London is the wonderful view; the downside is the fact that the back of our house is very exposed when the wind blows from the west ... and yesterday afternoon it was hit by very gusty winds and heavy rain.

The sound of the wind and rain was almost deafening in our conservatory, and our garden fence started to sway as the wind gusted around it ... and then – at about 3.30pm – we heard a very loud crack and the top two fence posts of our garden fence snapped off at ground level, taking the top two fence panels with them and damaging a third. Once these fence posts had gone the rest of the fence began to sway even more violently in the wind, and several of the other fence posts and panels looked as if they were also very likely to go as well.

By the time that the weather began to improve it was too dark to see how bad the total damage was. One thing was obvious, however, and that was that the fence will need to be replaced as it is too badly damaged to be repaired.

I have spent this morning removing the damaged part of the fence ... which is now stacked up in our driveway.

Before ...
... and after the damaged part of the fence was removed.
I have already had one quote to replace the existing fence, and it looks as if it is going to cost between £1,000 and £1,200 depending upon the type of replacement posts and fence we choose to have installed.

Expensive business, house ownership!

Sunday 29 March 2015

Looking back

As my work on varnishing and basing my collection of Del Prado pre-painted 25/28mm-scale Napoleonic figures progresses, I have been thinking about the rules I am going to use. As a result I looked back to some battles that I fought in late August and early September 2011 using part of this collection ... and remembered how much fun I had had.

The battles were set in a South American imagi-nation (Cordeguay) in the period after it had gained independence, and were the result of a civil war fought between the President-for-life, General José Santa Maria, and the leader of the Constitutionalists, General Roberto Branco.

The two armies looked like this:

Presidential Army
  • 1st Presidential Guard Infantry
  • 2nd Presidential Guard Infantry
  • Presidential Guard Foot Artillery
  • 1st Cuirassiers
  • 2nd Cuirassiers
  • 3rd Lancers
  • 4th Carabineers
  • 5th Hussars
  • 1st Foot Artillery
  • 2nd Foot Artillery
  • 1st Regular Infantry
  • 2nd Regular Infantry
  • 3rd Regular Infantry
  • 4th Regular Infantry
  • 5th Regular Infantry
  • 6th Militia Infantry
  • 7th Militia Infantry
  • 8th Militia Infantry
  • 9th Militia Infantry
  • 10th Militia Infantry

Constitutional Army
  • English Infantry (British Legion)
  • Scottish Infantry (British Legion)
  • The Rifles (British Legion)
  • British Artillery (British Legion)
  • 1st (Northern) Cavalry
  • 2nd (Northern) Cavalry
  • 3rd (Southern) Cavalry
  • 4th (Southern) Cavalry
  • 1st (Northern) Artillery
  • 2nd (Southern) Artillery
  • 1st (Northern) Infantry
  • 2nd (Northern) Infantry
  • 3rd (Northern) Infantry
  • 4th (Southern) Infantry
  • 5th (Southern) Infantry
  • 6th (Southern) Infantry

The first battle was THE BATTLE OF THE BRIDGE OVER THE RIO BLANCO and involved the following forces:

Presidential Army
  • 3rd Lancers
  • 4th Carabineers
  • 5th Hussars
  • 1st Foot Artillery
  • 1st Regular Infantry
  • 2nd Regular Infantry
  • 6th Militia Infantry
  • 7th Militia Infantry
Constitutionalist Army
  • 3rd (Southern) Cavalry
  • 4th (Southern) Cavalry
  • 2nd (Southern) Artillery
  • 4th (Southern) Infantry
  • 5th (Southern) Infantry
  • 6th (Southern) Infantry
The battlefield.
The battle ended with the Constitutionalists as marginal victors as they were able to capture and cross the bridge before the Presidential Army could stop them, but were unwilling to pursue the retreating Presidential Army troops.

The second battle was THE BATTLE OF THE CHERRO RICO ROAD and involved the following forces:

Presidential Army
  • 1st Presidential Guard Infantry
  • 2nd Presidential Guard Infantry
  • Presidential Guard Foot Artillery
  • 1st Cuirassiers
  • 2nd Cuirassiers
  • 3rd Lancers
  • 4th Carabineers
  • 5th Hussars
  • 1st Foot Artillery
  • 2nd Foot Artillery
  • 1st Regular Infantry
  • 2nd Regular Infantry
  • 3rd Regular Infantry
  • 4th Regular Infantry
  • 5th Regular Infantry
  • 6th Militia Infantry
  • 7th Militia Infantry
  • 8th Militia Infantry
  • 9th Militia Infantry
  • 10th Militia Infantry
Constitutionalist Army
  • English Infantry (British Legion)
  • Scottish Infantry (British Legion)
  • The Rifles (British Legion)
  • British Artillery (British Legion)
  • 1st (Northern) Cavalry
  • 2nd (Northern) Cavalry
  • 3rd (Southern) Cavalry
  • 4th (Southern) Cavalry
  • 1st (Northern) Artillery
  • 2nd (Southern) Artillery
  • 1st (Northern) Infantry
  • 2nd (Northern) Infantry
  • 3rd (Northern) Infantry
  • 4th (Southern) Infantry
  • 5th (Southern) Infantry
  • 6th (Southern) Infantry
The battlefield.
This battle resulted in a much more convincing win for the Constitutionalists, but the actual result of the civil war was not known.

The rules that I used to fight these battles were a lashed-together amalgam of Joseph Morschauser's 'Musket' and 'Frontier' wargames rules ... and in retrospect they were fun to use even though the results were a bit extreme at times.

Saturday 28 March 2015

Some more King's German Legion/Hanoverian troops

Another auction 'win' on eBay enabled me to add eight additional King's German Legion/Hanoverian figures to my collection of Del Prado pre-painted 25/28mm-scale Napoleonic figures. I already had almost enough 'spares' to varnish and base two additional bases of these figures, and the extra figures that I 'won' enabled me to increase the number of new bases to four.


I am now thinking of moving on to varnishing and basing the British figures in my collection, and with a bit of luck that should be completed by the end of April, leaving me May and early June to do the French figures.

Thursday 26 March 2015

The Battle of Riachuelo

After writing yesterday’s blog entry about the ARMIES OF THE WAR OF THE TRIPLE ALLIANCE 1864-70, I remembered writing a blog entry a year ago (3rd March 2014 to be precise) about William Eugene Warner's WARSHIPS AT THE BATTLE OF RIACHUELO. The book was written back in 2008 (ISBN 9781456314682) and can still be printed to order by Amazon UK.


The book describes the ships used by the two main opposing naval ‘powers’ – Paraguay and Brazil – and particularly those that saw action during the Battle of Riachuelo, the main naval battle of the war. Each ship is covered in a reasonable amount of detail, and each entry has a plan and side view of the ship in question.

If any of my regular blog readers is interested in re-fighting the War of the Triple Alliance, this book about the naval aspects of the war is worth buying, even though – for a paperback – it is not very cheap.

Wednesday 25 March 2015

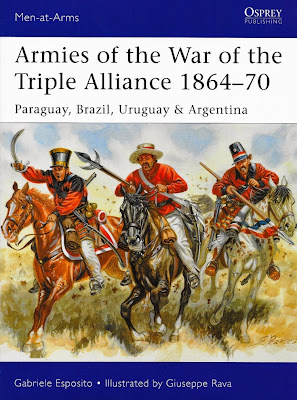
Armies of the War of the Triple Alliance 1864-70

The War of the Triple Alliance was the bloodiest war fought in South America. Over the course of six years Brazil, Argentina, and Uruguay fought against Paraguay, with the result that the latter's population was reduced by nearly 70% from 450,000 (pre-war) to 160,000.

Osprey Publishing has recently published a book about the war – ARMIES OF THE WAR OF THE TRIPLE ALLIANCE 1864-70 – written by Gabriele Esposito and illustrated by Giuseppe Rava ('Men-at-Arms' series No.499 [ISBN 978 1 4728 0725 0]).


As will be obvious from the illustrations on the cover of this book, the war took place at a time when uniforms styles were changing. Some of the uniforms harked back to the days of Napoleon (e.g. bell-topped shakos, turn-backed coatees) whilst others would not have looked out of place during the American Civil War and the Franco-German War (e.g. low kepis and tunics). This was also a war where both sides used steam-powered warships, including some rudimentary ironclads.

Looking through the book I was struck by how relatively quick and easy it would be to put together some very colourful small wargames armies for this war ... and how it would make an excellent basis for a mini-campaign! It will certainly be something for me to think about as I continue to varnish and base my collection of Napoleonic figures.

Tuesday 24 March 2015

Colonial armies

David Crook recently asked me to give him some sort of idea what multi-figure based colonial armies I had available to use with my 6 hex x 8 hex wargames board ... so here they are!

British


These figures have done service as British and Britannic army troops, and comprise:
  • 8 battalions of infantry (8 x 2 x 3 figure bases = 48 figures)
  • 1 battery of machine guns (1 x 1 x 2 figure bases = 2 figures + 1 Gatling Gun)
  • 2 batteries of artillery (2 x 1 x 2 figure bases = 4 figures + 2 Field Guns)
  • 3 transport columns (3 x 1 x 1 figure + 1 mule per base = 3 figures + 3 mules)
Egyptian


These figures have done service as Egyptian, Fezian, and Zubian regular army troops, and comprise:
  • 8 battalions of infantry (4 each of Egyptian and Sudanese) (8 x 2 x 3 figure bases = 48 figures)
  • 2.5 regiments of cavalry (2.5 x 2 x 2 figure bases = 10 figures)
  • 1 battery of machine guns (1 x 1 x 2 figure bases = 2 figures + 1 Gatling Gun)
  • 1 battery of artillery (1 x 1 x 2 figure bases = 2 figures + 1 Field Gun)
  • 3 transport columns (3 x 1 x 1 figure + 1 mule per base = 3 figures + 3 mules)
Mahdist


These figures have done service as Mahdists as well as Fezian and Zubian irregular troops, and comprise:
  • 20 units of spear-armed infantry (20 x 2 x 3 figure bases = 120 figures)
  • 7 units of musket-armed infantry (7 x 2 x 3 figure bases = 42 figures)
  • 4 units of cavalry (4 x 2 x 2 figure bases = 16 figures)
  • 3 units of camelry (3 x 2 x 2 figure bases = 12 figures)
  • 2 batteries of artillery (2 x 1 x 2 figure bases = 4 figures + 2 Field Guns)

Monday 23 March 2015

A few Prussians more

My recent visit to the Skirmish Toy Soldier and Wargames Show enabled me to buy enough additional Prussian Del Prado pre-painted Napoleonic 25/28mm-scale figures to add three more bases to my Prussian army.


My Prussian army now comprises:
  • 26 x 3 figure infantry bases (= 78 figures/13 units)
  • 6 x 2 figure cavalry bases (= 12 figures/3 units)
  • 5 x 2 figure artillery bases (= 10 figures/5 units)
  • 7 x 1 figure officer bases (= 7 figures)

Sunday 22 March 2015

Trouble in Zubia: A colonial mini-campaign

Zubia was a semi-autonomous part of Fezia. In fact the Khedive of Zubia barely acknowledged allegiance to the Sultan of Fezia, and had – over the years – acted as an independent ruler. Each year the Zubians paid a nominal amount of tax income to the Sultan, but the majority of the taxes collected went into the Khedive’s treasury.

A map of Zubia.
Over recent years the Khedive had expanded and modernised his armed forces, and although the majority of the troops who would serve in time of war were untrained irregular militia, there were a number of well-trained and well-equipped (by Fezian standards) regular units available.

The recent death of the former Khedive had caused some unrest in Zubia, and although the former Khedive’s son had taken his father’s place as ruler, the real power in Zubia lay with the leadership of the army … whose head was General Ali Nasir. General Nasir was a Zubian nationalist, and wanted to break all ties with Fezia. He was aware – however – that this would be unpopular with the foreign nations who wished to use Fezia as a bulwark against Rusland and from whom the former Khedive had borrowed considerable amounts of money.

An increase in grain prices had exacerbated the situation in Zubia, and anti-foreign riots had broken out in various towns and cities. The worst atrocities occurred in the city of Secundria, where over fifty foreigners were killed and their houses and businesses were looted and burned to the ground. In the aftermath of this a number of warships of the Royal Britannic Navy arrived offshore at Secundria and demanded that the local Governor arrest, try, and hang the perpetrators of this outrage. After sending the commander of the Britannic ships – Admiral Charles Benlow – a polite but negative reply, the Governor – acting upon orders from General Nasir – began work on extending and improving his city’s defences.

The coast of Zubia and the delta of the River Zub.

The bombardment of Secundria
The Britannic Navy's battleship HBMS Empress and cruiser HBMS Furious anchored off the coast of Secundria in Zubia. After receiving the message from the Governor of Secundria, Admiral Benlow kept his ships close enough to land to be able to send men ashore should the need arise. However when it became obvious that the Zubians were extending and improving the city’s coastal defences, he contacted the Britannic Admiralty and asked permission to use all reasonable force to remove this threat to his ships. When approval was forthcoming, Admiral Benlow set preparations for a shore bombardment – and possible landing – in motion.

HBMS Empress.
HBMS Furious.
The arrival offshore of several troopships carrying a brigade of the Britannic Army – led by General Horace Willingham – was the signal for Admiral Benlow to take action. He sent an emissary ashore to warn the Governor of Secundria that unless the coastal fortifications of the city were rendered inoperable, he would have no alternative but to take action to destroy them. His messenger was treated politely, but was left in no doubt that the Zubians had not intention of doing what they had been asked to do.

As soon as the messenger returned aboard the Empress, Admiral Benlow issued orders the captains of Empress and Furious to begin bombarding Secundria’s forts at sunrise the next day.


Secundria just after sunrise.
The bombardment was sustained for most of the day. HBMS Empress concentrated her fire on the Lighthouse Fort ...


... whilst HMBS Furious engaged the smaller of the two forts.


The Zubian gunners fought well but gradually they were overwhelmed and their guns fell silent.


The two Britannic warships then turned their attention – and their guns – onto the Zubian infantry who were defending the waterfront trenches ...


... and after they had sustained serious casualties they withdrew.

The way was then open for the Britannic Army brigade to land and secure Secundria.


The advance on Zubairo
Having secured Secundria and left a small garrison behind, General Horace Willingham marched his brigade towards the Zubian capital, Zubairo.

The desert inland from the delta of the River Zub was made up of salt plain, sand and rocky outcrops, and the brigade made fast progress towards Zubairo. Nearly halfway to Zubairo the column had to pass near to the 'Kings of the Desert', a pair of large rocks, and it was here that they were attacked by a detachment of hastily raised Zubian militia, supported by mounted desert dwellers.

The Kings of the Desert.
The Britannic brigade on the march.
The attack upon the Britannic brigade came from two directions. The Zubian militia infantry attacked from the flank and the mounted desert dwellers from the front.


The two leading Britannic infantry battalions formed square to meet the charge by the mounted desert dwellers whilst the other two battalions and the artillery swung around to engage the oncoming Zubian militia infantry.


The two Britannic infantry squares easily repulsed the mounted desert dwellers, but the sheer number of Zubian militia infantry was too much for the Britannic artillery and the foremost of the other pair of Britannic infantry battalions.


The Britannic artillery was swept away and the gunners were all slain, and the Britannic infantry battalion that had been engaged in hand-to-hand combat was pushed back. One of the Britannic infantry squares also came under attack, and although it suffered some casualties it repulsed its attackers.


At this point all the Britannic infantry battalions formed square and the Zubians threatened to attack again ... but did not.


General Willingham realised that his advance had stalled, and that without further reinforcements he stood little chance of capturing Zubairo even if his troops were able to reach the Zubian capital. He therefore withdrew to Secundria, where he requested additional troops be sent to reinforce his small army.

The advance from Port Zub
With the reinforcements came a new commander, General William Hooke. His appreciation of the situation was that the quickest way to resolve the problems in Zubia was to land troops at Port Zub and advance upon Zubairo with the tributary of the River Zub on his right flank. From Port Zub to Zubairo the river was wide enough for warships to escort his army and to keep them supplied. It was also a much shorter distance to march even though it was a much more densely populated area.

Port Zub was undefended and was swiftly occupied by sailors of the Britannic Navy. General Hooke's division landed and began to march inland, and reached Zigazag before encountering any opposition. Just outside the town the Zubians had built a line of trenches that stretched from the River Zub to the Zigazag Marshes.

The Zigazag trenches.
This left General Hooke with three choices:
  1. He could retreat back to Port Zub and try a different overland route. (This was totally unacceptable to General Hooke and choosing this option would have guaranteed his early retirement.)
  2. He could march inland and go around the marsh area. (This would remove the support the Britannic Navy was able to give and lengthen the supply route the advancing troops would have to rely upon. It would also leave the latter open to attack by the Zubians.)
  3. He could mount an all out attack at once in the hope of dislodging the Zubians before they were able to strengthen the defence line even further.
General Hooke chose the latter option, and at first light next day the attack began.

Thanks to the efforts of Admiral Benlow and the commanding officer of HBMS Furious, the cruiser had managed to sail up the River Zub as far as Zigazag. The attack began with HBMS Furious opening fire on the first line of Zubian trenches ...


... and despite suffering minor damage as a result of Zubian artillery fire, ...


... Furious gunfire caused numerous casualties and forced the Zubian defenders to withdraw.


The Britannic troops advanced and occupied the vacant trenches, ...


... and with Furious's guns and their own artillery providing fire support, they attacked the second line of Zubian trenches.


The commander of the Zubian troops at Zigazag realised that the situation was lost, and ordered his men to surrender.

Now that the bulk of the Zubian Army had been killed or captured, General Nasir had lost his power over the Khedive, and the latter sent members of his bodyguard to arrest General Nasir. The General had guessed what was likely to happen, and had sought – and been granted – refuge in the Gallian Embassy.

Having regained power, the Khedive sent diplomatic messages to both the Fezian and Britannic government requesting aid in restoring order in Zubia. Both countries agreed to this request and within months a newly-formed Zubian Army was recruited and being trained by officers and NCOs seconded from the Britannic Army. As for General Nasir ... well he proved to be a growing inconvenience for the Gallian Government, and his untimely death from eating a surfeit of oysters was regarded as a blessing in disguise for all concerned.

Saturday 21 March 2015

More Brunswickers and Dutch-Belgians

Just before my recent self-imposed buying 'holiday' (which has already gone by the board!) I 'won' an auction for a batch of mixed figures that included some more Brunswickers and Dutch-Belgian infantry. These – together with some 'spares' that I already had – were sufficient for me to add two more bases each of Brunswickers and Dutch-Belgian infantry.

Brunswick and Dutch-Belgian infantry

Friday 20 March 2015

Eclipse

For the first time since the beginning of the current millennium, parts of the UK experienced a partial solar eclipse. What made this even more interesting was that today is the Spring Equinox and the Moon is at its closest point to Earth.

I took photographs every fifteen minutes, starting at 8.45am ... when there was no sign of the Sun thanks to very low cloud.


9.00am ... and still lots of low cloud and no sign of the Sun!


9.15am ... and it is getting very slightly darker!


9.30am ... and the partial eclipse is at its height ... but still not a lot to see!


9.45am ... and the sky is getting lighter again ... just!


So this was the partial eclipse as seen from South East London ... and it was a bit of a washout!

Thursday 19 March 2015

Miniature Wargames with Battlegames Issue 384

The April issue of MINIATURE WARGAMES WITH BATTLEGAMES magazine arrived in the post yesterday afternoon, and from what I have read so far, it is another excellent issue. (I seem to say this every month, but this magazine does seem to maintain a very high level of readable and informative articles.)


The articles included in this issue are:
  • Briefing (i.e. the editorial) by Henry Hyde
  • World Wide Wargaming by Henry Hyde
  • Forward observer by Neil Shuck
  • Whistle while you wattle: The continuing tales of a wargames widow by Diane Sutherland
  • Fantasy Facts by John Treadaway
  • The march on Madrid: Gaming the Spanish Civil War: Part 1 by Andrew Rolph
  • Salute 2015 Official Show Guide
    • Welcome to Salute 2015 by Phil Portway
    • Sculpting the longbowman: How the Salute 2015 show figure was created by Alan Perry
    • The longbow: A stick that changed the course of history by David Barnes
    • The bowmen of England: The product of a nation organised for war by Alan Patrick
    • Salute 2014 painting competition
    • Salute 2015 Games
    • Salute 2015 Floor Plan
    • Salute 2015 Traders
    • Singray: Anything can happen in the next half hour by John Treadaway
    • Warlord memorabilia: Figures, mugs and other stuff produced by SLW by Stephen Dunn
    • The Battle of Araure: Simon Bolivar victorious in South America by Ian Spence, Des Darkin, and Martin Gane
  • Send three and fourpence by Conrad Kinch
  • Gravelines: Wargaming with Vauban fortresses: part 5 by Henry Hyde
  • Quick play the WRG way: Scouting out the new versions of DBA and HOTT by Dan Mersey
  • Hex encounter by Brad Harmer
  • Recce
  • The Battlegames Combat Stress Appeal report by Henry Hyde
I particularly liked:
  • Andrew Rolph's The march on Madrid ... which is not surprising considering my long-term interest in the Spanish Civil War
  • Ian Spence, Des Darkin, and Martin Gane's The Battle of Araure because the South American Wars of Liberation have always interest me
  • Dan Mersey's Quick play the WRG way because I have always thought that DBA and HOTT really helped wargamers understand that you don't need a huge table and thousands of figures to enjoy the hobby of wargaming.

Wednesday 18 March 2015

Brothers in Arms and Brothers in the Lodge revisited

Yesterday I travelled over to Cheshunt to deliver a talk based upon my book BROTHERS IN ARMS AND BROTHERS IN THE LODGE: THE STORY OF THE MEMBERS OF THE GROVE PARK LODGE (No. 2732) WHO SERVED DURING THE FIRST WORLD WAR (ISBN 978 1 291 98955 7*) to the Phocas Lodge (No.9295).


As the original version of this talk was specifically written to be delivered to a meeting of The Grove Park Lodge, I revised the text so that it would place greater emphasis on the impact of the First World War upon Freemasonry, using what happened in The Grove Park Lodge as an example.

I began by giving a brief history of the events that lead up to the outbreak of the war, and then outlined the history of The Grove Park Lodge between 1914 and 1919. I placed special emphasis on how the Lodge reacted to certain events such as the banning of Masons who were born in one of the Central Powers from participating in any Masonic activities during the war, and the death of Field Marshall the Lord Kitchener, a prominent Freemason. I then talked about what happened to the individual members of The Grove Park Lodge who served during the First World War.

The members of the Phocas Lodge and their guests were very welcoming, and expressed extremely appreciative comments about my talk. After the meeting, the Lodge very generously gave me a cheque for £50.00 which was made out to the charity of my choice, the Royal Masonic Trust for Girls and Boys. They also gave me a set of cuff links which were made to commemorate the 25th anniversary of the Phocas Lodge's founding in 1988. This was most unexpected, and I look forward to wearing them at the earliest opportunity.


I always enjoy visiting other Masonic Lodges, and I hope to be invited back to this one at some time in the near future.

* The book costs £5.00 and is available for sale from Lulu and Amazon. The profits from all sales of the book are being donated to the Royal Masonic Trust for Girls and Boys, a charity funded by Freemasons 'to relieve poverty and advance education for children and young people'.