Pages

Showing posts with label Painting. Show all posts

Monday, 28 July 2014

Little Wars: My 'Danish' Royal Life Guards

A LITTLE WARS session had been planned for COW2014, but unfortunately it was cancelled. This was a pity as I had decided just beforehand to 'recruit' a new unit for my 54mm-scale collection. The figures were old plastic British Guardsmen that I had been given, and I decided that with new mid blue trousers and white belts they would look rather like the Danish Royal Life Guard Regiment (Den Kongelige Livgarde) in their full-dress ceremonial uniform.

The real Danish Royal Life Guards look like this:


My toy soldier versions look like this:


Not 100% accurate ... but good enough for my wargaming needs!

Friday, 27 June 2014

Painting Figures: Another experiment

I decided to have another go at painting a wargames figure ... and this time I chose a 20mm-scale World War 2 one for my experiment.

I used almost exactly the same method as I used for my recently-painted Jacklex figures ... and the result looked like this:


The Nut Brown Indian Ink does add shadowing ... but I think that the darkening effect is too great. As a result I think that I may well miss that stage of the process out when I paint my next figures.

(Note: Most of the paints I used on this figure were craft acrylic paints bought in a local craft shop. I found them to be just as easy to use as specialist modelling acrylic paints ... but they were a LOT cheaper!)

Wednesday, 25 June 2014

Painting Jacklex figures: Day 7

The figures were then given a coat of Humbrol Gloss polyurethane varnish. I prefer this finish as it both protects the figures and makes them look like toy soldiers … which is – after all – what they are!


I had not used this painting process for a very long time, and I have re-learnt some useful lessons. Using Nut Brown India Ink is a quick and simple way to shade a figure … but the colours used to paint the figures have to be lighter and the detail more pronounced in order for the full effect not to be lost.

Tuesday, 24 June 2014

Painting Jacklex figures: Day 6

At this point the figures looked a bit of a mess … and I nearly stopped the process then and there. (My choice of colours had tended to be similar is shade if not in colour, and the ‘inking’ had made the figures look almost monochromatic.) In the end I decided to finish them to see what they would look like.

The base of each figure was then painted. I used Yellow Ochre as I think that it looks better on the tabletop.

Monday, 23 June 2014

Painting Jacklex figures: Day 5

At this point the figures were painted … but lacked any shading or detail. In order to achieve this quickly and easily I painted the whole figure with Windsor & Newton Nut Brown Indian Ink.

The ink was allowed to run into the undercuts etc. on the figures, and any surplus ink was removed using a brush that was regularly wiped clean.


I then let the ink dry overnight. (N.B. This is very important as the ink has to be absolutely dry before the next stage of the painting process can take place.)

Sunday, 22 June 2014

Painting Jacklex figures: Day 4

I continued painting on the details. The order I did this in was as follows:
  • Brown boots
  • Red point on top of the turban
  • Red or Green shoulder straps (four figures had red and four had green)

I then let the paint dry overnight.

Saturday, 21 June 2014

Painting Jacklex figures: Day 3

Once the undercoat was fully dry, I gave the figures a thin coat of Citadel Zandri Dust matt acrylic paint.


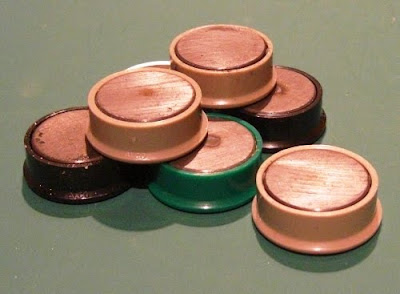
I then put each figure onto a display magnet. (These are sold in packs in large office supply stores and stationers.) I use display magnets because they are easy to get hold of when I am painting … and the figures don’t move around on them thanks to the steel pennies I have based each figure on.


I then began the process of painting on the details. The order I did this in was as follows:
  • Brown belts, water bottle, and bayonet scabbard
  • White haversack
  • Dark brown rifle and sling
  • Brown face and hands (in retrospect I realise that I should have used lighter shade of brown for the skin areas)

I then let the paint dry overnight.

Friday, 20 June 2014

Painting Jacklex figures: Day 2

Once the primer was fully dry, I undercoated the figures using Humbrol matt white enamel paint.

Thursday, 19 June 2014

Painting Jacklex figures: Day 1

I recently found some old, unpainted Jacklex 20mm-scale figures … and decided that they needed painting!

Now I am no great shakes as a figure painter (my figures often look like they have been painted by a gorilla with a 6-inch brush!), and have not painted any figures from scratch for a very long time. I decided, therefore, to see if I could make a reasonable job of these simple figures using a technique that I used many years ago … and the following blog entries will describe my progress.

The first step was to clean the casting up using emery paper and modelling files. As the bayonets were either badly bent or broken, I removed them. I then washed the figures to clean off any dirt, and once they were dry I superglued them to steel pennies.

I then primed them using a brush and Humbrol matt black enamel paint.

Wednesday, 13 January 2010

NOBO magnets and steel figure bases

I have never, ever mastered the art of painting figures that were stuck on multi-figure bases before being painted. I was always unable to get my brushes into all the little nooks and crannies that needed painting, with the result that the figures looked rather poorly painted.

Until now the only method that I have been happy to use has involved mounting each figure on a large, temporary base that I could hold whilst I painted the figure. When the figure had been painted and varnished, I then removed it from its temporary base and fixed it to its permanent base.

NOBO 30mm diameter display board magnets.
One of the benefits of using steel washers (or coins) for basing figures is that you can use NOBO 30mm diameter display board magnets to hold them whilst you paint the figures. These magnets are easy to grasp, and the figure (and base) can be removed after painting by just sliding them off. I have about twenty of these magnets – which is the average size of a batch of figures that I would normally paint – and I am looking forward to using them in the very near future.

A painted and based 15mm scale Essex Miniatures US Army officer on a NOBO 30mm diameter display board magnet. This figure gives some idea of the size of the magnet.

Sunday, 16 November 2008

Trying a new method of painting figures - more images

The images on my previous entry were a bit too sepia in colour due to my use of artificial lighting, so I have replaced them with photographs taken using natural light. At the same time I took individual front and back photos of each of the figure poses.

Saturday, 15 November 2008

Trying a new method of painting figures - the results

As promised, here are some pictures of my newly-painted World War II US Army figures. They are 15mm scale figures manufactured by Essex Miniatures.

I think that they are of a reasonable wargames standard, and I will persist with this 'new' method for the time being. The next figures will be 20mm and the undercoat will be light grey and not white as I think that this will work better with the slightly larger figures.

Thursday, 13 November 2008

Trying a new method of painting figures

Because of the problems I had with the model aircraft I had intended to paint for the Lauranian Air Force I was left without a short-tem wargames project to work on. I therefore decided to try out a painting technique I have not used before.

Basically the technique involves undercoating the figure with white paint, then washing the figure with the basic topcoat colour, picking out the detail, and then giving the figure a coat of ink (in this case GW's Sepia Ink).

I tried the technique on some 15mm World War II American figures and I must admit that they don't look too bad. The wash means that the figures are not too dark - a common problem with smaller figures - and the ink picks out the detail that the wash has missed. It also covers over some of the painting inaccuracies that are due to my lack of skill and basic clumsiness.

I am now basing the figures, and when they are finished I hope to add some pictures of them to this blog.