Pages

Wednesday 31 August 2022

Nugget 346

The editor of THE NUGGET sent me the latest issue over the Bank Holiday weekend, and I sent it to the printer yesterday morning. With luck, it should be ready to be posted out to members by the end of this week.

IMPORTANT: Please note that this is the first issue of THE NUGGET to be published for the 2022-2023 subscription year. If you have not yet re-subscribed, a reminder was sent to you some time ago. If you wish to re-subscribe using the PayPal option on the relevant page of the website, you can use the existing buttons as the subscription cost has not changed.

Tuesday 30 August 2022

The Franco-Prussian War of 1810: The Battle of the Northern Frontier (Part 2: The southernmost battle)

On Thursday afternoon Professor Gary Sheffield and I were able to fight the second and third battles of this campaign online via Skype. On this occasion he took command of the French (as General Lucas in the first battle and General Dupont in the second battle) and I commanded the Prussians (as General von Kluck in the first battle and General Lettow in the second battle). We used the revised draft of my FP3x3NapPW rules and fought the battle on a 3 x 3 grid of 6-inch squares.


Situation

Two French divisions (1st and Imperial Guard Divisions) had crossed the northern frontier between France and Prussia. They were faced respectively by two Prussian divisions (1st and Guard Divisions).

The southernmost French force was the Imperial Guard Division. It was commanded by General Dupont and comprised:

  • 1st Guard Grenadiers (Elite)
  • 2nd Guard Grenadiers (Elite)
  • 1st Guard Chasseurs (Elite)
  • 2nd Guard Chasseurs (Elite)
  • Guard Horse Artillery (Elite)
  • Guard Lancers (Elite)

The Prussian force was the Guard Division. It was commanded by General Lettow and comprised:

  • 1st Guard Infantry (Elite)
  • 2nd Guard Infantry (Elite)
  • 3rd Guard Infantry (Elite)
  • 4th Guard Infantry (Elite)
  • Guard Artillery (Elite)
  • Guard Dragoons (Elite)

The Terrain

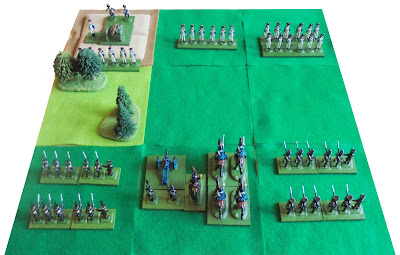
The French Reserve Area was on the left of the map and the Prussian Reserve Area was on the right.


The Battle of the Northern Frontier: The southernmost battle

Initial positions

General Lettow deployed his entire force on the battlefield. In the centre he placed himself alongside the Prussian artillery and cavalry units, and placed two infantry units on either flank.

In response, General Dupont deployed a double-strength column of infantry unit on his left flank, an infantry unit in the centre, and his artillery and a further infantry unit on the hill on his right flank. He kept his remaining troops (a cavalry unit) in the French Reserve Area.

Turn 1

The French attack began with the French artillery unit firing at the foremost right-hand Prussian infantry unit ... which it hit, causing the loss of 1 SP.

The column of French infantry moved forward towards the already-weakened foremost right-hand Prussian infantry unit, whilst the other two French infantry units advanced towards the Prussian positions.

The Prussian artillery unit fired at the French infantry unit directly in front of them, and caused them to lose 1 SP.

This was followed up be the Prussian cavalry unit charging the French infantry unit in the centre ... but they were effectively beaten off with the loss of 1 SP.

The foremost left-hand Prussian infantry unit moved into the wood to fight the French infantry unit that was in there, but they lost the encounter and were forced to fall back.

Turn 2

The French artillery unit fired at the Prussian artillery unit and missed. The column of French Infantry advanced into contact with the weakened foremost right-hand Prussian infantry unit and destroyed it!

In the centre the French infantry unit continued its fight with the Prussian cavalry unit, and was forced to withdraw.

The French infantry unit in the woods fired at the foremost Prussian infantry unit, but their fire was ineffective.

The Prussian cavalry unit withdrew to the Prussian Reserve Area to regroup and recover. This enabled the Prussian artillery unit to fire at the French infantry unit in front of them, but unfortunately they missed.

Turn 3

The Prussian artillery unit fired at the French artillery unit and caused it to lose 1 SP.

The right-hand Prussian infantry unit charged the column of French infantry, and forced them to fall back.

Once again, the foremast Prussian infantry unit attempted to dislodge the French infantry unit in the wood ... and failed yet again and was forced to retreat.

The column of French infantry took the opportunity to regroup and recover before making any further attacks.

The French artillery unit fired at the Prussian artillery unit, with the result that the Prussian artillery unit lost 1 SP and General Lettow was killed!

The French infantry unit in the wood fired at the foremost left-hand Prussian infantry unit, and inflicted the loss of 1 SP.

Turn 4

The French column of infantry charged forward and engaged the right-hand Prussian infantry unit, causing it to lose 1 SP and to fall back into the Prussian Reserve Area.

The French artillery unit fired at the Prussian artillery unit, but missed it.

At this point, the French cavalry unit moved onto the battlefield, and the French infantry unit in the wood fired at the foremost left-hand Prussian infantry unit, but to no effect.

Fearing that the French were about to win the battle, the Prussian cavalry unit charged out of the Prussian Reserve Area and engaged the French column of infantry. Unfortunately, they were already weakened by earlier losses, and were destroyed in the process, leaving the column of French infantry in a position to move into the Prussian Reserve Area once they had regrouped and recovered.

At this point it was obvious that the French had won the battle, and the remains of the leaderless Prussian Guard Division withdrew.

The Prussian position was not good. They had lost a further 10 SPs and had the French had only lost 4 SPs. When combined with losses in the other battle that was fought, the Prussians had lost a total of 18 SPs (the equivalent of an entire division!) whereas the French had only lost 5 SPs.


Afterthoughts

It was obvious that the use of large columns of determine infantry was a battle winner, even when their opponents were Elite troops. As a result, the rules need to be revised slightly to reduce the advantage such columns currently enjoy, but to ensure that when properly combined with artillery and cavalry attacks, they should be able to overcome almost all enemy units they engage in combat.

Monday 29 August 2022

The Franco-Prussian War of 1810: The Battle of the Northern Frontier (Part 1: The northernmost battle)

On Thursday afternoon Professor Gary Sheffield and I were able to fight the second and third battles of this campaign online via Skype. On this occasion he took command of the French (as General Lucas in the first battle and General Dupont in the second battle) and I commanded the Prussians (as General von Kluck in the first battle and General Lettow in the second battle). We used the revised draft of my FP3x3NapPW rules and fought the battle on a 3 x 3 grid of 6-inch squares.


Situation

Two French divisions (1st and Imperial Guard Divisions) had crossed the northern frontier between France and Prussia. They were faced respectively by two Prussian divisions (1st and Guard Divisions).

The northernmost French force was the 1st Division. It was commanded by General Lucas and comprised:

  • 1st Line Infantry (Average)
  • 2nd Line Infantry (Average)
  • 3rd Light Infantry (Average)
  • 4th Light Infantry (Average)
  • 1st Artillery (Average)
  • 1st Hussars (Average)

The northernmost Prussian force was the 1st Division. It was commanded by General von Kluck and comprised:

  • 1st Line Infantry (Average)
  • 2nd Line Infantry (Average)
  • 3rd Line Infantry (Average)
  • 4th Line Infantry (Average)
  • 1st Artillery (Average)
  • 1st Dragoons (Average)

The Terrain

The French Reserve Area was on the left of the map and the Prussian Reserve Area was on the right.


The Battle of the Northern Frontier: The northernmost battle

Initial positions

General von Kluck deployed his artillery unit on the hill in the centre of his army's position, with an infantry unit on each flank. He placed himself with his artillery unit as this gave him an excellent view of the battlefield.

General Lucas chose to position himself and his artillery unit on the hill that was on his left-hand flank, and deployed two infantry units to his right, one of which was in column.

Turn 1

The French artillery unit fired at the Prussian infantry unit directly in front of it, but its fire had no effect.

The French infantry column on the right advance towards the Prussian infantry unit facing it.

In reply, the Prussian artillery unit fired at the French infantry unit in column, but despite the dense target it presented, it inflicted no casualties.

Turn 2

For a second time, the Prussian artillery unit fired at the French infantry unit in column, and again inflicted no casualties.

Likewise, the fire from the left-hand Prussian infantry unit also failed to cause any casualties on the French infantry unit in column.

In order to support the advance of their infantry unit in column, the French artillery unit fired at the left-hand Prussian infantry unit, but its fire proved to be ineffective.

The French infantry unit in column charged forward and engaged the left-hand Prussian infantry unit and inflicted a loss of 1 SP on it.

Turn 3

The Prussian artillery unit fired at its French counterpart and inflicted the loss of 1 SP.

The fighting between the left-hand Prussian infantry unit and the French infantry unit in column continued, but things were going against the Prussian infantry unit, which lost another SP.

To counter this, General von Kluck brought forward a second infantry unit for his Reserved Area to support the seriously weakened left-hand Prussian infantry unit.

In response, the French artillery unit fired at its Prussian opponent, causing it to loss 1 SP. More importantly, the artillery fire also hit and killed General von Kluck!

At the same time, the French infantry unit in column finally overcame and destroyed the Prussian infantry unit it had been fighting.

Turn 4

General Lucas now brought forward his cavalry unit from the Reserve Area to support the French infantry unit in column.

This allowed the French infantry in column time to regroup and recover from its recent success.

The French artillery unit continued to fire at its Prussian counterpart, and destroyed it!

The recently-arrived left-hand Prussian infantry unit fired at the French infantry unit in column, but missed.

A new Prussian infantry unit entered the battlefield from the Prussian Reserve Area, and occupied the hill in the centre of the Prussian position.

Turn 5

The threat of a cavalry attack forced all the Prussian infantry units to form squares.

The newly-formed Prussian infantry unit in square on top of the hill proved to be too tempting a target for the French artillery unit, which fired at it and inflicted the loss of 1 SP.

Turn 6

Supported by the French cavalry unit, the French infantry unit in column attacked the left-hand Prussian infantry unit in square, but the fighting was indecisive.

General Lucas now chose to bring forward a third infantry unit in column onto the battlefield from his Reserve Area.

The left-hand Prussian infantry unit in square attempted to throw back the French infantry unit that was in column, but failed ... and at this point the leaderless Prussian troops began to withdraw, leaving the French in possession of the battlefield.

The battle had proved to be a costly one for the Prussians, who had not only lost a general (General von Kluck) but also 8SPs. The French had only lost 1 SP, and were still a formidable fighting force, quite capable of continuing the invasion of Prussia.


Afterthoughts

The amended rules certainly gave the battle a more Napoleonic flavour, and the only further changes we decided that were required was to make columns more effective against infantry in squares and to impose a one turn 'regroup and recover' penalty on all units that have been involved in Close Combat.

Sunday 28 August 2022

An experiment in publishing: A Gallimaufry of Colonial Wargames Rules is selling reasonably well

Earlier this month I published compilation of my Colonial wargames rules - A GALLIMAUFRY OF COLONIAL WARGAMES RULES - solely in PDF format via Wargames Vault.

To date it has sold twenty-two copies, which is more than I expected.

The rules included in the book are:

  • Bundock and Bayonet
  • 'Ere'st o you Fuzzy Wuzzy
  • Hordes of Dervishes
  • Heroes of Victoria's Empire (HoVE)
  • Restless Natives
  • Colonial rules for Heroscape terrain
  • Redcoats & Dervishes
  • SCWaRes: Simple Colonial Wargame Rules

A GALLIMAUFRY OF COLONIAL WARGAMES RULES is on sale for £7.50.

Saturday 27 August 2022

The History of the Gurkhas in Britain

Last night Sue and I went to our local community centre (Shrewsbury House) to watch a presentation by Captain Hari Bahadur Limbu about The History of the Gurkhas in Britain. It cost us £4.00 each, and all the proceeds went to the Panas Helping Hands Gurkha Veterans Support Fund.

Captain Limbu’s presentation described the history of the relationship between the Gurkhas and the UK …

… and then went on to talk about the Gurkha community in the Royal Borough of Greenwich (there are about 3,000 Gurkhas living the Borough) and the work being done by the Greenwich Gurkha Ex-Serviceman's Association.


Panas Helping Hands is a charity that is run by the owner of the Panas Gurkha Restaurant (Sujan Katuwal) and besides providing over 100,000 free meals during the COVID pandemic to essential workers, people in homeless shelters and those attending community centres, the charity is now supporting Ukranian refugees.

Both Panas Helping Hands and the Greenwich Gurkha's Ex-Servicemen's Association deserve recognition and support for the work that they are doing but more importantly, they need resources. Panas Helping Hands has Go Fund Me pages for the work they do to support the Gurkha Ex-Servicemen and Ukrainian refugees in Southeast London and the provision of free food during the recent pandemic.

For more information about Panas Helping Hands, see their Facebook Page, their Twitter page, and Sujan Katuwal's Linkedin page.

Friday 26 August 2022

The Herring War of 1912/The Second Herring War

Last Tuesday I took part in the opening moves of The Herring War of 1912/The Second Herring War. This was a distanced wargame conducted using Zoom, and it was organised by Tim Gow, who writes the Megablitz and more blog.

The First Herring War of 1908 was featured in Paul Wright's excellent LITTLE CAMPAIGNS: RULES FOR THE CONDUCT OF WAR GAME CAMPAIGNS IN MINIATURE ...

... and was a four-page supplement in the style of the 'Illustrated London News'.

It was also featured on Tim's bog in September 2013 and again in January 2016 here and here.

Both sides had been expanding their navies since the First Herring War had ended, and I had been promoted to command the defences of Jutland from a possible attack on the ports of Skagen and Hitshals.

The First Herring War was fought between Norway and Denmark as a result of disputes over fishing rights. The latest was fought because the Norwegian press published scurrilous (and possibly true) stories about a Danish royal princess.

Under my command were the following units:

  • Knusden Nyborg (Coast Defence Battleship)
  • Sorensen Fonsmark (Monitor)
  • Malling Friis (Monitor)
  • Laugensen (Cruiser)
  • Olsen (Cruiser)
  • Larsen (Torpedo Boat Destroyer) 
  • Herkind (Torpedo Boat Destroyer)
  • Two Heavy Coastal Forts
  • Two Medium Mobile Naval Batteries
  • The University Cycle Volunteers 
  • Local Defence Volunteers
  • A Bleriot aeroplane

As commander, I had to submit my opening moves to the umpire (Tim) before the Zoom session took place. I will not share them or the subsequent events with my regular blog readers as these will no doubt form part of a longer report that will appear on Tim's blog in due course. Needless to say, it was great fun, and several silly hats were worn by the participants!


LITTLE CAMPAIGNS: RULES FOR THE CONDUCT OF WAR GAME CAMPAIGNS IN MINIATURE was written by Paul Wright and published in 2013 by The (Virtual) Armchair General. It is hoped that a second revised edition will be published in due course.

Thursday 25 August 2022

The Franco-Prussian War of 1810: A progress check and more lead rot

Yesterday I fought two back-to-back Napoleonic battles using the latest draft of my Fast Play 3 x 3 Napoleonic Portable Wargame (FP3x3NapPW) rules. The battles were generated by the campaign that I’ve been running using the simple campaign rules I have written to use with the map board from Waddington’s 1971 game, CAMPAIGN. The results of these two battles will influence what happens next.

I’ll be writing up the battle reports over the next few days, but it’s fair to say that my opponent – Professor Gary Sheffield (who was in command of the French) – beat me soundly twice. As a result, the Prussians are disarray and if the French can gain the initiative, they could easily be on the outskirts of Berlin in less than a week!


I used a completely different set of figures from the ones I used in the last battle Gary and I fought … and I discovered some more cases of lead rot.

I am beginning to realise that I may have a major problem on my hands, and that my collection of Napoleonic figures is going to be decimated as a result.

Wednesday 24 August 2022

Feeling a bit better today

I woke up this morning feeling better than I have done for several days. I still have a bit of joint pain and general fatigue, but my nose is no longer running, and the headache seems to have gone, along with the stomach pain and diarrhoea. I'm certainly not back to feeling 100%, but I am well enough to get on with some of the things that have been awaiting my attention.

Taking part in a Zoom session last night with several other members of Wargame Developments helped to lift my sagging spirits (we were playing through the first few moves of the Herring War of 1912/The Second Herring War) as did doing a couple of hours of Spring cleaning during the day. The latter left me very hot and sweaty, and afterwards I had a hot shower and a sleep ... and when I woke up, I had already begun to feel a bit better.

I know that there is an Old Wives' Tale that it is possible to 'sweat out a cold', but the scientific evidence says that this is a load of old rubbish. That said, there is some agreement that mild to moderate, low-impact exercise for 30 to 45 minutes (such as cleaning windows) can give one's body's an immune and metabolic boost that will help fight off infection, and that a hot shower can help clear up cold-related nasal congestion. Sleep also helps ... so it may well be that it is an Old Wives' Tale that has a grain of truth in it!

Back in my twenties (Is it really fifty years ago? It doesn't seem that long!) I used to find that eating a really hot curry helped me to get over a cold quickly. I would walk to the local Indian takeway, buy a chicken vindaloo, take it home and eat it, have a hot bath, and then go to bed. Overnight I would toss abd turn and sweat profusely ... and wake up feeling much better. Alas, nowadays this 'remedy' is no longer available to me as I have been warned off spicey food by my doctor and Sue has an allergy to some of the spices used to make a curry.

Monday 22 August 2022

I’ve been feeling a bit under the weather of late … but it isn’t COVID … and it shouldn’t stop me wargaming later this week!

I woke up on Friday feeling rather unwell. The symptoms were joint pain, a runny nose, a mild headache, some stomach pain, mild diarrhoea, and general fatigue, none of which were bad enough to make me stay in bed but bad enough to prevent me from doing anything that required much concentration.

As I was unsure if these symptoms were caused by the Erleada I am taking as part of my prostate cancer treatment or if I had COVID-19 again, I look a lateral flow test on Saturday … which was negative. I took a further test on Sunday … which also proved to be negative.

In the end I came to the conclusion that I was probably suffering from a cold or 'flu bug, which had in some way enhanced the mild side effects I was already suffering as a result of taking the Erleada. This is just as well, as I hope to be taking part in a couple of online wargames later this week.

Saturday 20 August 2022

More Meng ships

Thanks to some diligent searching (and a bit of luck!), I have managed to acquire three more 'cartoon' warships manufactured by Meng. They are the USS Lexington ...

... and two copies of the Scharnhorst.

The Lexington only cost me £5.00 (plus postage and packing) from eBay and the Scharnhorsts were bought online from a specialist model retailer.

I am sure that I can find a wargaming use for them. The Scharnhorsts could certainly feature in coastal operations during my Eastern Front/Great Patriotic War campaign, and the Lexington cries out to be used in a Pacific War campaign.

Friday 19 August 2022

Revised version of the story of the Franco-Prussian War of 1810: 1st March to 14th March 1810 (Turns 1 to 7)

In light of the recent changes I have made to the campaign rules, I have amalgamated and rewritten my previous blog posts to reflect those changes. For my own benefit (and for the benefit of any regular blog readers who are following the story of this campaign), I have reproduced the combined version of these blog posts below.


Background to the war

Tension between France and Prussian had been growing during the winter, and things finally came to a head when the French ambassador to the court of the King of Prussia took exception to a leaflet that was being circulated in berlin that lampooned the Emperor of France. He demanded that the author and printer be arrested at once and a guarantee be given that no further such scurrilous publications would be allowed. When the Chancellor demurred to make suck a guarantee, the ambassador said, 'This means war!' and immediately left for Paris.

Within days of his return to Paris, the Emperor ordered the immediate mobilisation of his army, and within a week a formal declaration of war had been made.


The starting positions and strengths of both armies

The French Army

The French Army comprised five divisions, the Imperial Guard Division (based in Paris and commanded by General Dupont) and the 1st Division (based in Nancy and commanded by General Lucas), the 2nd Division (based in Lyon and commanded by General Lapointe), the 3rd Division (based in Bordeaux and commanded by General Janvier), and the 4th Division (based in Toulouse and commanded by General Torrance).

Each Division comprised four infantry regiments, a cavalry regiment, and an artillery regiment, and each city was garrisoned by one (Nancy, Lyon, Bordeaux, and Toulouse) or two (Paris) reserve infantry regiments.

As each division hah an opening Strength Point Value of 18 SPs (4 x 3 SPs [infantry] + 1 x 2 SPs [cavalry] + 1 x 2 SPs [artillery] + 1 x 2 SPs [general]) and the garrisons total 12 SPs (6 x 2 SPs), the French Army had a Strength value of 102 SPs. Its Replacement Pool was therefore 51 SPs.

France was allocated the red card suits.

The Prussian Army

The Prussian Army comprised five divisions, the Guard Division (based in Berlin and commanded by General Lettow), the 1st Division (based in Hanover and commanded by General von Kluck), the 2nd Division (based in Leipzig and commanded by General Steiner), the 3rd Division (based in Dresden and commanded by General von Horn), and the 4th Division (based in Stettin and commanded by General von Bissing).

Each Division comprised four infantry regiments, a cavalry regiment, and an artillery regiment and each city was garrisoned by one (Hanover, Leipzig, Dresden, and Stettin) or two (Berlin) reserve infantry regiments.

As each division had an opening Strength Point Value of 18 SPs (4 x 3 SPs [infantry] + 1 x 2 SPs [cavalry] + 1 x 2 SPs [artillery] + 1 x 2 SPs [general]) and the garrisons total 12 SPs (6 x 2 SPs), the Prussian Army had a Strength value of 102 SPs. Its Replacement Pool was therefore 51 SPs.

Prussian was allocated the black card suits.


The initial moves of the war

Turn 1: Thursday 1st/Friday 2nd March 1810:

  • Red King: French moved IG to F4 (2) and 1st to L5 (3)
  • Black King: Prussians moved 1st to N5 (2) and 2nd to O10 (3)
  • Red 10: French moved 3rd to D9 (1)

Turn 2: Saturday 3rd March/Sunday 4th March 1810:

  • Black Jack: Prussians moved 2nd to M10 (2)
  • Red 10: French moved IG to G4 (1)
  • Red Jack: French moved 2nd to L10 (2)

The French 2nd Division had moved into a square that was adjacent to that occupied by the Prussian 2nd Division and attacked them.

Turn 3: Monday 5th March/Tuesday 6th March 1810:

The battle (the Battle of the Southern Frontier) between the French 2nd Division and Prussian 2nd Division was fought. The French 2nd Division was beaten and suffered the loss of 8 SPs. The Prussian 2nd Division lost 3 SPs.

Elsewhere ...

  • Red 9: French moved 4th to H11 (1)
  • Black 4: Prussians moved G to S5 (1)
  • Red 8: French moved 4th to I11 (1)

Turn 4: Wednesday 7th/Thursday 8th Match 1810

As a result of their defeat in the Battle of the Southern Frontier, the French 2nd Division fell back to K10.

  • Black 3: Prussians moved G to R5 (1)
  • Black Queen: Prussians moved G to P6 (3)
  • Red 2: French moved 3rd to E9 (1)

The French 2nd Division recovered 3 SPs from the French Replacement Pool, which now stood at 48 SPs.

The Prussian 2nd Division recovered 1 SP from Prussian Replacement Pool, which now stood at 50 SPs.

Turn 5: Friday 9th March/Saturday 10th March 1810

  • Red Jack: French moved IG to H4 (1) and 3rd to F9 (1)
  • Black 4: Prussians moved G to O6 (1)
  • Black Ace: Prussians moved G to N6 (1), 4th to W4 (1), 3rd to T8 (1); the remaining Prussian divisions remained where they were.

The French 2nd Division recovered 3 SPs from the French Replacement Pool, which now stood at 45 SPs.

The Prussian 2nd Division recovered 1 SP from the Prussian Replacement Pool, which now stood at 49 SPs.

Turn 6: Sunday 11th March/Monday 12th March 1810

  • Red 7: French moved IG to I4 (1)
  • Black Queen: Prussian moved 4th to U5 (3)
  • Red 6: French moved IG to J4 (1)

Turn 7: Tuesday 13th March/Wednesday 14th March 1810

  • Black 9: Prussians moved 4th to T5 (1)
  • Red King: French moved IG to L6 (4) and 3rd to G9 (1)
  • Red Ace: French moved IG to M6 (1), 1st to M5 (1), 3rd to H9 (1), 4th to J11 (1), and 2nd to K9

The French 2nd Division recovered 2 SPs from the French Replacement Pool, which now stood at 43 SPs. The division had returned to full strength.

The Prussian 2nd Division recovered 1 SP from the Prussian Replacement Pool, which now stood at 48 SPs. The division had returned to full strength.

The French Imperial Guard Division had moved into a square that was adjacent to that occupied by the Prussian Guard Division and the French 1st Division had moved into a square that was adjacent to the that occupied by the Prussian 1st Division. The French divisions attacked them.

To be continued ...

Thursday 18 August 2022

I have been to Tiverton … again!

Sue and I have been wanting to return to Tiverton for some time, and as the weather was good and I had no hospital appointments due for a week or so, we contacted the owners of Tiverton Castle to see if our preferred holiday let (Castle Lodge) was available. It was … and last Thursday we set off on the two-hundred-mile journey from Southeast London to the West Country.

Friday 12th August

We left home a few minutes after 11.00am, and twenty-five minutes later we had joined the M25 at the Dartford interchange. The traffic was heavy, and by the time we reached Junction 10, where the M25 and A3 intersect, the estimated journey time had risen from four to five hours and the satnav was advising us to turn off to avoid the traffic jam that was ahead of us.

We accepted the suggested route, which took us via Guildford, Aldershot, and Frimley, where we were able to join the M3. After a very brief stop at Fleet Services for a comfort break, we carried on down the M3 until the A303 branched off it just past Basingstoke. We then travelled along the so-called ‘Highway to the Sun’, taking diversions around well-known choke points like Stonehenge.

By 3.00pm we were in need of both a comfort break and lunch and chose to stop at Camel Hill Services between Amesbury and Ilchester, where we ate an excellent meal at the Mattia Diner.

We were finished and on our way by 3.45pm, and finally reached Tiverton Castle at 5,30pm after turning off the A303 near Ilminster and onto the A358 and then the M5. Our host was waiting to greet us with a cake, milk, fresh fruit, and tomatoes, all of which were much appreciated.

We had unloaded our car by just after 6pm, and once we had unpacked, Sur and I had a much-needed drink and spent the rest of the evening chilling out. thanks to our late lunch, neither of us felt very hungry we did not both to go out to eat, but stayed at home and had a snack that included some of the excellent tomatoes that we had been given

Saturday 13th August

After a much-needed night's sleep, Sue and I went for a walk into the centre of Tiverton. Our stroll took us through the Pannier Market and out into Fore Street, which is a pedestrianised area where many of the shops can be found. Having done some shopping, we walked down Gold Street to the statue of King Edward VII ('The Peacemaker' according to the inscription) and then back to Bampton Street, which took us back to the castle.

Sue and I had arranged to have lunch with our nephew, who is one of the duty managers of the Lord Poulett Arms in Hinton St George, in Somerset. The village is three miles from Crewkerne, and as the Lord Poulett Arms has a well-earned reputation for its food and drink, it made sense to meet there. The drive took us just under an hour, and after a brief tour of the establishment, we had a drink in the garden before eating in the restaurant. The food was excellent, and it was great to be able to have a long chat with our nephew.

We returned home by 5.00pm and spent the rest of the day trying to keep cool and watching The Hundred on TV.

(For the benefit of those of you who don't follow cricket, The Hundred is a competition between teams from around the UK where each side faces one hundred balls organised in twenty 5-ball sets. The rules are similar to other limited over formats of the game, but with a few specific rules of its own.)

Sunday 14th August

Sue and I are both members of the National Trust, and as we had seen signs to Killerton House on our drive to Hinton St George on the previous day, we decided to pay it a visit. It was already over 30°C when we arrived, and during out stay it got even hotter.

Until it was sold to the National Trust in 1944 by Sir Richard Thomas Dyke Acland, 15th Baronet (26th November 1906 to 24th November 1990), the house was the home of the Acland family of baronets (i.e., hereditary knights).

The entrance to the property is through the old stable block.
Besides the entrance, the old table block houses a shop, a second-hand bookshop, and one of the property's two cafés.
The approach to the main door into Killerton House.
The main door into Killerton House.
The view of part of the surrounding estate, as seen from the house's main entrance.

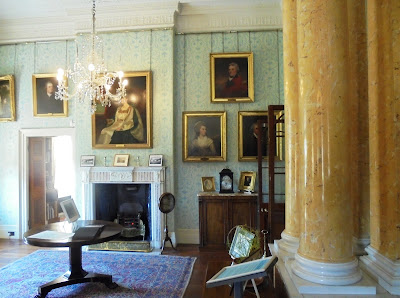
Whilst we were at Killerton, we visited all the rooms that were open of the ground floor, ...

... before making our way upstairs, ...

... where an exhibition that traced the development of sports and leisure wear was being staged.

One of the exhibits was a dolls house that had lights that could be turned on ...
... and turned off.

After paying a visit to the house's laundry (the backstairs areas of these large houses is always very interesting!), ...

... we had a drink in the café that forms part of the house's ground floor. This proved to be a good idea, as we both got very hot on the walk back to the stable block, which houses the shop and another café.

Sue and I then decided to go to Exmouth in the hope of being able to find somewhere to park and get lunch ... but the town and beach were more crowded than we had even seen before, and after a fruitless search for somewhere to park, we drove back to Tiverton.

We returned to Exmouth later that day, by which time many people had returned home from the beach.

We were able to find a parking space near to the Marina, and it was only a short walk from there to the Rockfish Restaurant, where we were able to eat some fresh-caught fish accompanied by chunky chips, mushy peas, and home-made tartare sauce.

The sun was setting by the time we had finished eating, ...

... and it was dark by the time we retuned to Tiverton. We spent the rest of the evening resting and watching more cricket on TV and were asleep well before midnight.

Monday 15th August

The weather began to change overnight. The heat of the previous day did not dissipate, and the humidity began to rise, and when this was coupled with a total lack of even a breeze, the air in Castle Lodge was stifling. We managed to get some sleep, but it was very fitful until the rain finally began to fall as did the air temperature.

After a late breakfast, Sue and I paid a visit to shop at Heathcoat Fabrics, the local fabric manufacturer. Sue was able to buy enough material for three skirts and a jacket at prices that were well below what she would have had to have paid in London. We then returned home for a drink before getting ready from a visit from some long-term friends of ours who moved to Somerset just before COVID struck. We had seen them a couple of time since, and on this occasion, they came to visit us for a full-blown afternoon tea.

Our friends had just arrived when the skies began to darken and for the first time in weeks it began to rain ... torrentially! This lasted for over two hours and ended just in time for our friends to leave to return home before a thunderstorm arrived over Tiverton. This lasted for quite some time, and it was still raining when we went to bed.

Tuesday 16th August

We awoke just after 7.00am and were ready to return home at 9.30am. We handed back the keys to Caste Lodge to our host, and after stopping off at the local branch of Morrison's for breakfast, we left Tiverton at 10.30am.

Our route took us back to the M5, then onto the A358 at Taunton. We joined the A303 near Ilminster and travelled along it until it merged with the M3, and thence as fat at the junction with the M25. We then drove around the motorway in an anticlockwise direction until we reached junction with the A2. We turned off the motorway there, and less then thirty minutes later we were home and unloading our car.

Our journey home had taken us just four and a half hours ... which, in spite of the bad weather we had to drive through on our way back, was two hours less than our journey to Tiverton.