Pages

Sunday 31 December 2023

The MF&FMLR model railway project: The River Thames (Part 1)

The next element of the layout I wanted to work on was the riverfront. The flats and the marshes lie near the River Thames, and I wanted to replicate the look of the river.

My first decision was to avoid the use of too much blue when painting the river. The Thames is a tidal river, and when seen from a distance it appears to be grey with flecks of green and brown. I started by painting the river area using neutral grey acrylic craft paint (Daler Rowney Neutral Grey No.084). Before the grey paint dried, I lightly touched the surface of the wet paint with green paint (Reeves Oxide Chromium Green) which naturally blended in with the grey paint to produce the look of shallow, tidal water.

Once this had dried, I painted the river area with a lighter grey acrylic paint wash (Reeves Medium Grey) to which I had added a single drop of light blue (Boldmere Cerulean Blue). The end result was a murky grey river that had a tint of blue and green.

I then finished it off with four coats of polyurethane gloss varnish.


Whilst I was varnishing the river, I varnished the inundated parts of the marsh.

Saturday 30 December 2023

What could I do with the other half of the pasting table?

When I decided to use half of a pasting board as the baseboard for my model railway, I put the leftover half to one side. As I’m not currently planning to make another model railway layout in the near future and I don’t like things to go to waste, I’ve been thinking about what to do with it.

The obvious thing would be to turn it into some sort of PORTABLE WARGAME board … but its dimensions (22” x 35”) don’t obviously lend themselves to being divided up into a square or hex grid. However, if the dimensions are converted into metric units, the board measures 55.88cm x 88.9cm. If these are rounded down, they become 55cm x 88cm. I could therefore mark the board using 11cm or 5.5cm squares, which would produce – respectively – a 5 x 8 ...

... or a 10 x 16 square grid.

The latter is not too unlike the 12 x 20 square grid I’ve used for my recent SHAMBATTLE map/battlefields, so perhaps I should consider turning the spare half of the pasting table into my own . It’s certainly something I’m going to give serious thought to doing.

Friday 29 December 2023

The MF&FMLR model railway project: The first passengers?

The following is an extract from the privately published A BRIEF HISTORY OF THE MUCKING FLATS AND FOBBING MARCH LIGHT RAILWAY by Alfred Bean Jr., the son of the builder of the MF&FMLR.


The Mucking Flats & Fobbing Marsh Light Railway was not originally intended to be used by civilian passengers, but once the construction of the Brennan Torpedo launch station and its attendant coastal defence fort was complete, the railway was used to supply the garrison with food and ammunition. One day, as one of the line’s locomotives was slowly steaming near the bank of the River Thames, two agricultural workers who were walking next to the line flagged the driver down. Having brought his train to a halt, the following conversation took place.

First agricultural labourer to the locomotive driver: ‘Are you going near Stin-po-leep?’

The confused driver asked the labourer to repeat what he had said … which he did.

At this point the second labourer chimed in, ‘You’d not be from ‘round here, be you?’

The driver, who was a native of Yorkshire, shook his head, and the second labourer said,’What Fred asked was if you were going near Stanford-Lope.’

At that point the penny dropped, and the driver realised they were asking about whether his journey was going anywhere near Stanford-le-Hope. He replied, ‘About a mile or so’, to which the second labourer asked if they could have a lift. The driver glanced over his shoulder at the empty wagons he was pulling, he jerked his thumb towards them, and the two labourers climbed aboard.

As a result, these two unknown labourers became the first civilian passengers to be carried by the railway.

Thursday 28 December 2023

The MF&FMLR model railway project: Making the marsh (Part 3)

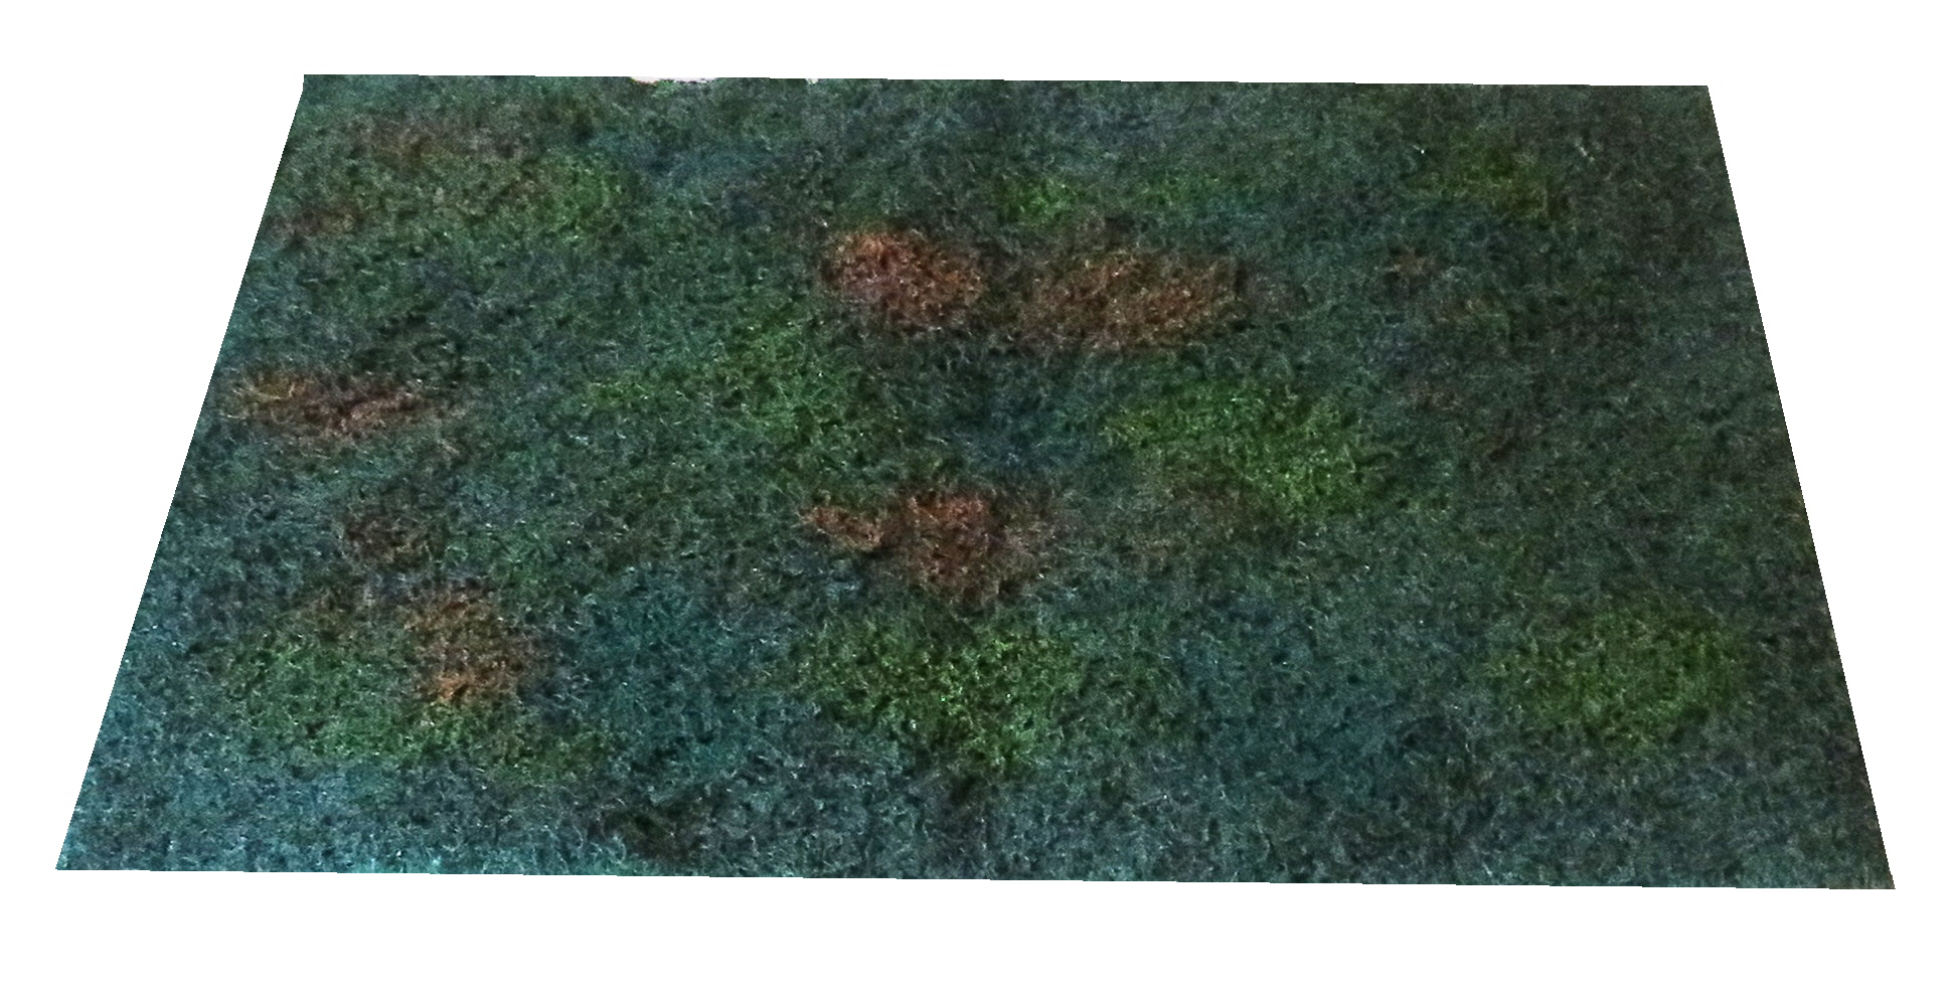
Suitably chastened by my experiment, I decided to revert to a more conventional approach ... the use of flock and PVA glue.

Firstly, I carefully applied PVA glue in and around the area covered by the marsh and sprinkled a layer of green flock (K&M Trees No.1 Grass Green) over it. I then let that thoroughly dry before using a desk vacuum cleaner to remove the excess flock.

I did this twice in order to get as thick and regular a coverage as was possible.

I then applied some more PVA glue to any gaps or areas where the initial flocking was rather thin and sprinkled some darker flock (K&M Trees No.7 Dark Green) over it. Once that was dry and the excess flock had been removed, I repeated this process, this time using a lighter flock, K&M Trees No.3 Light Olive flock.

By this time my marsh was beginning to look much more as I had wanted it to look, but the vegetation seemed to be a bit flat, and I decided to take a gamble and add some green clump foliage that was home-made from plastic foam.

This was made by soaking a couple of small pieces of plastic foam (mine were taken from the back of a pan cleaner) in a mixture of dark green and black acrylic craft paint and water in an old jam jar overnight. The excess fluid was drained off, and the foam was squeezed to remove any that remained.

Caution: This was extremely messy and was carried out over a bowl that could be washed out afterwards. Keep plenty of paper kitchen towel at hand to wipe off your hands as it is very easy to transfer the paint to everything around you!

The damp plastic foam was then placed on a small tray covered with a thick layer of kitchen paper and allowed to dry overnight. I carefully placed my tray near a radiator to help speed the process. Once the foam was dry, I tore it into smaller lumps which I then placed in a very cheap coffee grinder that I had bought for this purpose. Once it was turned on, the blades in the coffee grinder quickly chewed the plastic foam up into small pieces, which I tipped into a small plastic bag. I then very carefully cleaned the coffee grinder to remove any traces of the green foam!

The green plastic foam was glued in place using PVA glue. I used an old syringe to make sure that the PVA was placed very precisely and the small pieces of the foam were applied to the blobs of PVA. I then allowed several hours to pass to ensure that the PVA was properly dry before removing any excess pieces of foam.

To make sure that the foam remained in place, I dripped a mixture of 50% PVA and 50% water (with a tiny drop of washing up liquid added to it) on every clump of foam. I used my trusty syringe to do this. This had the effect of both reducing the chance that the foam would 'shed' during use and hardening the foam.

I’m now satisfied that the marsh is now finished, and I can move on to the next stage of building my layout.

Monday 25 December 2023

Merry Christmas!

Wishing all my friends and fellow bloggers a Merry Christmas!

Saturday 23 December 2023

A short break for Christmas

I’ve decided to take a short break from blogging over the Christmas holiday, but I will return very soon afterwards. I have already written a couple of blog posts in advance, and I have scheduled them to appear between Christmas and the New Year.

Friday 22 December 2023

The MF&FMLR model railway project: Making the marsh (Part 2)

Once the muddy part of the marsh was done, I began to look at ways in which to replicate the vegetation found in a marsh. In the end I decided to experiment with a method based on one that I had seen for modelling hedges. The main components were:

  • Pan scourers.
  • Various acrylic paints.
  • PVA glue.
  • An old (i.e. disposable if necessary) soft paintbrush.
  • An assortment of different green and brown scatter material.
  • A jar of warm water.
  • A bowl of warm water.

Other than the green pan scourers – which were bought as a pack of five from a local supermarket – I had everything that I needed to hand.

Before I outline the method than I used, I need to issue a warning to anyone contemplating copying it: it is very messy and should only be done on a surface that has been properly covered in old newspapers or a waterproof sheet. I also advise that a large roll of kitchen towel be kept close to hand to mop up any overspills and to dry one's hands one.

  • First, I took a green pan scourer and randomly dropped dollops of green and brown acrylic paint over its surface. (I used Oxide Chromium Green, Viridian, Sap Green, and Burnt Sienna acrylic paints previously bought from craft shops.)

  • I then used the brush to work the paint into the surface of the scourer until the whole surface was covered. Dipping the brush into the jar of water helped this process.
  • The scourer was then scrunched up into a ball as tightly as possible. (Warning: If you attempt to duplicate this method, wet and runny paint will ooze out and drip as you do this and will cover your hands ... so be careful!)
  • Once I was satisfied that the paint has well and truly been forced into the scourer, I rinsed it out in the bowl of clean water, and squeeze-dried by hand. I then placed it to one side on something absorbent (and disposable, such as a number of layers of kitchen towel) and allowed it to dry.

  • Once this has been done, I cleaned up the area I had used very thoroughly to ensure that domestic calm was maintained!!!

Before gluing pieces of my home-made foliage in place on the board, I cut one of the three pan scourers I had prepared into small, randomly-shaped pieces, which I placed at various locations around and in the marsh.

Until this point, I felt that everything was going well ... and then I realised that my experiment was actually not going to work! The result did not just look bad; IT LOOKED AWFUL!

Back to the drawing board! 

Wednesday 20 December 2023

The MF&FMLR model railway project: Making the marsh (Part 1)

I assumed – wrongly as it turned out – that there would be a large number of 'how to model a marsh' articles on the Internet or videos on YouTube, but when I looked there were very few, and most of those involved quite detailed modelling processes whilst what I wanted was something quick, easy, and relatively cheap.

The first thing I did was to indicate the wet part of the marsh with a wash made from approximately 50% Medium Grey and 50% Burnt Sienna acrylic paint mixed with water (and a small drop of washing-up liquid to break the surface tension) until it was the consistency of ink. This wash was then dripped into the lower areas of the marsh using a plastic syringe thus ...

... and allowed to dry overnight.

It is interesting to note that in one place the wash overflowed the edge of the marsh and found its own level. Rather than treat this as a disaster, I allowed the wash to dry and accepted that this method had actually found the sort of area on the baseboard that the liquid part of the marsh would have inundated.

Tuesday 19 December 2023

Other people's Portable Wargame battle reports: A bit of a catch-up (2)

Another of the regular contributors to the PORTABLE WARGAME FaceBook page is Luke Casey, and since July he has been fighting a very interesting campaign set in Medieval Japan that I have been following avidly.

He drew his own map of the campaign area ...

... and arranged his troops into the various warring armies.

(The sheer colour and variety of the uniforms makes this a very attractive period to wargame and I have been very sorely tempted ... )

It is impossible to relate the events of the campaign, but I hope that the following photographs show why I have been following it with such great interest.


Please note that all the photographs and drawings used above are © Luke Casey.

Monday 18 December 2023

The MF&FMLR model railway project: A problem solved

The fact that I had chosen the wrong (and far too dark) paint with which to cover my layout's baseboard was quickly resolved after a trip to THE RANGE, where I was able to buy two colour tester pots of Johnstone's Toasted Beige matt emulsion paint.

Johnstone's Toasted Beige, as shown on their colour chart.

In fact, I only need one to give my board two coats of paint, after which all trace of the previous Burnt Umber colour was gone.

The stage was now set for me to tackle the task of creating a marsh on my layout ... something I intended to do after doing a trawl through the Internet and YouTube.

Sunday 17 December 2023

Other people's Portable Wargame battle reports: A bit of a catch-up (1)

My recent brush with COVID gave me the opportunity to catch up with reading some of the many battle reports on FaceBook.

The first I would like to mention is Mark Cordone’s recent Battle of Burney. This was a fictional Franco-Prussian war battle which he fought using his 'Musket and Saber' variant of the PORTABLE NAPOLEONIC WARGAME rules.

The battle is set during the Autumn of 1870, and took place in Alsace. The French Army of Alsace – commanded by Marshal McMahan – encountered the Prussian 1st Army commanded by General Steinmetz. The latter was deployed around the town of Burney.

The Prussians troops were all regular and armed with breechloading rifles and artillery. Steinmetz had deployed (from left to right) the 1st, the 2nd, the 3rd, and the 4th Corps (the 3rd Corps being placed in the town of Burney), whilst his cavalry division was in reserve. His artillery was deployed on the heights overlooking the town. His orders were to hold the town at all costs.

The majority of Marshal McMahan's troops were regulars, the exception being the 1st National Guard Corps. He deployed his 1st Corps on the left, then his artillery, then the 2nd Corps, and finally the 3rd Corps in the town of Colombey. His cavalry was left in reserve, and the 1st National Guard Corps was deployed on the right on the other side of the woods with orders to flank the Prussian position.

The weather was fine, and the streams were fordable along their entire lengths.

As can be seen from the following photographs, the French advanced and engaged the Prussians.

The Prussian 1st Corps was forced back, and their cavalry reserve was unable to stop the French National Guard Corps from outflanking the Prussian position.

By noon the Prussian had been forced out of Burney and all their units had suffered casualties, including the destruction of the Prussian 3rd Corps.

The French had won a signal victory and shown that the Prussian were not invincible.

At a time when my spirits need lifting, this battle report did exactly that. It is a fine example of the PORTABLE WARGAME at its best, and I look forward to reading many more such battle reports.


Please note that all the photographs used above are © Mark Cordone.

Saturday 16 December 2023

The MF&FMLR model railway project: A bit of a problem

Everything was bimbling along nicely with this project … until I tried to paint the baseboard!

I decided to paint my model railway layout’s baseboard using some burnt umber acrylic craft paint from THE WORKS. Everything was going reasonably well until I was about halfway down the tube of paint, at which point its consistency seemed to change and it became like trying to paint with thick gloop. I tried dipping my brush in water in the hope that this would thin the gloop, and it helped a bit. However, the end result didn’t look very good …

… and I’ll have to overpaint the burnt umber with a lighter colour before I can move on to the next stage of this project.

Friday 15 December 2023

Phil Sabin’s version of Napoleon at Waterloo

I have known Professor Phil Sabin for many years, and even though he is now living in South America, we still keep in touch.

Our most recent contact came as I was coming down with COVID and it was over a week before I was able to watch his most recent YouTube video. This outlines the interesting changes that he has made to James Dunnigan's classic NAPOLEON AT WATERLOO game. His modifications are outlined in some detail, and coming at a time when Ridley Scott’s film about Napoleon has been released and Professor Charles Esdaile has published his excellent book about wargaming Waterloo, I can foresee them being used by a large number of wargamers.

Phil’s video includes a complete visual record of a recreation of the Battle of Waterloo he fought using his tweaked version of the rules and collection of painted Airfix 20mm Napoleonic figures. The latter are mounted on hexagonal bases that fit very nicely onto Phil’s hexed 2m x 2m tabletop.

The blow-by-blow account of Phil’s wargame helps to explain how the rules work and the decisions made by both commanders. This is very helpful to someone like me who has never used Dunnigan’s original game or Phil’s earlier tweaks.

The following stills from Phil's video give a flavour of its contents.


Phil's blog is a cornucopia of useful game designs and is well worth adding to one's list of favourite blogs/websites.