After doing all the recent thinking and experimenting (well, a bit of both anyway), I decided that the best way to test the new card-driven unit activation system was to get some toys soldiers and terrain out, set up a scenario, and to give it a go.
To keep things a simple as possible I set myself the following parameters:
Scenario Tension has been rising along the disputed border between Morschauserland and Eastland. Stories that increased numbers of Eastland troops have been gathering near the border have reached the ears of the Morschauserland Ministry of War, and the Minister has ordered increased vigilance in the border area. Defences have been manned by well-equipped troops who have orders to prevent any Eastland incursions.

The Battle Black 4: Morschauserland: No units activated.
Black 4: Morschauserland: No units activated.
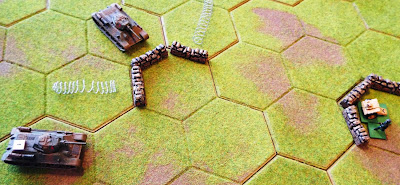
Red 3: Eastland: Two Armoured Units and an Infantry Unit with Machine Gun advanced towards the Morschauserland positions.

Red 4: Eastland: The two Armoured Units continued to advance towards the nearest Morschauserland position and an Infantry Unit and Artillery Unit moved up in support.

The two Armoured Units opened fire on the Morschauserland Infantry Unit with Machine Gun in front of them ...

... and wiped out half of the Morschauserland Unit.

Red 4: Eastland: The two Armoured Units continued to advance towards the nearest Morschauserland position and a further Infantry Unit moved up in support. The Artillery Unit fired at the Morschauserland Infantry Unit that was directly in front of them ... but their gunfire had no effect.

The gunfire from the two Armoured Units was much more effective ...

... and the Morschauserland Infantry Unit with Machine Guns was destroyed.

Black 4: Morschauserland: No units activated.
Red 3: Eastland: The two Armoured advanced towards the Morschauserland Artillery Unit's position and the Artillery Unit moved forward to reduce the range at which it had to fire.

The two Armoured Units opened fire on the Morschauserland Artillery Unit ...

... and killed half of the Unit's manpower.

Black 4: Morschauserland: The Artillery Unit now engaged one of the Eastland Armoured Units ...

... and forced it to fall back.

Black 3: Morschauserland: The Artillery Unit now engaged the other Eastland Armoured Unit ...

... and reduced it to two-thirds of its original strength.

Black 3: Morschauserland: Buoyed up by this success, the Artillery Unit engaged the Eastland Armoured Unit for a second time ...
... and destroyed it!

Joker: The playing cards were shuffled anew and the Morschauserland Armoured Unit became available.
Red 3: Eastland: The remaining Infantry Units (one with a machine Gun and one with an Anti-tank Gun) moved into the battle area ...

... and the Artillery Unit moved forward yet again to reduce the range at which it had to fire.

Red 3: Eastland: The remaining Armoured Unit moved forward and fired at the Morschauserland Artillery Unit, but its gunfire was ineffective.

The Artillery Unit also engaged the Morschauserland Artillery Unit, also without effect.

The Infantry Unit with Anti-tank Gun advanced and fired at the last remaining Morschauserland Infantry with Machine Gun unit, but its gunfire was similarly ineffective.

Black 4: Morschauserland: The arrival of the Armoured Unit marked the turning point in the battle. It fired at the Eastland Armoured Unit ...

... and inflicted damage equivalent to two-thirds of its original strength.

Not to be outdone, the Artillery Unit also fired at the Eastland Armoured Unit ...
... and knocked it out!

On the other flank of the Morschauserland defences, the Infantry with Machine Gun Unit fired at the Eastland Infantry with Anti-tank Gun Unit ... but inflicted no casualties.

Black 3: Morschauserland: The Infantry with Machine Gun Unit fired again at the Eastland Infantry with Anti-tank Gun Unit ...

... and this time they caused a casualty ...

... as well as forcing them to retire.

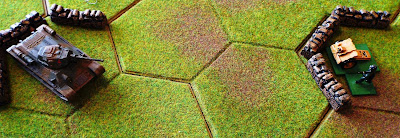
The Armoured Unit pressed forward and engaged the Eastland Artillery Unit, ...

... causing it to suffer 50% casualties as well as forcing it to retreat.

Black 2: Morschauserland: The Armoured Unit fired yet again at the Eastland Artillery Unit ... and destroyed it.

Black 2: Morschauserland: Pressing home it advantage, the Armoured Unit engaged the nearby Eastland Infantry Unit ...

... which suffered a casualty.

Black 4: Morschauserland: The Armoured Unit continued to fire at the Eastland Infantry Unit ...

... causing it a further casualty as well as forcing it to retreat.

Joker: At this point I decided that the battle was close to ending. The Morschauserlanders had stopped the Eastland incursion, but were unable to exploit their success. The Eastlanders were in a position to push forward, but without Armoured support they felt that the possibility of victory was not assured.

Conclusions I was very pleased with the way this card-driven unit activation system worked. The action on the tabletop seemed to flow much better than it would have done with a traditional IGOUGO system, and not knowing whether one side or the other would be able to develop an attack before their opponents could respond added just enough uncertainty to events to make it interesting. The effect one side getting a 'string' of unit activations can be seen in this play-test.
I think that this system has lots of potential, and I hope to run some further tests in the very near future.
To keep things a simple as possible I set myself the following parameters:
- To use the movement and combat rules from MEMOIR '44
- To set up the terrain so that was nine hexes wide by ten hexes deep (i.e. slightly longer than it was wide)
- To use no more than a dozen or so units in total
- To use only playing cards with a value of 2, 3, or 4 (this should give an average of 3 unit 'activations' per card)
- To use a single Joker

Morschauserland Forces (Black):Please click on the image to enlarge it.
- 2 x Infantry Units with Machine Guns
- 1 x Artillery Unit
- 1 x Armoured Unit (This will appear when the first Joker is turned over)
- 2 x Infantry Units
- 2 x Infantry Units with Machine Guns
- 1 x Infantry Unit with Anti-tank Guns
- 1 x Artillery Unit
- 2 x Armoured Units
Black 4: Morschauserland: No units activated.
Red 3: Eastland: Two Armoured Units and an Infantry Unit with Machine Gun advanced towards the Morschauserland positions.

Red 4: Eastland: The two Armoured Units continued to advance towards the nearest Morschauserland position and an Infantry Unit and Artillery Unit moved up in support.

The two Armoured Units opened fire on the Morschauserland Infantry Unit with Machine Gun in front of them ...

... and wiped out half of the Morschauserland Unit.

Red 4: Eastland: The two Armoured Units continued to advance towards the nearest Morschauserland position and a further Infantry Unit moved up in support. The Artillery Unit fired at the Morschauserland Infantry Unit that was directly in front of them ... but their gunfire had no effect.

The gunfire from the two Armoured Units was much more effective ...

... and the Morschauserland Infantry Unit with Machine Guns was destroyed.

Black 4: Morschauserland: No units activated.
Red 3: Eastland: The two Armoured advanced towards the Morschauserland Artillery Unit's position and the Artillery Unit moved forward to reduce the range at which it had to fire.

The two Armoured Units opened fire on the Morschauserland Artillery Unit ...

... and killed half of the Unit's manpower.

Black 4: Morschauserland: The Artillery Unit now engaged one of the Eastland Armoured Units ...

... and forced it to fall back.

Black 3: Morschauserland: The Artillery Unit now engaged the other Eastland Armoured Unit ...

... and reduced it to two-thirds of its original strength.

Black 3: Morschauserland: Buoyed up by this success, the Artillery Unit engaged the Eastland Armoured Unit for a second time ...

... and destroyed it!

Joker: The playing cards were shuffled anew and the Morschauserland Armoured Unit became available.
Red 3: Eastland: The remaining Infantry Units (one with a machine Gun and one with an Anti-tank Gun) moved into the battle area ...

... and the Artillery Unit moved forward yet again to reduce the range at which it had to fire.

Red 3: Eastland: The remaining Armoured Unit moved forward and fired at the Morschauserland Artillery Unit, but its gunfire was ineffective.

The Artillery Unit also engaged the Morschauserland Artillery Unit, also without effect.

The Infantry Unit with Anti-tank Gun advanced and fired at the last remaining Morschauserland Infantry with Machine Gun unit, but its gunfire was similarly ineffective.

Black 4: Morschauserland: The arrival of the Armoured Unit marked the turning point in the battle. It fired at the Eastland Armoured Unit ...

... and inflicted damage equivalent to two-thirds of its original strength.

Not to be outdone, the Artillery Unit also fired at the Eastland Armoured Unit ...

... and knocked it out!

On the other flank of the Morschauserland defences, the Infantry with Machine Gun Unit fired at the Eastland Infantry with Anti-tank Gun Unit ... but inflicted no casualties.

Black 3: Morschauserland: The Infantry with Machine Gun Unit fired again at the Eastland Infantry with Anti-tank Gun Unit ...

... and this time they caused a casualty ...

... as well as forcing them to retire.

The Armoured Unit pressed forward and engaged the Eastland Artillery Unit, ...

... causing it to suffer 50% casualties as well as forcing it to retreat.

Black 2: Morschauserland: The Armoured Unit fired yet again at the Eastland Artillery Unit ... and destroyed it.

Black 2: Morschauserland: Pressing home it advantage, the Armoured Unit engaged the nearby Eastland Infantry Unit ...

... which suffered a casualty.

Black 4: Morschauserland: The Armoured Unit continued to fire at the Eastland Infantry Unit ...

... causing it a further casualty as well as forcing it to retreat.

Joker: At this point I decided that the battle was close to ending. The Morschauserlanders had stopped the Eastland incursion, but were unable to exploit their success. The Eastlanders were in a position to push forward, but without Armoured support they felt that the possibility of victory was not assured.

Both sides decided to withdraw to their initial positions, and the tensions along the border eased very slightly.Please click on the image to enlarge it.
I think that this system has lots of potential, and I hope to run some further tests in the very near future.


Nice to see the lads up and running about Bob.
ReplyDeleteWould I be right in saying that your activation system is similar to the one employed in TSATF?
Conrad Kinch,
ReplyDeleteIt was great to actually fight a solo wargame again. It seems like a very long time since the last time!
I think that my activation system is not very different from the one used in the latest version of TSATF ... and my own BUNDOCK AND BAYONET rules.
All the best,
Bob
Hi Bob,
ReplyDeleteA great little action and you must be delighted to be pushing some models around again. the card system seemed to work well and I liked your idea from your previous post about modifying the card numbers to reflect commander ability. As ever this has given me much to ponder - not least of which is the use of individual figure bases....;-)
All the best,
DC
David Crook,
ReplyDeleteIt was a very nice little action ... and my first solo wargame for some time.
The card-driven unit activation system produces the sort of unpredictable game sequence that I like. It might need a bit of minor tweaking and certainly needs some more play-testing, but I think that this is likely to be my preferred method of unit activation for the immediate future.
I am sorry that my battle report has made you re-think about whether or not to rebase your new figures on multi-figure or single figure bases, but I think that you can see why I prefer single figure bases.
All the best,
Bob
I enjoyed this battle report and i like the system. I was wondering why the Morschauser side seemed to not activate several times? I can see not wanting to move from a prepared position, but did they not have any available targets? Admittedly children were distracting me during my read through.
ReplyDeleteSean,
ReplyDeleteI am very pleased to read that you enjoyed this battle report and found the card-driven unit activation system interesting.
The Morschauserlanders were in fixed defences and only activated units when Eastland units came into range. (I was using a version of the MEMOIR '44 rules. Small arms have a range of 3 hexes, as do tanks; artillery has a range of 6 hexes.)
All the best,
Bob