The following battle was fought using my own World War II version of the rules, and was intended to play-test some of the changes and developments that I had incorporated.
Scenario
Things were not going well for the Morschauserlanders. The loss of the small, fortified island off the coast of Morschauserland had been a massive blow to their national pride, and to make matters worse, a column of Eastland troops had crossed the border and were heading for the town of Essenburg. Essenburg was the location of one of Morschauserland's largest armaments factories, and its loss would be a further major blow to the country.
The only troops immediately available to defend Essenburg were:
The Defenders
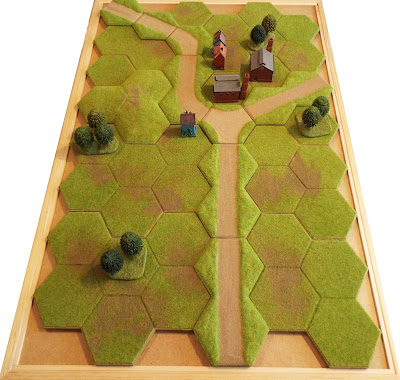
The local commander had ordered his Militia Infantry and Anti-tank Gun Units to take up positions that enabled them to spot and engage any Eastland troops that advanced up the road towards Essenburg. He kept his regular Infantry Unit in reserve in order to counter any breakthroughs and placed his Militia Artillery Unit where it could fire in support of his other troops.

Turn 1
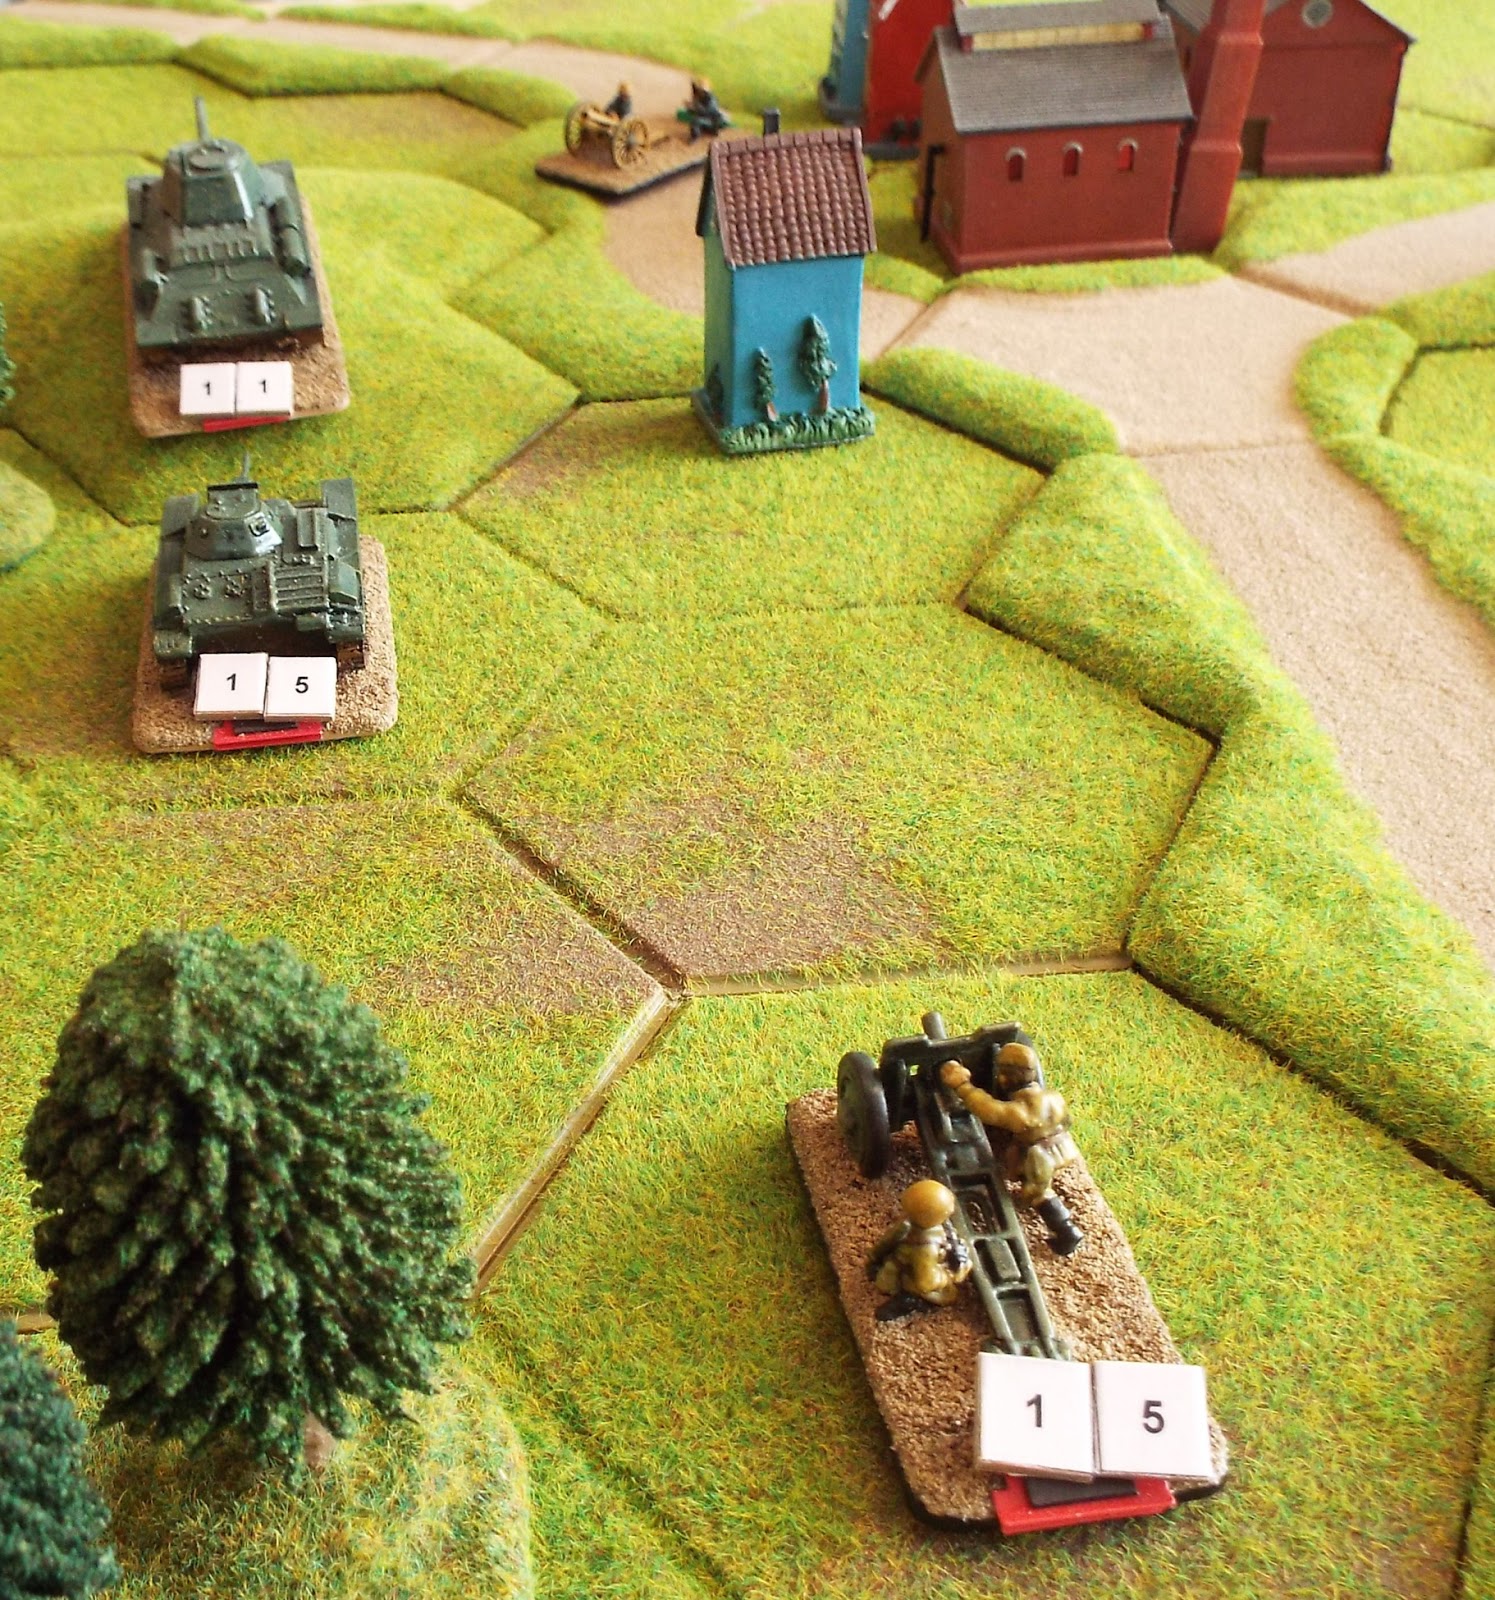
The leading elements of the Eastland column advance up the road to Essenburg ...

... and were immediately spotted and engaged by the foremost Morschauserland troops.
The Morschauserland Militia Artillery Unit was in range of the leading Eastland Cavalry Unit, and opened fire upon it ...

... inflicting terrible casualties on the already weakened Cavalry Unit.

Turn 2
The Eastlanders reacted swiftly to the threat to their advance. Their Cavalry Units moved to the right and away from the threat posed by the Morschauserland Militia Anti-tank Gun and Militia Artillery Units ...

... whilst the leading Eastland Tank Unit swung to the left to advance and engage the foremost Morschauserland Militia Infantry Unit in the nearby woods.

Unfortunately the Morschauserland Militia Infantry Unit was well ensconced, and the Eastland Tank Unit was forced to fall back.

At the same time that this was happening, the remaining Eastland Units entered the field of battle.
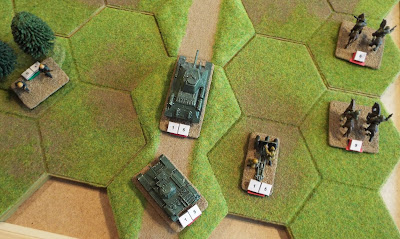
Fighting between the Morschauserland Militia Infantry Unit and the Eastland Tank Unit that had attacked it continued ...

... and the leading Eastland Cavalry Unit was fired at by both the second Morschauserland Militia Infantry Unit ...

... and the Morschauserland Militia Artillery Unit ...

... with the result that the Cavalry Unit was destroyed.
Turn 3
Eager to exact some sort of revenge for their recent losses, the Eastland Artillery Unit fired at the Morschauserland Militia Anti-tank Gun Unit and inflicted serious casualties on it.

The two Eastland Tank Units opened fire on the foremost Morschauserland Militia Infantry Unit ...

... and despite the fact that it was undercover, the Morschauserland Militia Infantry Unit's strength was seriously depleted.

The Morschauserland Militia Infantry Unit fought back against one of its attackers, but was unable to inflict any casualties upon the Eastland Tank Unit.

The Morschauserland Militia Artillery Unit did manage to inflict a few casualties on the leading Eastland Tank Unit ...

... but not enough to seriously impair its fighting ability.
Turn 4
The Eastlanders began by deploying one of their Tank Units to attack and wipe out the foremost Morschauserland Militia Infantry Unit.

The Eastland Artillery Unit then destroyed the Morschauserland Militia Anti-tank Gun Unit ...

... and the other Eastland Tank Unit left the road and moved left.

As they were out of weapon range, the remaining Eastland Cavalry Unit moved forward tentatively.

The remaining Morschauserland Militia Infantry Unit responded to this by opening fire on the Eastland Cavalry Unit ...

... but their fire only caused a few casualties.
The Morschauserland Militia Artillery Unit also fired at the Eastland Cavalry Unit ...

... but also only inflicted a minimal number of casualties.
Turn 5
The Eastlanders pulled back their Cavalry Unit to protect their line of retreat ...

... whilst the rest of their force began to move towards their left, thus threatening the now-exposed Morschauserland right flank.

As they were now unable to see what the Eastlanders were doing, the Morschauserlanders stayed in their existing positions.

Turn 6
The Eastlanders continued their advance towards the unprotected Morschauserland right flank whilst the Morschauserland troops – who were expecting further attacks – maintained a high state of alert.

Turn 7
As the leading Eastland Tank Unit began to climb the hill on the Morschauserland right flank, they came into view of the Morschauserland Militia Artillery Unit.

The Morschauserland Militia Artillery Unit opened fire on the enemy Tank Unit, and managed to cause it minor casualties.

Turn 8
Now that the position of the Morschauserland Militia Artillery Unit was observable, the Eastland Artillery Unit opened fire on it ... with devastating results. The Morschauserland Militia Artillery Unit was instantly reduced to less than 50% of its original strength!

The situation was made worse by the attack made on the Morschauserland Militia Artillery Unit by the leading Eastland Tank Unit ...

... which wiped out the Morschauserland Militia Artillery Unit!

The fight was not – however – a one-way affair, and the Morschauserland Regular Infantry Unit in the town engaged the leading Eastland Tank Unit and inflicted some damage on it.

Turn 9
The battle now turned into a slogging match, with the Eastlanders using their Artillery Unit and Tank Units to bombard the Morschauserland Regular Infantry Unit in Essenburg.

Morschauserland Regular Infantry Unit fought back as best it could, but found it impossible to inflict further casualties on the leading Eastland Tank Unit.
Turn 10
The fight for Essenburg continued unabated with the result that both sides suffered increasing numbers of casualties.

In response to the losses suffered by the Morschauserland Regular Infantry Unit, the Morschauserland Militia Infantry Unit began to move from the wood it had occupied towards the centre of Essenburg.

Turn 11
The Eastland Cavalry Unit moved forward in the hope that this would deter the Morschauserland Militia Infantry Unit from moving into Essenburg.

At the same time, the attack by the Eastland Tank and Artillery Units finally destroyed the Morschauserland Regular Infantry Unit ...

... but did not prevent the Morschauserland Militia Infantry Unit from taking its place.

Turns 12 and 13
The bombardment of the town continued, and eventually the remaining defenders were eliminated.

Essenburg was in Eastland hands ... but for how long?
This play-test was a most enjoyable battle to fight. It did throw up one or two things that need to be changed (e.g. Cavalry need to have their weapon range increased to 2 hexes), but I feel that they work pretty well and do not require many changes to reach the point where I will be happy to use them for the foreseeable future.
Scenario
Things were not going well for the Morschauserlanders. The loss of the small, fortified island off the coast of Morschauserland had been a massive blow to their national pride, and to make matters worse, a column of Eastland troops had crossed the border and were heading for the town of Essenburg. Essenburg was the location of one of Morschauserland's largest armaments factories, and its loss would be a further major blow to the country.
The only troops immediately available to defend Essenburg were:
- 1 x Regular Infantry Unit (full strength)
- 2 x Militia Infantry Units (starting strength of 10 points each)
- 1 x Militia Artillery Unit (starting strength of 10 points)
- 1 x Militia Anti-tank Gun Unit (starting strength of 10 points)
- 2 x Cavalry Units
- 1 x Artillery Unit
- 2 x Tank Units

The Defenders
The local commander had ordered his Militia Infantry and Anti-tank Gun Units to take up positions that enabled them to spot and engage any Eastland troops that advanced up the road towards Essenburg. He kept his regular Infantry Unit in reserve in order to counter any breakthroughs and placed his Militia Artillery Unit where it could fire in support of his other troops.

Turn 1
The leading elements of the Eastland column advance up the road to Essenburg ...

... and were immediately spotted and engaged by the foremost Morschauserland troops.
The Morschauserland Militia Artillery Unit was in range of the leading Eastland Cavalry Unit, and opened fire upon it ...

... inflicting terrible casualties on the already weakened Cavalry Unit.

Turn 2
The Eastlanders reacted swiftly to the threat to their advance. Their Cavalry Units moved to the right and away from the threat posed by the Morschauserland Militia Anti-tank Gun and Militia Artillery Units ...

... whilst the leading Eastland Tank Unit swung to the left to advance and engage the foremost Morschauserland Militia Infantry Unit in the nearby woods.

Unfortunately the Morschauserland Militia Infantry Unit was well ensconced, and the Eastland Tank Unit was forced to fall back.

At the same time that this was happening, the remaining Eastland Units entered the field of battle.

Fighting between the Morschauserland Militia Infantry Unit and the Eastland Tank Unit that had attacked it continued ...

... and the leading Eastland Cavalry Unit was fired at by both the second Morschauserland Militia Infantry Unit ...

... and the Morschauserland Militia Artillery Unit ...

... with the result that the Cavalry Unit was destroyed.
Turn 3
Eager to exact some sort of revenge for their recent losses, the Eastland Artillery Unit fired at the Morschauserland Militia Anti-tank Gun Unit and inflicted serious casualties on it.

The two Eastland Tank Units opened fire on the foremost Morschauserland Militia Infantry Unit ...

... and despite the fact that it was undercover, the Morschauserland Militia Infantry Unit's strength was seriously depleted.

The Morschauserland Militia Infantry Unit fought back against one of its attackers, but was unable to inflict any casualties upon the Eastland Tank Unit.

The Morschauserland Militia Artillery Unit did manage to inflict a few casualties on the leading Eastland Tank Unit ...

... but not enough to seriously impair its fighting ability.
Turn 4
The Eastlanders began by deploying one of their Tank Units to attack and wipe out the foremost Morschauserland Militia Infantry Unit.

The Eastland Artillery Unit then destroyed the Morschauserland Militia Anti-tank Gun Unit ...

... and the other Eastland Tank Unit left the road and moved left.

As they were out of weapon range, the remaining Eastland Cavalry Unit moved forward tentatively.

The remaining Morschauserland Militia Infantry Unit responded to this by opening fire on the Eastland Cavalry Unit ...

... but their fire only caused a few casualties.
The Morschauserland Militia Artillery Unit also fired at the Eastland Cavalry Unit ...

... but also only inflicted a minimal number of casualties.
Turn 5
The Eastlanders pulled back their Cavalry Unit to protect their line of retreat ...

... whilst the rest of their force began to move towards their left, thus threatening the now-exposed Morschauserland right flank.

As they were now unable to see what the Eastlanders were doing, the Morschauserlanders stayed in their existing positions.

Turn 6
The Eastlanders continued their advance towards the unprotected Morschauserland right flank whilst the Morschauserland troops – who were expecting further attacks – maintained a high state of alert.

Turn 7
As the leading Eastland Tank Unit began to climb the hill on the Morschauserland right flank, they came into view of the Morschauserland Militia Artillery Unit.

The Morschauserland Militia Artillery Unit opened fire on the enemy Tank Unit, and managed to cause it minor casualties.

Turn 8
Now that the position of the Morschauserland Militia Artillery Unit was observable, the Eastland Artillery Unit opened fire on it ... with devastating results. The Morschauserland Militia Artillery Unit was instantly reduced to less than 50% of its original strength!
The situation was made worse by the attack made on the Morschauserland Militia Artillery Unit by the leading Eastland Tank Unit ...

... which wiped out the Morschauserland Militia Artillery Unit!

The fight was not – however – a one-way affair, and the Morschauserland Regular Infantry Unit in the town engaged the leading Eastland Tank Unit and inflicted some damage on it.

Turn 9
The battle now turned into a slogging match, with the Eastlanders using their Artillery Unit and Tank Units to bombard the Morschauserland Regular Infantry Unit in Essenburg.

Morschauserland Regular Infantry Unit fought back as best it could, but found it impossible to inflict further casualties on the leading Eastland Tank Unit.
Turn 10
The fight for Essenburg continued unabated with the result that both sides suffered increasing numbers of casualties.

In response to the losses suffered by the Morschauserland Regular Infantry Unit, the Morschauserland Militia Infantry Unit began to move from the wood it had occupied towards the centre of Essenburg.

Turn 11
The Eastland Cavalry Unit moved forward in the hope that this would deter the Morschauserland Militia Infantry Unit from moving into Essenburg.

At the same time, the attack by the Eastland Tank and Artillery Units finally destroyed the Morschauserland Regular Infantry Unit ...

... but did not prevent the Morschauserland Militia Infantry Unit from taking its place.

Turns 12 and 13
The bombardment of the town continued, and eventually the remaining defenders were eliminated.

Essenburg was in Eastland hands ... but for how long?
This play-test was a most enjoyable battle to fight. It did throw up one or two things that need to be changed (e.g. Cavalry need to have their weapon range increased to 2 hexes), but I feel that they work pretty well and do not require many changes to reach the point where I will be happy to use them for the foreseeable future.


.jpeg)


Looks very good, Bob. (Great AAR, but the way!) I had thought yesterday about differentiating the tanks into light, medium, and heavy, but decided that was defeating the whole point of OHW, and resolved to go with what you formulated. I'll let you know how my playtest comes out.
ReplyDeleteBest regards,
Chris
Chris,
ReplyDeleteThanks very much for your kind comment.
I also thought about including light, medium, and heavy tanks in the rules, but decided that the best way to represent the differences between types of tank was to alter the points accordingly (i.e. Light tank = 12 points, Medium tank = 15 points, Heavy tank = 18 points).
Good luck with your play-test.
All the best,
Bob
Very clean and tidy game. I like the look of the game using your Hexon hexes.
ReplyDeleteI only this week gave the OHW rules a try for Pike & Shot. Have not tried the WWII variant.
I'm having to get my head around the size of action (somewhere between brigade and division level) depicted here. But I don't imagine it would take long to become accustomed to it. Looks like a lot of fun. One thing thing that struck me, though: such a quick action sort of battle system would be great within a broader campaign environment.
ReplyDeleteFar be it for me to foment hostilities and all-out war between peace-loving Morschauserland and "Expansionist? Us? Nah!" Eastland, but... well... y'know...
Jonathan Freitag,
ReplyDeleteThe Hexon II is probably the best wargames purchase I have ever made, and I cannot foresee doing much wargaming in the future where it isn't used.
If you enjoyed the OHW Pike and Shot rules, I suspect that you will like the WWII ones as much.
All the best,
Bob
Archduke Piccolo,
ReplyDeleteWhen we first tried out Megablitz, this was the reaction we had from a lot of players. They were used to 'one model tank = five real tanks' and not 'one tank = one tank battalion', although if we used small models the reaction was less negative. Once the players began to think of the based models as units (or 3D counters), they seemed to overcome their objections to the concept.
The joy of this way of doing things is that you can fight smallish campaign battles very quickly. If I had not been recording each move in detail, I could probably have fought three or four battles in the time I spent on yesterday's play-test.
The ongoing conflict between Morschauserland and Eastland will no doubt continue - on and off - into the future. Whether it will ever erupt into all-out war is something that only time will tell.
All the best,
Bob
Bob,
ReplyDeletePersonally, I think it is easier, psychologically and aesthetically, to accept that several figures/models represent a much larger number of the same than it is to avoid subconsciously feeling that one figure/model is only one - or at most, a very few - which was my initial reaction to seeing your tank bases.
After all, we wargamers have for years suspended disbelief and accepted 15 or 20 man figures portraying 600-800 man battalions and one artillery piece being a battery of 4 or 6 guns! So I suppose such ratios are now deeply embedded in the dim recesses of our brains, and are, consequently, very difficult to ignore/suppress in the 'heat of battle'...
If I was going to create an OHW style WWII army, I think I would mount at least two tank models - perhaps of a smaller scale - on a base, to serve as a visual reminder that the base represents a unit/formation rather than just one vehicle. But, you obviously don't find the visual discrepancy so jarring, which makes things much easier for you, and the overall effect is attractive.
But - as I'm sure you are aware - I'm never going to forgo the spectacle of ranks of troops in colourful uniforms advancing through the powder-smoke for 'tin cans' hurling high explosive shells at each other!
Best wishes,
Arthur
Arthur1815 (Arthur),
ReplyDeleteI suspect that you are – as usual – right; it is psychologically and aesthetically easier to accept that several figures/models on a common base represent a unit rather than a couple of figures or a single model. If I was going to ‘do’ my version of OHW WWII from scratch, I would probably use much smaller scale figures and vehicles and more of them per unit … but as I already have quite sizeable Megablitz armies it would seem to be both a shame and a waste not to use them.
Are the ‘1 man = 33 men’ sort of ratio – much-beloved by some Napoleonic wargamers of a certain age – embedded inexorably in the general wargamer’s mind? I suspect so judging by the reaction we had when we first demonstrated Megablitz at a wargames show. If I had used my rules with a 2D counter on a hexed map, I suspect that people would have accepted that; it is the ‘replacement’ of the counter with what is – in effect – a 3D counter where the trouble begins … and that is down to some form of embedded psychological and aesthetical response.
It is interesting to note that in the recently published Blucher rules the units depicted are quite high level and can be represented by either counters (the unit cards) or figures on bases. Not a million miles from what I have done, but because the players seem to want to use large numbers of figures it appear not to jar with them.
All the best,
Bob