Pages

Friday, 21 June 2013

Miniature Wargames with Battlegames Issue 363

I received my second subscription issue of the re-launched MINIATURE WARGAMES WITH BATTLEGAMES magazine today.


The articles included in this issue are:
  • Briefing (i.e. the editorial) by Henry Hyde
  • Forward observer by Neil Shuck
  • Fantasy Facts: An Alien concept by John Treadaway
  • No Messines about: The British Army's attack, June 1917 by William Haggart
  • Command challenge: Reap the whirlwind by Mark A Latham
  • Send three and fourpence by Conrad Kinch
  • Whispering death : A complete convoy-bombing game by Dillon Browne
  • From Vietnam to Nieuw Friesland: The story of "Hammer's Slammers" by John Treadaway
  • Take that, you varlet!: A simple medieval melee game by Daniel Mersey
  • Muster mayhem: Who was that Leveller I saw you with last night by Arthur Harman
  • Sprange attack: It started in a pub ... an interview with Matthew Sprange by Conrad Kinch
  • Thoughts from an armchair by Mike Siggins
  • Recce
  • The Battlegames Combat Stress Appeal report by Henry Hyde
  • The Secret Eye Candy Page: Partisan 2013 Photo Gallery by Henry Hyde
From what I have read so far, this looks like being another great issue. I certainly think that I am getting my money's worth from my subscription.

Incorporating tanks into Morschauser's 'Frontier' wargames rules

I have been thinking about how I could incorporate tanks into my development of Joseph Morschauser's FRONTIER wargames rules ... and have come up with the following ideas.

Tanks will:
  • Move 2 grid squares;
  • Fire at a range of 4 grid squares as if they are light field artillery (i.e. they will be able to be stationary for a move to fire, but may not move during the same move);
  • Have a Battle Power of 7.
I have tried to keep the additions to the rules as simple as possible and to keep them in line with the Morschauser's original design philosophy.

With luck I should be able to see whether or not these ideas work in a play-test at some time over the weekend.

Thursday, 20 June 2013

Nugget 263

I collected the latest edition of THE NUGGET (N263) from the printer this morning and it will be posted out to members of Wargame Developments by Saturday.


I have also uploaded the PDF versions of THE NUGGET and THE NUGGET COLOUR SUPPLEMENT to the Wargame Developments website, and they are now available for members of Wargame Developments to read online or to download and print.


This is the penultimate issue of the subscription year and the last issue before COW2013. The next issue will be published at the end of August/beginning of September.

Wednesday, 19 June 2013

The Strackenzian Revolution

At the end of the First World War and in the aftermath of the Russian Revolution many countries suffered Communist-led revolutions ... and the former Duchy of Strackenz was no exception to this. In December 1918 the Duke of Strackenz had gone into exile in Paris, and a democratically-elected Socialist government had tried to take over ... but a Spartacist-inspired rising had ensured that a proletarian dictatorship now ruled Strackenz.

Under the leadership of Karl Rot (the Chairman of the ruling Proletarian Council) a 'People's Militia' had been formed to 'defend' the People's Democratic Republic of Strackenz from reactionary forces. Most of the Militia's rank-and-file were factory workers and students, and although they had plentiful supplies of small arms and ammunition, they lacked training and experience. The same could not be said to be true of their opponents.

A freikorps led by Colonel Erik von Sapten and recruited from ex-members of the Strackenzian regiments of the former Imperial German Army had been assembled just across the border in Mecklenburg. It was well-equipped with machine guns, mortars, and artillery, and its leader was determined to rid Strackenz of the 'Red Menace' that was 'infesting' his beloved homeland.

In response to the threat of an invasion, Karl Rot had ordered four battalions of the Strackenzian People's Militia to take up positions astride the road leading from Mecklenburg to Strackenz City ... at exactly the same place that the Mecklenburg invasion had been beaten off during the nineteenth century.

The opening positions
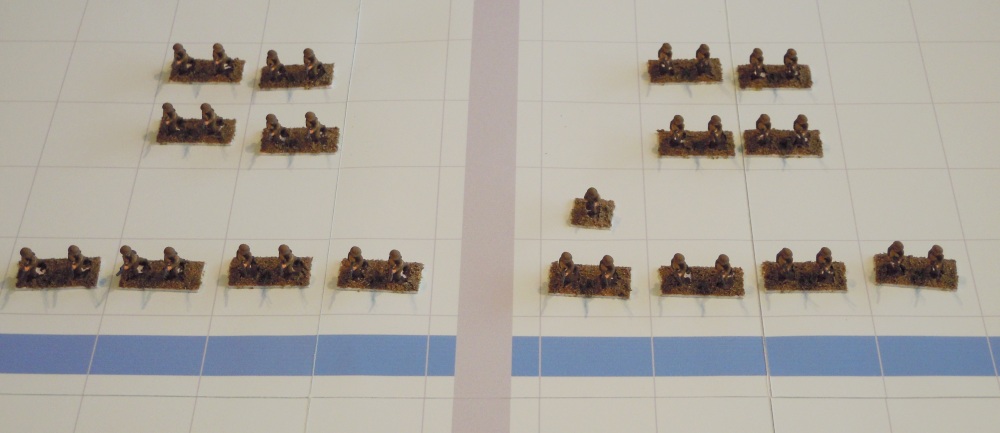
The Strackenzian Peoples' Militia had occupied positions astride the road on the western side of the river.


Von Sapten's Freikorps advanced along the road from the Strackenz-Mecklenburg border and emerged from the forest covering the Jotun Gipfel.


Turn 1
The Freikorps had the initiative and advanced towards the river ...


... whilst the Militia stayed where they were.


Turn 2
The Freikorps again had the initiative, and continued their advance ...


... and despite the entreaties of their commander (who had been a corporal during the First World War and therefore had some military experience) the Militia were fired up by the rhetoric of their Commissars and began to move forward.


Turn 3
This massed infantry proved too tempting a target for the Freikorps artillery and mortars, who opened fire on the advancing Militia. Although their fire did not land exactly where it had intended to, it did hit units of the Militia ...


... and destroyed them!

The Strackenzian People's Militia had the initiative and surged forward ...


... and their advance was met in several places by units of the Freikorps ...


... with catastrophic results for the Militia, who lost three units and had one force to retreat!


Turn 4
The Freikorps artillery and mortars opened fire yet again on the advancing Militia, but proved to be much less effective this time and only destroyed one Militia unit.


The Freikorps had the initiative, and used the opportunity this presented to consolidate their position by realigning some of their units.


Despite their mounting losses, the Militia continued their advance and engaged the Freikorps machine gun units in battle ...


... which they lost, but without suffering casualties.


Turn 5
As the Militia was almost on top of them Freikorps artillery and mortars opened fire at close range in the hope that this would cause the Militia to retreat. Their fire was accurate ... and very deadly!


This did not stop the Militia's advance, and their leading units were soon battling units of the Freikorps.


The fighting led to the destruction of a Freikorps infantry unit ...


... whilst elsewhere the Militia was unable to prevail and one of its units was forced to retreat.


Only one Freikorps unit counter-attacked, but it destroyed its opponent without difficulty.


Turn 6
Although only the Freikorps artillery unit and one of the mortar units were in range of any Militia units, the artillery unit did manage to hit and kill the Militia's commander.


This did not deter the Militia, who charged the line of Freikorps units ...


... and forced one of them to retreat.


The Freikorps were veterans, and this minor setback did little to stop them taking their revenge upon the Militia. One of the Freikorps machine gun units destroyed one of the Militia units attacking it ...


... whilst some distance away the Freikorps unit that had been forced to retreat returned to the combat and destroyed its opponent.


At this point the morale of the remaining Militia units broke and they began to fall back. The Freikorps were not prepared to let them get away, and the retreat turned into a massacre. Only a few of the People's Militia made it back to Strackenz City ... and they were swiftly followed by von Sapten's Freikorps, who exacted bloody revenge upon the revolutionaries. Karl Rot and the rest of the Proletarian Council were imprisoned and later shot after a very short series of courts martial that were organised and chaired by Colonel von Sapten. Von Sapten asked the Duke of Strackenz to return, but the latter refused to do so, and within a matter of month von Sapten had handed power over to a democratically elected Christian Democrat government.

The Strackenzian Revolution was over!

Note
For the purposes of this battle the Strackenzian People's Militia were given a Battle Power of 4 and the Freikorps mortars were treated as if they were light field artillery.

Conclusions
The changes to the combat system seemed to work well, and produced a number of reasonable results. It is fair to say that the Freikorps did have some lucky dice scores, but I don't think that this unduly skewed the results too much during the play-test.

One thing that became obvious is that artillery (including mortars) is deadly if troops move about the battlefield en masse. On several occasions during the play-test artillery and mortar fire did not hit the intended target ... but other enemy units were so close to the intended target that they were hit (and often destroyed) instead.

I really enjoyed this play-test and feel that the rules have lots of potential for further development. Interestingly the changes to the combat system actually reduced the length of the rules slightly, which was an unintended bonus. My thoughts are now turning to the incorporation of armoured fighting vehicles into the rules ... but more of that later.

Tuesday, 18 June 2013

A 'new' combat system for Morschauser's 'Frontier' wargames rules

I have been doing some serious thinking about a 'new' combat system for my latest version of Joseph Morschauser's FRONTIER wargames rules. My initial thoughts were that each side in a combat would throw a D6 die and then add that score to their unit's Battle Power. The side with the highest total score would then win the combat. In addition, if the winner's total score was twice (or more than twice) that of the loser, then the loser would be destroyed; otherwise the loser would have to retreat two grid squares at once. If the loser could not do so, their unit would be destroyed.

I very quickly realised that the probability of a unit ever destroying another equivalent unit were very, very low, and so I had to have a re-think ... and came up with the following:
  • Both sides in a combat throw a D6 die and add their die scores to their unit's Battle Power.
  • If the resulting scores are the same, the combat is a draw and both units survive until the next turn.
  • If the resulting scores are not the same, the side with highest score wins and if the winner's D6 die score was a 6, the loser's unit is destroyed, otherwise it must retreat immediately. If it is unable to retreat, the loser's unit is destroyed.
To see the effects of this 'new' combat system I set up a spreadsheet to test the results:
  • A machine gun unit (Battle Power = 6) in combat with a European infantry unit (Battle Power = 5) has a 58.33% overall probability of winning the combat (and a 16.67% overall probability of destroying the enemy unit), a 27.78% overall probability of losing the combat (and a 11.11% overall probability of being destroyed in the process), and a 13.89% overall probability of drawing the combat.
  • A European infantry unit (Battle Power = 5) in combat with another European infantry unit (Battle Power = 5) has a 41.67% overall probability of winning the combat (and a 13.89% overall probability of destroying the enemy unit), a 41.67% overall probability of losing the combat (and a 13.89% overall probability of being destroyed in the process), and a 16.67% overall probability of drawing the combat.
  • A Native infantry unit (Battle Power = 4) in combat with a European infantry unit (Battle Power = 5) has a 27.87% overall probability of winning the combat (and a 11.11% overall probability of destroying the enemy unit), a 58.33% overall probability of losing the combat (and a 16.67% overall probability of being destroyed in the process), and a 13.89% overall probability of drawing the combat.
  • An artillery unit (Battle Power = 1) in combat with a European infantry unit (Battle Power = 5) has a 2.78% overall probability of winning the combat (and a 2.78% overall probability of destroying the enemy unit [i.e. if it manages to win the combat it will automatically destroy the enemy unit]), a 91.67% overall probability of losing the combat (and a 16.67% overall probability of being destroyed in the process), and a 5.56% overall probability of drawing the combat.
This 'new' combat system appears to be a lot less 'bloody' than the existing combat system as well as being simple to use. It is not difficult to remember that if you throw a 6 and win (rather than draw) a combat, the enemy unit is destroyed. The 'new' system also allows less powerful units to have a chance of destroying stronger enemy units in the right circumstances.

I hope to play-test this 'new' combat system in the very near future.

Monday, 17 June 2013

Gideon's Angel

I need to make something clear. As a general rule I don't read books about the supernatural and I don't read historical fiction set before the Napoleonic Wars. So why have I just read GIDEON'S ANGEL by Clifford Beal (published in 2013 by Solaris Books [ISBN 978 1 78108 083 2])?


The simple answer is that I know the author ... but I don't want to give the impression that the following review of this book is favourable just because it was written by someone I know ... it is favourable because it is a very good novel.

The main character is Richard Treadwell, a professional soldier who supported the defeated – and subsequently executed – King Charles I, and who now serves in Cardinal Mazarin's Guard. The Cardinal gets wind of a plot by the exiled Royalists to overthrow Cromwell's regime, and that it might involve the use of some form of necromancy. Treadwell is given the task of investigating what is happening, but uses the opportunity it provides to go back to England – for which he has been exiled for life – to see his wife and family. In the process he becomes involved in a plot to kill Cromwell ... and then to save him from being killed by members of the Fifth Monarchy movement who think that they are doing God's work, but who have been duped into using supernatural forces to ensure that England falls under Satan's control. He is aided in his battle against the Forces of Darkness by a French lieutenant (none other than D'Artagnan), the daughter of a fellow exile who is also Treadwell's mistress, a former Parliamentarian soldier (who is also a member of the Ranters), Elias Ashmole (the famous English antiquary, astrologer, and student of alchemy), a Jewish wine merchant (who is also a rabbi), the wine merchant's daughter, and a gypsy-like wise woman.

All the characters are believable, well-rounded, and reflect the numerous contemporary beliefs and scientific/philosophical understanding of the period, so much so that I found it easy to believe the supernatural elements of the book as seen through their eyes. The fight scenes are all exceptionally well described and sound technically correct ... which is hardly surprising as the author is a renowned swordsman. The depictions of seventeenth century Plymouth, Exeter, and London are obviously based on high-quality research, and one could almost smell the sweat and the stench of rubbish and manure that permeated the atmosphere of those places. The story also clips along at a vigorous pace, and I did find it difficult to put down once I started to read this book.

I will certainly read any other books about Richard Treadwell's adventures in seventeenth century Europe. I understand that at least one more book is almost complete and that there may be plans for a third.

PS. My copy of the book came from Amazon UK ... but had the cover intended for the US/Canada edition (ISBN 978 1 78108 084 9).

Sunday, 16 June 2013

Making Morschauser's 'Frontier' wargames rules less bloody

Yesterday's play-test of Joseph Morschauser's FRONTIER wargames rules was very enjoyable but it did demonstrate that the artillery fire and combat systems are rather 'bloody'. Units either survive or are destroyed; there are no other results.

Whilst this means that the battles can be fought very quickly, it also means that both sides seem to lose units at a very fast pace once the fighting starts. Although this can be rationalised away as representing the 'loss' of units that still exist but that are no longer capable of further combat, it does rather leave the tabletop battlefield somewhat denuded of toy soldiers ... and this can detract from the aesthetic appeal of the game. It also does not feel right.

So what can be done?

Firstly it should be possible to amend the artillery rules so that units can be hit but not destroyed. As written a unit that is hit is destroyed by a 2, 4, or 6 by direct fire and by a 4 or 6 by indirect fire. My current thinking is that this could be changed so that a unit will be pinned (i.e. unable to move, fire or engage in combat until the end of the next turn) by a 2 or 4 by direct fire and a 4 by indirect fire. This would reduce the number of units that are totally destroyed by artillery fire and also disrupt the movement of units on the battlefield.

Secondly the combat mechanism needs to be altered so that there are three possible results rather than the present two. Something simple could easily be devised along the lines of the combat system used in the DBA/HOTT rules. My current thinking is that each side could throw a D6 die and add the score to their unit's Battle Power. The side with the highest total score wins the combat. If the winner's total score is twice or more than that of the loser, then the loser is destroyed; if the total score is less than twice that of the loser, then the loser must retreat two grid squares at once. If it cannot do so, it is destroyed.

I would also like to incorporate the use of playing card tiles in my own solo version of the rules as I think that this would make the game a bit more interesting and a little less predictable. Likewise I am giving serious consideration to allowing Native infantry and all mounted cavalry the ability to move diagonally if such a move would bring them into combat with an enemy unit.

These are my initial thoughts about how the rules could be improved, and no doubt I – and some of my regular blog readers – will come up with others as the day progresses.

Nugget 263

The editor of THE NUGGET emailed the original of the latest issue (N263) to me last night, and I hope to be able to take it to the printer tomorrow morning. With luck I should then be able to collect it from the printer by Thursday so that I can post it out to members of Wargame Developments by Friday at the very latest.

This issue is the last before COW2013, and contains a brief outline of the sessions that are on offer. A full programme will be published in due course, and will be sent to attendees.

If any of my regular blog readers would like to subscribe to THE NUGGET, they can do so via the link on the Wargame Developments website (click here).

IMPORTANT: Please note that this is the penultimate issue of THE NUGGET before the next year's subscription begins.

Saturday, 15 June 2013

The invasion of Strackenz

Otto von Bismarck's plan to destabilise the Duchy of Strackenz so that it can be 'incorporated' into the German (actually Prussian) sphere-of-influence has come to fruition. A number of disturbances – including some anti-Danish street demonstrations, the looting of a few shops and houses belonging to Danish merchants, and the burning down of the offices of a Danish-language newspaper – have broken out in Strackenz City. The Strackenzian Army has attempted to restore order, and leading members of the German community have accused them of only arresting German-speaking members of the population. Outside Strackenz there have been calls for some form of 'intervention' to protect Germans living in the Duchy ... and this has been backed by the Prussian Government.

The Prussians have put pressure on the Grand Duke of Mecklenburg to send troops into Strackenz 'to restore order' ... and he has rather reluctantly agreed to do as he has been asked. (This ensures, of course, that von Bismarck can claim that it is a German rather than a Prussian 'intervention'. The old boy was no fool!) To this end three infantry battalions and an artillery battery of the Mecklenburg Army have marched across the border and are making their way towards Strackenz City.

In response an infantry battalion (1st Battalion, Strackenz Grenadiers) and an artillery battery of the Strackenzian Army – under the leadership of Marshal von Saldern, the Constable of Strackenz – have taken up positions astride the road leading from Mecklenburg to Strackenz City. They have occupied the western side of the only bridge across the river ... a bridge that the invaders must cross if they are to reach Strackenz City.

The opening positions
The Strackenzians have occupied positions astride the road on the western side of the river.


The Mecklenburgers will emerge from the forest covering the Jotun Gipfel along the road from the Strackenz-Mecklenburg border.


Turn 1
The leading infantry company of the Mecklenburgers advanced down the road towards the bridge, followed by the rest of the battalion.


Turn 2
The Strackenzian artillery battery opened fire ... and hit and destroyed the foremost Mecklenburg infantry company!


The remainder of the leading Mecklenburg infantry battalion began to deploy. They were followed out into the plain by their commander and three companies of the second Mecklenburg infantry battalion.


Turn 3
The Strackenzian artillery fired for a second time ... and destroyed yet another Mecklenburg infantry company!


The Mecklenburgers were determined to get to grips with the Strackenzians as quickly as possible, and whilst two of their infantry companies advanced as quickly as they could towards the river, the rest of the Mecklenburg troops began to deploy behind them.


Turn 4
The Strackenzian artillery battery fired for a third time ... and missed! This gave the Mecklenburgers the opportunity to continue their deployment and to bring their artillery battery closer to the river.


Turn 5
The Strackenzian artillery battery opened fire on the Mecklenburg infantry company that was directly in front of it ...


... and destroyed it. The Mecklenburg artillery battery returned fire, but its shot landed behind the Strakenzian artillery battery.


Having gained the initiative this turn, the Mecklenburg infantry advanced, and several infantry companies began to wade across the river ... a course of action that the Strackenzians had expected.


The resultant fighting was intense, and both sides lost heavily.


The turn ended with the Mecklenburgers weakened but still numerous enough to continue their advance, whilst the Strackenzians had barely enough troops to mount even a token defence.


Turn 6
A further exchange of artillery fire resulted in the destruction of the Strackenzian artillery battery, but before the Mecklenburgers could push home their advantage a group of Strackenzian militia (made up entirely of members of the Sons of the Volsungs) burst out of the forest behind the Mecklenburgers!


This cause the Mecklenburg commander considerable consternation, and he hurriedly sent two of his infantry companies back to deal with the threat.


Unfortunately for the Mecklenburgers, the Sons of the Volsungs were all excellent shots (many of them were foresters and huntsmen) and they shot the first of the Mecklenburg infantry companies to pieces.


Turn 7
Whilst the Mecklenburg artillery battery moved away from the threat as quickly as possible, the second Mecklenburg infantry company closed with the Strackenzian militia ... and suffered the same fate as its sister unit!


It was now apparent that the Mecklenburgers had let the possibility of victory slip from their grasp.


Turn 8
Neither the Strackenzians nor the Mecklenburgers were now in a position to win the battle, but both sides realised that they could still lose it if they made the wrong decision what to do next. The Mecklenburg commander pulled his remaining units together around the bridge, and the Strackenzian commander – Marshal von Saldern – ordered his units to stay out of range of infantry combat.


Both sides remained in these positions until nightfall, at which point the Mecklenburgers retreated unhindered back down the road to the Strackenz-Mecklenburg border.

The Duchy of Strackenz was safe again – for the moment – and von Bismarck's plans had come to nought ... this time!

Conclusions
Joseph Morschauser’s FRONTIER rules produce very bloody battles that – once each side gets into combat with the other – can be over in a matter of minutes. What is important is the use of artillery to break up enemy attacks before they get too close and ensuring that you manoeuvre your units into the best possible position before you get into combat.

The extemporised printed card terrain worked very well and took only a matter of minutes to produce and piece together. The green card did not appear very green in the photographs (it is actually described as being emerald green on the packet), but the grey rather than black grid lines were visible but did not detract from the overall look of the battle.

I thoroughly enjoyed setting up this play-test, especially as it was the first wargame I have fought in months! I do like the simplicity of Morschauser’s basic rules, although the results of infantry combat are a bit too black-and-white for my personal taste (I remember now why I introduced a retreat option when I first began to modify the rules!).

I have plenty to think about and I have several ideas as to how the rules could be developed … and I might easily be tempted to run another play-test battle in the near future to try some of these ideas out.

Bespoke Terrain ... sort of

I intended to set out the terrain for my play-test of Joseph Morschauser's FRONTIER wargames rules this morning ... and then discovered that I could not find the gridded green cloth that I had planned to use. After a fruitless search of my wargames/toy room I gave up and watched the Queen's Birthday Parade on the TV.

Whilst I was doing so I saw a copy of last month's issue of MINIATURE WARGAMES (May 2013 No.361) on the coffee table ... and then remembered Arthur Harman's article about his PORTABLE LITTLE WARGAME. Henry Hyde had set up a photograph to illustrate the article, and seeing it made me think. I did not have a piece of grass mat available ... but I did have green card, a PC, a drawing program (MS Publisher), and a colour printer ... so I drew and printed off a bespoke terrain for my play-test battle!


I laid out a 40mm x 40mm grid on each sheet and then I drew the grid lines on in grey. I then added the road (in grey), the river (in blue), and the edge of the woods that the invaders will appear from (in dark green). The fact that I printed it out onto green card meant that I did not waste ink printing the main body of the terrain.

All I have to do now is to trim the sheets of card down to size and stick them together using masking tape ... et voila!