I had an inkling that the naval battle we were going to fight was going to be a big one ... but it wasn't until I actually entered the room, we were going to fight in that I realised that the ship models were set up for the opening moves of the Battle of Jutland!
Before trying to write a battle report, I must point out a few things. Firstly, the ship models used belong to the vast collections of two of my long-term wargaming friends and that the location was the floor of an empty office that we were able to access thanks to another member of the Jockey's Fields Irregulars. Secondly, that the mix of players included experienced naval wargamers who had used the rules before and a couple of total novices. Thirdly, that no ships below the size of a capital ship (i.e. battleships and battlecruisers) was used in order to speed up play. Fourthly, that the usually tedious measuring of gun ranges was speeded up by the use of laser measuring tapes by the umpires ... hence the appearance of little red boxes (i.e. the 'targets' for the lasers) in the following photographs. Finally, my battle report (which is written from the point of view of the British fleet commander) is very photo heavy, and I recommend that readers click on the images if they need to see them in a larger size.
The Battle of Jutland: Opening situation
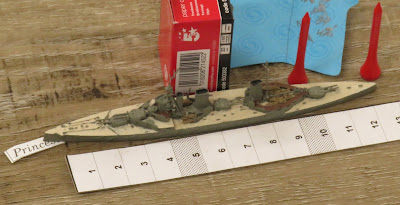
The action opened when the 1st and 2nd Battlecruiser Squadrons (HMS Princess Royal, HMS Queen Mary, & HMS Tiger and HMS New Zealand & HMS Indefatigable respectively, led by HMS Lion) ...

Left to right: HMS Lion, HMS Princess Royal, and HMS Queen Mary.

Left to right: HMS Tiger, HMS New Zealand, and HMS Indefatigable.
... came in sight of the German 1st Scouting Group (SMS Derfflinger, SMS Seydlitz, SMS Moltke, and SMS Von der Tann, lead by SMS Lutzow).

The German 1st Scouting Group.

Turn 1
My initial orders were for the two Battlecruiser Squadrons to follow HMS Lion in line, by turning 10 degrees to port in order to close the range on the German ships. Almost immediately, HMS Lion was bracketed by fire for the leading German battlecruisers.

HMS Lion in the lead.

The two Battlecruiser Squadrons open fire ...

... HMS Lion, HMS Princess Royal, ...

... HMS Queen Mary, HMS Tiger, ...

... HMS New Zealand, and HMS Indefatigable.

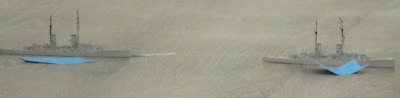
Getting the range and direction of fire right is a vital task ... but one that has to be completed within a very short time frame! The players write the range at which they are firing on the blue arrows, which they must point at the target they are firing at.

Then the process of measuring ranges begins ...

... using the laser measuring tapes.

The players await the results of the first exchange of fire. This photograph gives some idea of the size of the room (and floor) used for this battle.
Turn 2
I ordered the two Battlecruiser Squadrons to turn to starboard 5 degrees in order to position them so that they would be in a better placed to 'cross the T' of the German battle line later in the battle. In response, the Germans seemed to turn to port by approximately 5 degrees.
Turn 3
The opposing battlecruisers continued to sail on slightly converging courses, exchanging fire as they did.

HMS Lion is bracketed by many shells ... and hit once!
Turn 4
This continued during the next turn, and ships began to suffer damage.

Like her sistership HMS Lion, HMS Queen Mary was also hit by several 12-inch shells fired by the German battlecruisers.
Turn 5
At this point the Germans did something unexpected ... and their line of battlecruisers began to split. Some maintained their existing course, but others turned to starboard, bringing them closer to the British ships.

The German battlecruiser squadron ... apparently in total disarray!
I ordered the 1st and 2nd Battlecruiser Squadrons to turn 40 degrees to starboard in order to position them to deal with the apparently errant German battlecruisers ... and one of them began to suffer serious damage.

SMS Von der Tann was repeatedly hit by 13.5-inch shells fired by some of the 'Big Cats' (i.e. the larger of the British battlecruisers).
The smoke of the 5th Battle Squadron was then seen coming from some distance behind the line of British battlecruisers.
Turn 6
I ordered the 1st and 2nd Battlecruiser and 5th Battle Squadrons to maintain their current course and to engage the enemy as best they could. The results were devastating for the SMS Von der Tann, which came under galling and effective gunfire yet again.

The number of shell splashes (i.e. upturned golf tees) shows just how much gunfire the two errant German battlecruisers came under.

The SMS Von der Tann was hit four times. This is indicated by the upturned red golf tees.
Turn 7
Whilst the 5th Battle Squadron continued on its existing course, the 1st and 2nd Battlecruiser Squadrons turned 10 degrees to port to shorten the range to the closest German battlecruisers.
Turn 8
Smoke was seen behind the the furthest German battlecruiser ... and this meant that the High Seas Fleet was approaching!
The leading German battleships of the High Seas Fleet emerging from the North Sea gloom. As can be seen, the grey flooring really helped to make it difficult to see ships at any distances.

The leading squadrons of the German High Seas Fleet.
The appearance of the main body of the German fleet did little to influence the fighting that was taking place between the battlecruisers.

HMS Princess Royal ...

... and HMS Lion were both hit by enemy shells.
Turn 9
As the leading battleships of the High Seas Fleet came into range and began firing with great effect at the British battlecruisers, ...

HMS Lion under fire from both the German battlecruisers and the leading battleships of the High Seas Fleet. She suffered twelve hits, which caused her considerable damage ... and would eventually lead to her sinking.

HMS Queen Mary was also damaged, but not as badly.
... it seems appropriate that the ships of the 1st Battlecruiser Squadron should begin to turn away by executing a 90 degree turn to starboard.

The carefully choreographed 'battle turn away' performed by the 1st Battlecruiser Squadron.
Turn 10
The ships of the 2nd Battlecruiser Squadron also began to turn away from the oncoming High Seas Fleet, ...

The 1st and 2nd Battlecruiser Squadrons complete their 'battle turn away' and begin their run back towards the Grand Fleet.

The leading units of the German High Seas Fleet. Two of the German battlecruisers are in the foreground.
... hopefully drawing them towards the 5th Battle Squadron and the Grand Fleet.

The 5th Battle Squadron continued to engage any enemy ships that came within range.
Turn 11
Whilst the High Seas Fleet continued to sail into sight, ...

The main body of the German High Seas Fleet!
... both sides ships continued to suffer damage.

A German battlecruiser is hit three times ...
... and HMS Princess Royal also suffers serious damage.
Turn 12
By this time, British reinforcements came into sight. The 3rd Battlecruiser Squadron (HMS Invincible, HMS Inflexible, and HMS Indomitable) had arrived!

The 3rd Battlecruiser Squadron has arrived!
Just behind them, the leading units of the Grand Fleet began to emerge from the gloom.

British super-dreadnaughts of the Grand Fleet.

Left to right: Two King George V-class super-dreadnaughts following two Orion-class super-dreadnaughts into battle.
Turn 13
Whilst the main bodies of both fleets sailed towards each other, HMS Barham came under fire from the leading dreadnaughts of the High Sees Fleet ... and suffered further damage.

HMS Barham is hit twice by German heavy shells.
HMS Lion, which had suffered very heavy damage earlier in the fighting, finally sank.
Turn 14
As more and more battleships of the Grand Fleet hove into sight ...

More ships of the Grand Fleet come into view.
... some of the German dreadnoughts began to suffer damage at the hand of the 5th Battle Squadron.

A German battleship of the Helgoland-class is hit three times by 15-inch shells.
At this point, we ran out of time and the battle came to an end. We all wish that we could have continued fighting this incredible wargame, but it left us all wanting to do it again.
The situation at the end of the wargame
The following photographs show the positions of the two fleets at the end of the wargame.
The positions of the opposing fleets at the end of the battle.

The positions of the opposing fleets at the end of the battle with labels.
Please note that these two photographs are quite large (1.6 Mb each) and are best viewed by clicking on them.


.webp)


What a great looking game and I loved the fact that you had to get down to sight your guns and then guess the range; a great idea! Sadly my knees wouldn't cope with that now but maybe something similar could be done on a large table with smaller scale ships!
ReplyDeleteAs you mentioned before, at this grand scale, you really do get the feel of a large fleet action and the distances involved. I do hope you are able to repeat this at some point in the future.
Steve J.,
DeleteThe gunnery system can be a bit slow to use if the umpires have to use tape measures, but the introduction of lasers speeds everything up. It also simulates the real life problems experienced by naval gunners at the time, namely getting the range and direction right! I left all the difficult bits (i.e. kneeling down etc.) to my younger colleagues.
I suspect that within the next year or so, another large naval action of this sort is likely to be staged somewhere in the UK. I only hope that I get the opportunity to take part!
All the best,
Bob
Hello there Bob,
ReplyDeleteMagnificent! One could have spent the whole weekend fighting this. The models are lovely looking and probably hideously expensive but what a spectacle!
All the best,
DC
PS Was you 'eye' in to good effect?
David Crook,
DeleteYou really ought to come to the next Fletcher Pratt naval battle; you would thoroughly enjoy it!
I understand that the models were bought as and when they became available at a reasonable price ... and having seen a couple of examples of 3D printed ones that cost less than £5.00 to make, such large fleets are now not beyond the pocket of most wargamers.
I didn't take part in nay of the shooting, being confined to the admiral's chair!
All the best,
Bob
Hello BOB,
ReplyDeleteMagnificent Naval Battle- it would have been great to participate in such an event- rather special for you Bob. Thought the Ships may have been represented with name Titles for each Model- it would have been hard to tell which ship is which...guess everyone knew the shape and design of their battleships. Thanks for posting. Cheers. KEV.
Kev Robertson (Kev),
DeleteIt was a magnificent sight to see so many model ships in action together, and taking part is a memory that will last with me for a very long time.
It is not clear in the photos, but each model had a very small paper label underneath it showing its name. This helped everyone to keep track of which ships were being damaged.
All the best,
Bob
A splendid game, if only real life could be paused to allow such games to complete. I'm very jealous of your laser measures (I had to use a tape) can you specify the model used and how accurate it is?
ReplyDeleteRob,
DeleteIt would have been great to actually seen the two opposing fleets in action against each other, but we would have needed at least another five or six hours to get to a conclusion ... and we just did not have the time.
The lasers were relatively inexpensive (I think they cost about £20.00 each) and when checked against standard metal tape measures, they were as accurate.
All the best,
Bob
Wow, brings back memories of games held by the Halifax-Dartmouth Wargaming Leaque at Dalhousie University in the early to mid 1970s. I still have my SMS Lutzow balsa wood model. Wish we had digital cameras back then.
ReplyDeleteRthingley,
DeleteI'm glad that this blog post has reminded you of such a memorable event! I hope that you dust off your model of the Lutzow and that she sees some tabletop action soon.
All the best,
Bob
This brought back some fond memories for me. When I lived in the Dallas-Fort Worth Texas area during the 70s and early 80s, I belonged to a group that played Fletcher Pratt pretty regularly. We actually had a fictional series of wars set in the 1930s called the Tuna Wars. We presumed a famine that was so severe that nations were fighting over the world's fisheries and we proceeded to provide navies using the historical ships of the time for the various combatants and fight the battles on basketball courts or in large empty office building rooms. It was great fun.
ReplyDeleteUnknown,
DeleteYou were fighting your Fletcher Pratt battles at about the same time I was taking part in the Madasahatta Campaign, where all the naval actions were fought using the rules.
Your Tuna Wars sound as if they were great fun, and very much in the tradition of the original games.
If you have access to a large enough space, the rules do give you the feel of a real naval battle.
All the best,
Bob
That looks fantastic. I do like a good FP naval game.
ReplyDeleteCheers,
Pete.
Pete.,
DeleteNow that the speed of play has been improved by the use of laser measuring devices, the game is even better.
All the best,
Bob
"A German battleship of the Helgoland-class is hit three times by 15-inch shells."
ReplyDeleteIn the third picture up from the comments, there's a strip of paper(?) or something between the funnels and the masts? Was that part of the ship, just the model or was it something to aid in the game?
Mr. Pavone,
DeleteThe strip of paper has the ship's name on it as an aid to the umpires.
All the best,
Bob
Excellent report Bob. Certainly a game to remember and the use of laser measuring devices was a very clever idea. Cheers Greg
ReplyDeleteDelta Coy (Greg),
DeleteCheers! Its great to hear from you again!
It was a memorable battle, and the use of the laser measuring devices considerably speeded up the adjudication of gunfire. Conventional tape measures are either too flexible (surveyor's tapes) or not long enough (metal builder's tapes) and take too much time to get right.
All the best,
Bob
Like some of the other commentators, this takes me back 50 years to the Fletcher Pratt WWll sea battles my friends and I fought on our basement floors. We used a lot more elaborate range finders made out of clothes hangers. Each of us collected a different navy in 1:1200 scale and we had quite an naval arms race... I still have my Royal Navy fleet and every so often take it out and admire it.
ReplyDeleteCharles Litka,
DeletePerhaps putting on this sort of game and writing blog posts about them might revive some interest in Fletcher Pratt's rules. I do hope so ... and then your fleet might get another chance to see some action again!
I'm interested to know more about how you made rangefinders out of clothes hangers ... although they would not have been allowed in the game I took part in.
All the best,
Bob
Hi Bob,
DeleteOops, this comment slipped my mind until now. Our "rangefinders" did not indicate range,but were merely used for targeting. We did not have umpires, to determine if your ship was aiming accurately. The proof was in the wire "rangefinder", which basically consisted of the wire of a clothes hanger bent into two end posts fore and aft for aiming with a straight stretch of wire between them along which the tape measure was laid and run out to the target.Some sort of foot was also included to keep the posts upright. This device was taped down to the floor to insure that it wasn't bumped in the measuring process. We also used golf teas to indicate the fall of shells.
It would be fun to get down on the floor to sail a fleet again -- getting up, however, would be problematical these days):
Charles Litka,
DeleteAh! That makes lots of sense! It must have made things a lot easier in the absence of an umpire or umpires.
I use slightly shorter castle golf tees designed for lifting the ball at a particular distance above the grass. They are much more stable than normal tees when inverted.
Like you, getting down on the floor is easy … but getting up is problematic.
All the best,
Bob
Absolutely brilliant Bob, I am completely envious :)
ReplyDeleteYou lucky man :)
Geordie an Exiled FoG,
DeletePerhaps you might get a chance to take part in such a game one day. I do hope so.
All the best,
Bob
I am not really a naval gamer but that was most excellent..
ReplyDeleteCan you tell me what the boxes by some of the ships signify?
Steve-the-Wargamer,
DeleteEven the novice naval wargamers enjoyed it, if only because of the spectacle.
The small red boxes are the aiming points for the lasers.
All the best,
Bob
Looks like jolly good fun.
ReplyDeleteAdelaide Gamer,
DeleteIt was … and we hope hold a similar event next year.
All the best,
Bob
Any sign of a player who commands a good knowledge of trigonometry with a facility for mental arithmetic and a careful study of floor geometry? I vaguely recall at least one account from ancient wargaming history of such an individual achieving exceptional gunnery results. As no artificial aids were involved and any opponents could have done the same it seemed to be perfectly fair.
ReplyDeleteMike Hall,
DeleteDuring one of Fletcher Pratt’s games a team of US Navy officers were trounced by a team of seamstresses who - thanks to their professional expertise - were able to estimate ranges very accurately.
When I took part in naval wargames during the Madasahatta Campaign, I gained a reputation for being able to estimate ranges quite accurately … using the method that you suggest.
All the best,
Bob