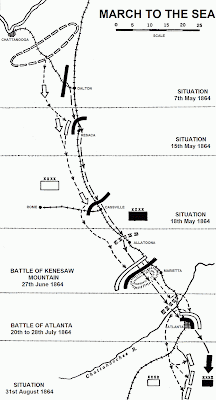
5th May 1864: ADVANCE INTO GEORGIA
Sherman's army group left Chattanooga. It included:
27th June 1864: BATTLE OF KENESAW MOUNTAIN
After a series of indecisive combats near Dallas and New Hope Church (25th to 28th May), Sherman made a frontal assault on Kenesaw Mountain, which was the key to Johnston's position. The attacks were repulsed and Sherman lost some 3,000 men. Johnston’s losses were only 800. Once again Sherman (2nd July) turned his opponents left, and Johnston (4th July) took up a powerful entrenched line north of the Chattahoochee River.
9th July 1864: CROSSING OF THE CHATTAHOOCHEE
Again Sherman turned the Confederate position. Johnston fell back on Peachtree Creek, just north of Atlanta, and prepared for a counterattack. He was then summarily relieved of overall command on 17th July. This could be viewed as an ungrateful administration's reward for a really remarkable delaying campaign against very superior forces. For 2 months he had, with a minimum of losses, held Sherman to an average advance of 1 mile per day. He was succeeded by John B. Hood, who had a reputation for being somewhat impetuous.
20th July 1864: BATTLE OF PEACHTREE CREEK
Johnston had already foreseen that Sherman's advance on Atlanta, on a 10 mile front, offered possibility for a successful counterstroke. Hood seized the opportunity, and attacked Thomas’ army. Although surprised, the Union forces were alert and the attack was repulsed. Some 20,000 men on each side were involved. Southern casualties were about 2,500 and Union losses were 1,600. The Union advance continued (21st July), forcing Hood to withdraw behind Atlanta’s defences. Sherman hoped to follow his enemy into the city and sent his left-flank cavalry division eastward to cut the railway. Hood, however, had retreated with the full intention to strike back.
22nd July: BATTLE OF ATLANTA 1864
William J. Hardee's corps - the elite of Hood's army - together with Joseph Wheeler's cavalry division, hit the open left flank of McPherson's army. Surprise was complete, but the veteran Federal troops reformed, despite the death of McPherson in the melee. The assault was repulsed with Confederate losses of some 8,000 men. Federal casualties were 3,722. Sherman - his strength insufficient for a siege - determined to swing entirely around to the western side of Atlanta and operate against the railroads. Sending most of his cavalry raiding south (27th July), he started the move next day.
28th July 1864: BATTLE OF EZRA CHURCH
An further assault by Hood was repelled - mainly by the Army of the Tennessee - with 4,300 Southern casualties against 632 Union losses.
28th July to 22nd August 1864: CAVALRY RAIDS
Part of Sherman's cavalry - 6,000 strong - moving around both sides of Atlanta failed in its dual mission to cut the railroad and to liberate the Union prisoners at Andersonville. As a result Major General George Stoneman and some 2,000 men were surrounded and captured by the Confederates on 4th August. Meanwhile Sherman continued to build up the strength of his forces on Atlanta's western side. Another Union cavalry raid was mounted of 22nd August but this also failed to cut rail communication between Atlanta and the outside world.
27th to 31st August 1864: FALL OF ATLANTA
Leaving one army corps to guard his own communications, Sherman swung his remaining troops forward in a great wheeling move towards the railroad lines south of the city, driving Wheeler's cavalry before them. Hood sent Major General W. J. Hardee - with half of his army - to hold the railroads, but Hardee was thrown back at Jonesboro on 31st August. Hood's communications line was cut now cut, and after destroying ammunition and supply stores, Hood evacuated Atlanta that night, moving east and south. Next morning Sherman's troops marched in.
September to October: MANOEUVRING AROUND ATLANTA 1864
Sherman, turned Atlanta a military base, but found further any further advance almost impossible because of the need to protect his 400-mile line of communications to Nashville. In addition to the daring and successful attackes of Forrest and Wheeler, Hood had moved west and north with his entire army (1st October) to attack these lines of communication in the hope of forcing Sherman's withdrawal from the city. After chasing Hood’s force through Allatoona (5th October) as far as Baylesville, Alabama (22nd October), Sherman came to the conclusion that further efforts to get to grips with the elusive Confederates would nullify Grant's giant pincers concept.
14th November 1864: HOOD INVADES TENNESSEE
Reinforced by Forrest's cavalry, Hood crossed the Tennessee River and moved rapidly northwards toward Nashville with 54,000 veteran troops. Thomas, building an extemporised army at Nashville around his own hard core of veterans, did not wish to withdraw garrisons from key points in Tennessee. He therefore played for time. Major General John M. Schofield, with 2 corps and Wilson's cavalry division (about 34,000 men in all) was directed to delay the Southern advance. Schofield managed to avoid Hood's attempts to box him in at Columbia (26th & 27th November), and he fought his way through the enveloping Confederate forces in a night battle at Spring Hill (29th November), and then moved into previously prepared defences at Franklin, 15 miles south of Nashville.
15th November to 8th December 1864: MARCH FROM ATLANTA
Sherman solved the problem - with the somewhat reluctant approval of Grant - by sending Thomas' Army of the Cumberland back to Nashville and Chattanooga, whilst he abandoned his line of communications and marched eastward from Atlanta toward Savannah with 68,000 veterans. With him were 2,500 wagons and 600 ambulances carrying supplies (mostly ammunition); other that that, his men lived off the country. With practically no opposition he cut a 50-mile-wide swath of ‘scorched earth’ to the sea, 300 miles away. He was deliberately making ‘Georgia howl’ as he devastated crops and the war-supporting economy of central Georgia. He ignored Hood's efforts to distract him when the latter mounted a full-scale invasion of Tennessee whilst - to his front - Beauregard, assisted by Hardee, tried to protect Savannah and Charleston.
30th November 1864: BATTLE OF FRANKLIN
Hood, impetuous as ever, attacked piecemeal with two-thirds of his army. He was thrown back after losing 6,300 casualties out of 38,000 men engaged. His opponent – Schofield - lost 2,300 out of his force of 32,000 men. Having successfully defeated Hood’s army, Schofield retired that night to Nashville.
15th & 16th December 1864: BATTLE OF NASHVILLE
Hood assembled his army outside the defences of Nashville from 2nd December onwards. In the meantime methodical Thomas, who was busy training his largely newly-recruited army - particularly Wilson's new cavalry corps - would not be budged until he was ready. When he did finally attack, he destroyed the left flank of Hood's army because it was exposed as a result of Hood’s decision to send Forrest away on a raid towards Murfreesboro. On the second day of the battle Hood found Thomas’ troops were enveloping both his flanks. In the end Wilson's cavalry, which struck behind the Confederate left, delivered the final blow. Federal losses were 3,061 out of 49,773 men engaged. The Confederates lost 5,350 out of 31,000 on the field, and Hood's army dissolved into a fleeing rabble. This was the most decisive tactical victory gained by either side in a major engagement in the war.
9th to 21st December 1864: OPERATIONS AGAINST SAVANNAH
Arriving in eastern Georgia, Sherman discovered that Hardee held fortified Savannah with 15,000 men. Sherman stormed Fort McAllister at the mouth of the Ogcechee River, 15 miles from Savannah on 13th December. After establishing communications with Union naval forces, Sherman’s army began an investment of the city. With his lines of communication about to be cut, Hardee evacuated the city and Sherman moved in at once (21st December), presenting the city (in a ship-borne and telegraph message to Lincoln) as ‘a Christmas gift’.
Umpire’s Comments
One measure of whether or not the re-creation of a particular historical campaign works is to compare what happened in the game with what happened in reality, and it is interesting to see how close some of the events in the game mirrored those of the actual campaign. This may - in part - be due to the fact that several of the players were very knowledgeable about the period, but it is also due to the quality of the arguments presented by the players, most of whom took a very ‘cultural’ (i.e. historically correct) view of events as they unfolded. For my part I deliberately did not read up any of my sources about the Atlanta Campaign until I had typed in the last moves. This was in order to ensure that I did make any biased decisions as I ran the campaign. The result was a realistic and enjoyable campaign that was not a burden to the players - I hope - or the umpire. I enjoyed it very much, and I hope that you did too.
Sherman's army group left Chattanooga. It included:
- Thomas' Army of the Cumberland, 61,000 strong
- James B. McPherson's Army of the Tennessee, 24,500 men
- John M. Schofield's Army of the Ohio, mustering 13,500.
27th June 1864: BATTLE OF KENESAW MOUNTAIN
After a series of indecisive combats near Dallas and New Hope Church (25th to 28th May), Sherman made a frontal assault on Kenesaw Mountain, which was the key to Johnston's position. The attacks were repulsed and Sherman lost some 3,000 men. Johnston’s losses were only 800. Once again Sherman (2nd July) turned his opponents left, and Johnston (4th July) took up a powerful entrenched line north of the Chattahoochee River.
9th July 1864: CROSSING OF THE CHATTAHOOCHEE
Again Sherman turned the Confederate position. Johnston fell back on Peachtree Creek, just north of Atlanta, and prepared for a counterattack. He was then summarily relieved of overall command on 17th July. This could be viewed as an ungrateful administration's reward for a really remarkable delaying campaign against very superior forces. For 2 months he had, with a minimum of losses, held Sherman to an average advance of 1 mile per day. He was succeeded by John B. Hood, who had a reputation for being somewhat impetuous.
20th July 1864: BATTLE OF PEACHTREE CREEK
Johnston had already foreseen that Sherman's advance on Atlanta, on a 10 mile front, offered possibility for a successful counterstroke. Hood seized the opportunity, and attacked Thomas’ army. Although surprised, the Union forces were alert and the attack was repulsed. Some 20,000 men on each side were involved. Southern casualties were about 2,500 and Union losses were 1,600. The Union advance continued (21st July), forcing Hood to withdraw behind Atlanta’s defences. Sherman hoped to follow his enemy into the city and sent his left-flank cavalry division eastward to cut the railway. Hood, however, had retreated with the full intention to strike back.
22nd July: BATTLE OF ATLANTA 1864
William J. Hardee's corps - the elite of Hood's army - together with Joseph Wheeler's cavalry division, hit the open left flank of McPherson's army. Surprise was complete, but the veteran Federal troops reformed, despite the death of McPherson in the melee. The assault was repulsed with Confederate losses of some 8,000 men. Federal casualties were 3,722. Sherman - his strength insufficient for a siege - determined to swing entirely around to the western side of Atlanta and operate against the railroads. Sending most of his cavalry raiding south (27th July), he started the move next day.
28th July 1864: BATTLE OF EZRA CHURCH
An further assault by Hood was repelled - mainly by the Army of the Tennessee - with 4,300 Southern casualties against 632 Union losses.
28th July to 22nd August 1864: CAVALRY RAIDS
Part of Sherman's cavalry - 6,000 strong - moving around both sides of Atlanta failed in its dual mission to cut the railroad and to liberate the Union prisoners at Andersonville. As a result Major General George Stoneman and some 2,000 men were surrounded and captured by the Confederates on 4th August. Meanwhile Sherman continued to build up the strength of his forces on Atlanta's western side. Another Union cavalry raid was mounted of 22nd August but this also failed to cut rail communication between Atlanta and the outside world.
27th to 31st August 1864: FALL OF ATLANTA
Leaving one army corps to guard his own communications, Sherman swung his remaining troops forward in a great wheeling move towards the railroad lines south of the city, driving Wheeler's cavalry before them. Hood sent Major General W. J. Hardee - with half of his army - to hold the railroads, but Hardee was thrown back at Jonesboro on 31st August. Hood's communications line was cut now cut, and after destroying ammunition and supply stores, Hood evacuated Atlanta that night, moving east and south. Next morning Sherman's troops marched in.
September to October: MANOEUVRING AROUND ATLANTA 1864
Sherman, turned Atlanta a military base, but found further any further advance almost impossible because of the need to protect his 400-mile line of communications to Nashville. In addition to the daring and successful attackes of Forrest and Wheeler, Hood had moved west and north with his entire army (1st October) to attack these lines of communication in the hope of forcing Sherman's withdrawal from the city. After chasing Hood’s force through Allatoona (5th October) as far as Baylesville, Alabama (22nd October), Sherman came to the conclusion that further efforts to get to grips with the elusive Confederates would nullify Grant's giant pincers concept.
14th November 1864: HOOD INVADES TENNESSEE
Reinforced by Forrest's cavalry, Hood crossed the Tennessee River and moved rapidly northwards toward Nashville with 54,000 veteran troops. Thomas, building an extemporised army at Nashville around his own hard core of veterans, did not wish to withdraw garrisons from key points in Tennessee. He therefore played for time. Major General John M. Schofield, with 2 corps and Wilson's cavalry division (about 34,000 men in all) was directed to delay the Southern advance. Schofield managed to avoid Hood's attempts to box him in at Columbia (26th & 27th November), and he fought his way through the enveloping Confederate forces in a night battle at Spring Hill (29th November), and then moved into previously prepared defences at Franklin, 15 miles south of Nashville.
15th November to 8th December 1864: MARCH FROM ATLANTA
Sherman solved the problem - with the somewhat reluctant approval of Grant - by sending Thomas' Army of the Cumberland back to Nashville and Chattanooga, whilst he abandoned his line of communications and marched eastward from Atlanta toward Savannah with 68,000 veterans. With him were 2,500 wagons and 600 ambulances carrying supplies (mostly ammunition); other that that, his men lived off the country. With practically no opposition he cut a 50-mile-wide swath of ‘scorched earth’ to the sea, 300 miles away. He was deliberately making ‘Georgia howl’ as he devastated crops and the war-supporting economy of central Georgia. He ignored Hood's efforts to distract him when the latter mounted a full-scale invasion of Tennessee whilst - to his front - Beauregard, assisted by Hardee, tried to protect Savannah and Charleston.
30th November 1864: BATTLE OF FRANKLIN
Hood, impetuous as ever, attacked piecemeal with two-thirds of his army. He was thrown back after losing 6,300 casualties out of 38,000 men engaged. His opponent – Schofield - lost 2,300 out of his force of 32,000 men. Having successfully defeated Hood’s army, Schofield retired that night to Nashville.
15th & 16th December 1864: BATTLE OF NASHVILLE
Hood assembled his army outside the defences of Nashville from 2nd December onwards. In the meantime methodical Thomas, who was busy training his largely newly-recruited army - particularly Wilson's new cavalry corps - would not be budged until he was ready. When he did finally attack, he destroyed the left flank of Hood's army because it was exposed as a result of Hood’s decision to send Forrest away on a raid towards Murfreesboro. On the second day of the battle Hood found Thomas’ troops were enveloping both his flanks. In the end Wilson's cavalry, which struck behind the Confederate left, delivered the final blow. Federal losses were 3,061 out of 49,773 men engaged. The Confederates lost 5,350 out of 31,000 on the field, and Hood's army dissolved into a fleeing rabble. This was the most decisive tactical victory gained by either side in a major engagement in the war.
9th to 21st December 1864: OPERATIONS AGAINST SAVANNAH
Arriving in eastern Georgia, Sherman discovered that Hardee held fortified Savannah with 15,000 men. Sherman stormed Fort McAllister at the mouth of the Ogcechee River, 15 miles from Savannah on 13th December. After establishing communications with Union naval forces, Sherman’s army began an investment of the city. With his lines of communication about to be cut, Hardee evacuated the city and Sherman moved in at once (21st December), presenting the city (in a ship-borne and telegraph message to Lincoln) as ‘a Christmas gift’.


A very readable and interesting account. At the time I thought the Confederates central position at Atlanta offered them a chance to strike at separated portions of the Union army, it seemed to me that an opportunity had been presented to the southerners that never quite materialised in the actual campaign.
ReplyDeleteThere were a couple of occasions in which Johnston contemplated a strike against enemy forces that had become widely enough separated for such an action to be contemplated (one of them at Cassville, I think), but was stymied by his subordinates - Hood in particular. But this was not quite the same is strikes from a genuinely central position.
I guess the problem so late in the war was that attack was very so very difficult anyway in the face of the fire power possessed by experienced troops. Hood's counter-attacks around Atlanta might have succeeded in Napoleonic times, but by 1864, against rifle-armed troops, it was too late.
When in 1865 Wilson set out upon his raid with some 12-13,000 troops nearly all equipped with repeating carbines, not even Bedford Forrest (outnumbered 5 to 1) could do much about it.
It would have been intriguing too if the battles could have been fought on the table-top, but that sort of thing isn't always possible...
Cheers,
Ion
Archduke Piccolo (Ion),
ReplyDeleteLooking back at it now, I think that the players who presented arguments for both Bedford Forrest and Morgan were possibly concentrating too much on being being 'Southern Gentlemen/Cavaliers' and not enough on co-ordinating their efforts with Johnston. (I did allow players to contact each other if they wanted to - as long as I was told the basics of what had been discussed - but all did.)
I think that the Northern players took a 'slow but steady' approach to the campaign, and may have missed achieving a really decisive victory as a result.
I would have loved to have fought out the battles on the tabletop rather than having to rely upon SCRUD (which is a very good system, by the way!), but at the time I did not have the tools to do so. Now that I have my various 'fast-play' rules at my disposal and some suitable figures and terrain, anything is possible!
All the best,
Bob