The method I use to build a larger model ship with a normal freeboard involves building the hull in the form of a Plasticard 'box' and the then fixing a suitable superstructure to the hull.
The first stage is to cut two strips of Plasticard that will form the battleship's bow section.
In this instance I wanted the hull to fit within two Hexon II hexes (i.e. approximately 8.0”/20.0cm long and 2.0”/5.0cm wide), so each of the pieces that will form the sides of the bow section is cut to be 4.5"/11.5cm x 0.75"/2.0cm from 0.060"/1.5mm thick Plasticard.

When the two sides are glued together, they are supported by a triangular fillet of 0.080"/2.0mm Plasticard. Therefore the next task is to determine the angle the fillet needs to be cut at; I have found that the best method of doing this is by drawing it on a piece of paper thus:

As the sides of the bow section are going to be curved, the fillet must be cut at an angle that will help them curve realistically. Trial and error have shown that if the sides of the bow section are 4.5"/11.5cm long and the beam of the model is 2.0"/5.0cm, the best angle to use is the apex angle of a triangle with a base length of 4.0"/10.0cm and sides of 4.5"/11.5cm. This is approximately 55 degrees. (The actual angle used was 60 degrees as this was easier to measure and cut.)
Note 1: If the sides were longer or the beam wider, the angle would change as the dimensions of the triangle would change.
Note 2: The actual beam of the model ended up being 2.5"/6.25cm ... but I did not know this when I began construction of the model.
I chamfer the edges of the strips of Plasticard that are going to be glued together to form the ship's bow as this makes the assembly process easier. I also glue short vertical lengths of Plasticard (just less than 0.75"/2.0cm long) 2.5"/6.25cm from the bow edge on each inner side of the strips that will form the bow section. These form location points for internal strengthening later in the build process. In order to support the bow fillet I glue short horizontal lengths of Plasticard strip (each 0.5"/1.25cm long) onto the inner side of each bow side 0.4”/1cm behind the chamfered edge.
N.B. I use liquid cement to glue the pieces of Plasticard together. This does produce fumes when it is being used and can irritate the nose and throat if the gluing is not done in a well ventilated room. It is absolutely vital that any safety instructions are followed and obeyed.

The bow section is then carefully glued together and set aside to allow the glue to 'cure' for as long as possible. Because I want the bond between the two pieces of Plasticard to be as strong as possible, I usually leave the glue to 'cure' for five to six hours at least (overnight is even better).

Whilst the glue on the bow section is 'curing', I begin work on the stern section. In this instance I want the stern to curve so it is made of a single piece of 0.060"/1.5mm thick Plasticard that is 9.0"/22.5cm x 0.75"/2.0cm.
I glue short vertical lengths of Plasticard (just less than 0.75"/2.0cm long) 2.5"/6.25cm in from the short edges on the inner side of the strip that will form the stern section. These form location points for internal strengthening later in the build process.

I then glue a horizontal strip of 0.080"/2.0mm Plasticard that is 2.0"/5.0cm x just less than 0.75"/2.0cm long onto each end of the stern section strip so that they overlap each end of the strip by 1.0"/2.5cm. These will reinforce the join between the bow and stern sections when they are glued together.

Plasticard is flexible, and the thinner it is, the easier it is to bend into a curve. The 0.060"/1.5mm Plasticard used to make the stern section will bend into a curve, but because it is a thermoplastic it is easier to shape it if is warmed in very hot water and allowed to cool whilst it is held against some type of former.
In this case a former was made from basswood. The former is 2.0"/5.0cm wide and the end is cut to form the shape of the required curve.

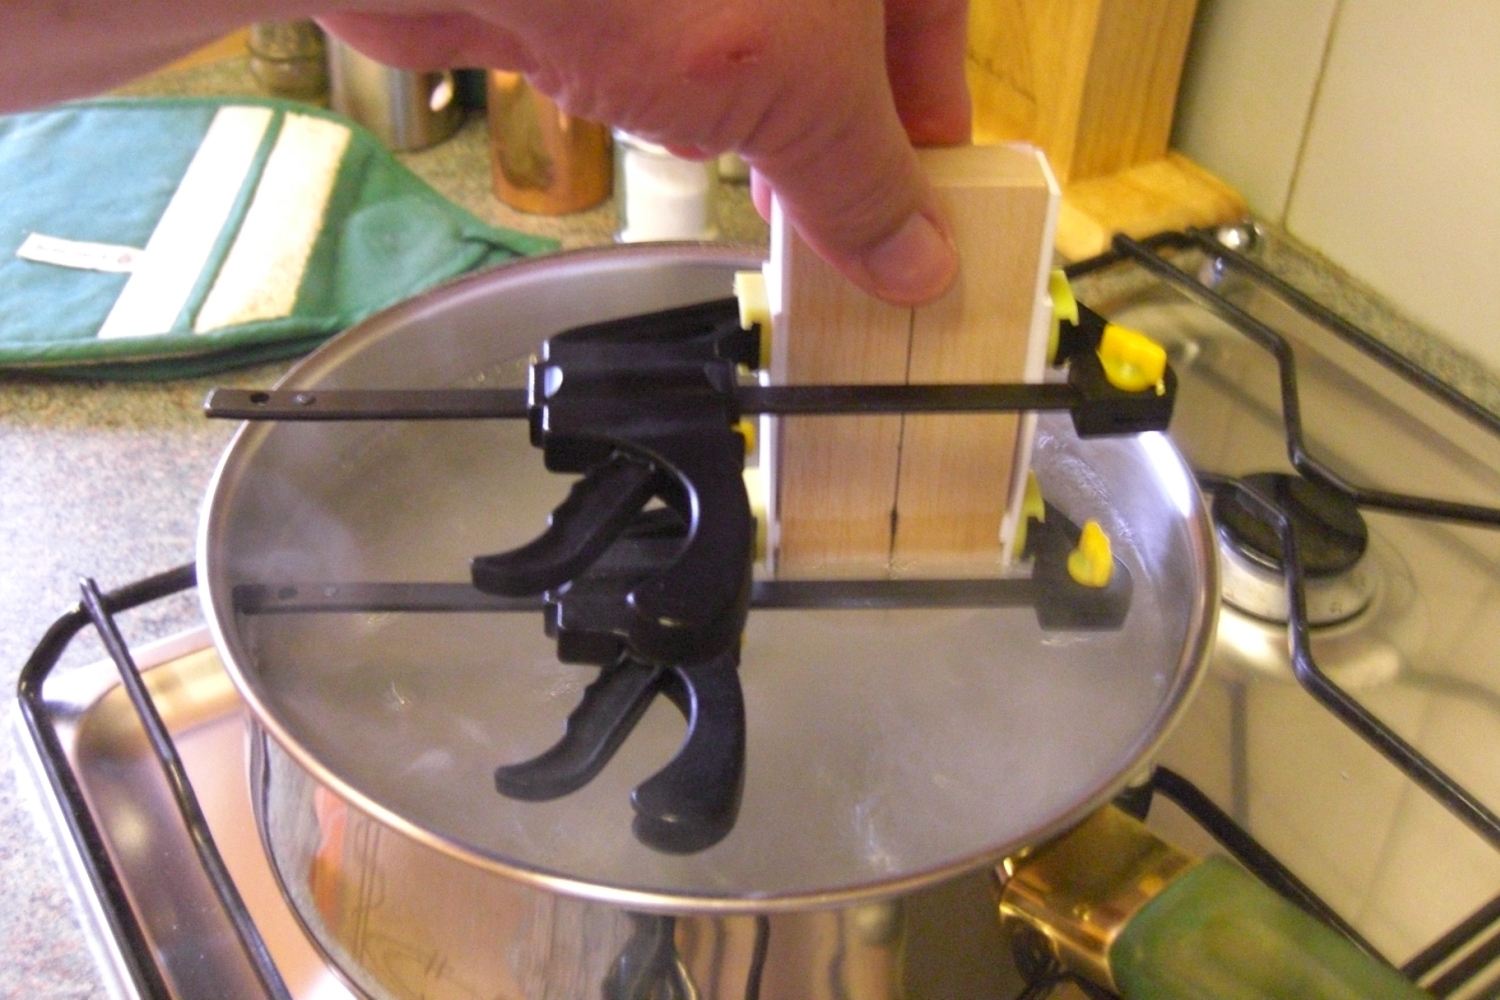
The Plasticard strip that will form the stern section is clamped in place against the former, making sure that the centre of the strip lines up with the centre line on the former.

The former and strip are then gently held upright in a saucepan of boiling water for about ten to fifteen seconds, making sure that they do not touch the sides or bottom of the pan.

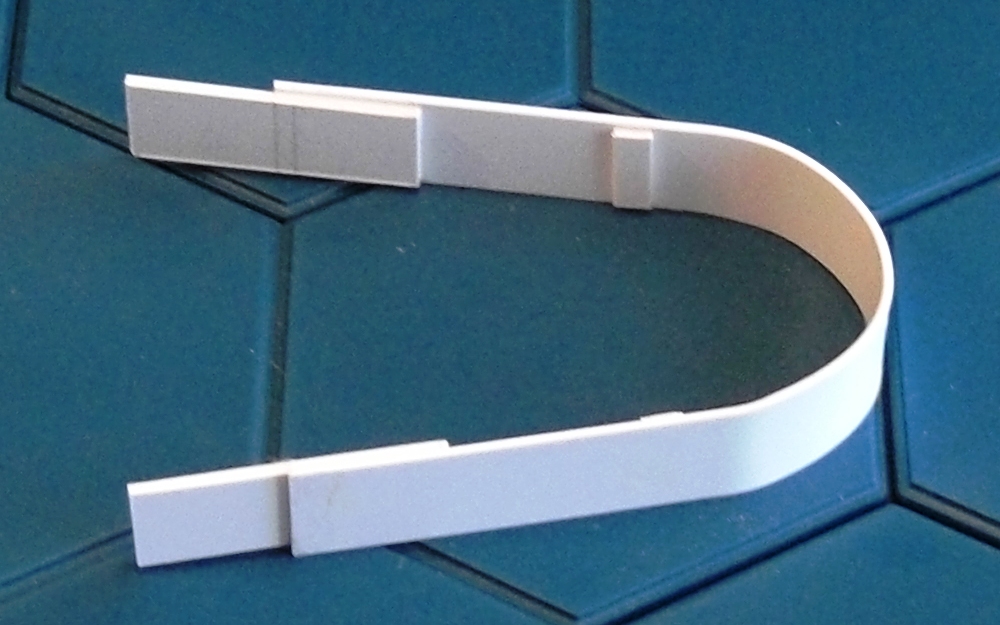
When the former and strip are removed from the boiling water, they are left to cool. This usually takes a couple of minutes. The clamps are then undone and the stern strip is removed. It should now be shaped into the required curve.

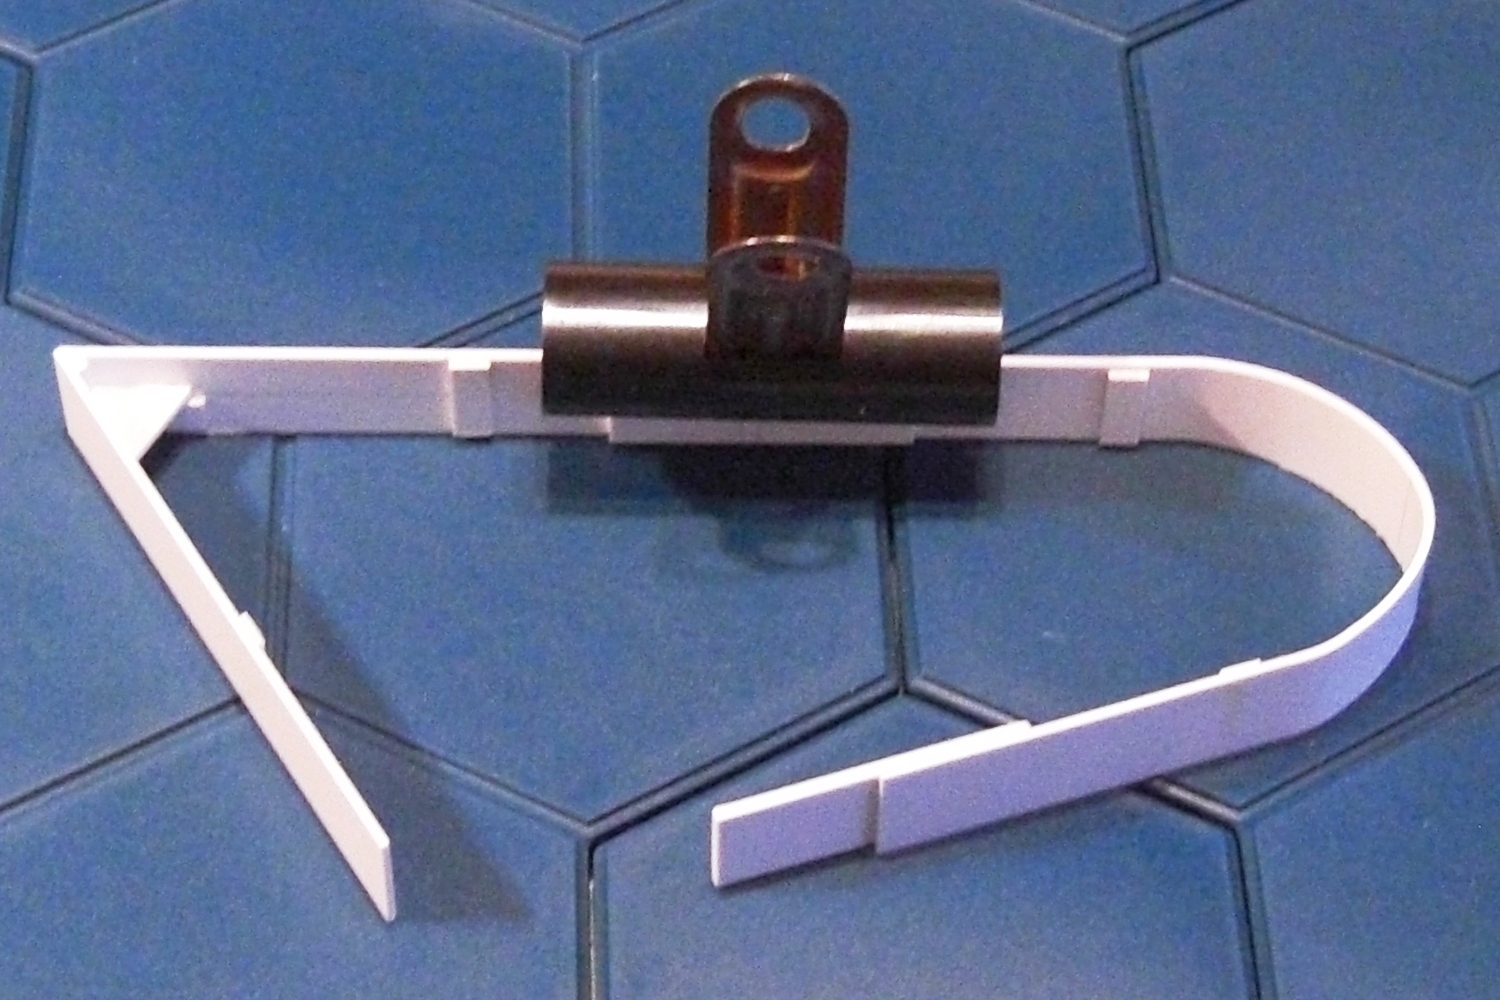
Once the glue holding the bow section together has 'cured', I glue the bow and stern sections together. I glue one side of the stern section to one side of the bow section using glue applied to the reinforcing strips, and clamp them together whilst the glue 'cures'.

When the glue holding the two pieces together has 'cured', I glue and clamp the other sides together.

Once the glue in the second join has 'cured' I begin the process of adding internal cross-pieces that will hold the sides of the 'box' the correct distance apart as well as giving the 'box' an additional degree of strength and rigidity. The cross-pieces are cut from 0.080"/2.0mm Plasticard (the central cross-pieces) or 0.060"/1.5mm Plasticard (the front and rear cross-pieces). The central cross-pieces (which are 2.5"/6.25cm x 0.75"/2.0cm) are glued in place at each end of the reinforcing strips, and clamps are used to hold the assembly rigid whilst the glue 'cures'.

The front and rear cross-pieces can then be glued in place using the Plasticard location points previously fixed to each internal side of the bow and stern sections.

Once the glue has ‘cured’ I then add a bottom (usually made from 0.020”/0.05mm Plasticard) by placing the ‘box’ onto the sheet of Plasticard, gluing it in place with liquid cement, and – once the glue has ‘cured’ – cutting around the edge of the ‘box’ very carefully.
The top deck is added in the same way, but I use 0.040”/0.10mm Plasticard as it needs to be somewhat more substantial.
The hull of my ship is then ready to have a superstructure added to it.
The first stage is to cut two strips of Plasticard that will form the battleship's bow section.
In this instance I wanted the hull to fit within two Hexon II hexes (i.e. approximately 8.0”/20.0cm long and 2.0”/5.0cm wide), so each of the pieces that will form the sides of the bow section is cut to be 4.5"/11.5cm x 0.75"/2.0cm from 0.060"/1.5mm thick Plasticard.

When the two sides are glued together, they are supported by a triangular fillet of 0.080"/2.0mm Plasticard. Therefore the next task is to determine the angle the fillet needs to be cut at; I have found that the best method of doing this is by drawing it on a piece of paper thus:

As the sides of the bow section are going to be curved, the fillet must be cut at an angle that will help them curve realistically. Trial and error have shown that if the sides of the bow section are 4.5"/11.5cm long and the beam of the model is 2.0"/5.0cm, the best angle to use is the apex angle of a triangle with a base length of 4.0"/10.0cm and sides of 4.5"/11.5cm. This is approximately 55 degrees. (The actual angle used was 60 degrees as this was easier to measure and cut.)
Note 1: If the sides were longer or the beam wider, the angle would change as the dimensions of the triangle would change.
Note 2: The actual beam of the model ended up being 2.5"/6.25cm ... but I did not know this when I began construction of the model.
I chamfer the edges of the strips of Plasticard that are going to be glued together to form the ship's bow as this makes the assembly process easier. I also glue short vertical lengths of Plasticard (just less than 0.75"/2.0cm long) 2.5"/6.25cm from the bow edge on each inner side of the strips that will form the bow section. These form location points for internal strengthening later in the build process. In order to support the bow fillet I glue short horizontal lengths of Plasticard strip (each 0.5"/1.25cm long) onto the inner side of each bow side 0.4”/1cm behind the chamfered edge.
N.B. I use liquid cement to glue the pieces of Plasticard together. This does produce fumes when it is being used and can irritate the nose and throat if the gluing is not done in a well ventilated room. It is absolutely vital that any safety instructions are followed and obeyed.

The bow section is then carefully glued together and set aside to allow the glue to 'cure' for as long as possible. Because I want the bond between the two pieces of Plasticard to be as strong as possible, I usually leave the glue to 'cure' for five to six hours at least (overnight is even better).

Whilst the glue on the bow section is 'curing', I begin work on the stern section. In this instance I want the stern to curve so it is made of a single piece of 0.060"/1.5mm thick Plasticard that is 9.0"/22.5cm x 0.75"/2.0cm.
I glue short vertical lengths of Plasticard (just less than 0.75"/2.0cm long) 2.5"/6.25cm in from the short edges on the inner side of the strip that will form the stern section. These form location points for internal strengthening later in the build process.

I then glue a horizontal strip of 0.080"/2.0mm Plasticard that is 2.0"/5.0cm x just less than 0.75"/2.0cm long onto each end of the stern section strip so that they overlap each end of the strip by 1.0"/2.5cm. These will reinforce the join between the bow and stern sections when they are glued together.

Plasticard is flexible, and the thinner it is, the easier it is to bend into a curve. The 0.060"/1.5mm Plasticard used to make the stern section will bend into a curve, but because it is a thermoplastic it is easier to shape it if is warmed in very hot water and allowed to cool whilst it is held against some type of former.
In this case a former was made from basswood. The former is 2.0"/5.0cm wide and the end is cut to form the shape of the required curve.

The Plasticard strip that will form the stern section is clamped in place against the former, making sure that the centre of the strip lines up with the centre line on the former.

The former and strip are then gently held upright in a saucepan of boiling water for about ten to fifteen seconds, making sure that they do not touch the sides or bottom of the pan.
When the former and strip are removed from the boiling water, they are left to cool. This usually takes a couple of minutes. The clamps are then undone and the stern strip is removed. It should now be shaped into the required curve.
Once the glue holding the bow section together has 'cured', I glue the bow and stern sections together. I glue one side of the stern section to one side of the bow section using glue applied to the reinforcing strips, and clamp them together whilst the glue 'cures'.
When the glue holding the two pieces together has 'cured', I glue and clamp the other sides together.

Once the glue in the second join has 'cured' I begin the process of adding internal cross-pieces that will hold the sides of the 'box' the correct distance apart as well as giving the 'box' an additional degree of strength and rigidity. The cross-pieces are cut from 0.080"/2.0mm Plasticard (the central cross-pieces) or 0.060"/1.5mm Plasticard (the front and rear cross-pieces). The central cross-pieces (which are 2.5"/6.25cm x 0.75"/2.0cm) are glued in place at each end of the reinforcing strips, and clamps are used to hold the assembly rigid whilst the glue 'cures'.

The front and rear cross-pieces can then be glued in place using the Plasticard location points previously fixed to each internal side of the bow and stern sections.

Once the glue has ‘cured’ I then add a bottom (usually made from 0.020”/0.05mm Plasticard) by placing the ‘box’ onto the sheet of Plasticard, gluing it in place with liquid cement, and – once the glue has ‘cured’ – cutting around the edge of the ‘box’ very carefully.
The top deck is added in the same way, but I use 0.040”/0.10mm Plasticard as it needs to be somewhat more substantial.
The hull of my ship is then ready to have a superstructure added to it.


Honestly, you do make some of the best "how-to's" I've seen on a blog. Clearly written and well-illustrated. They're also covering topics I've not seen elsewhere (because I haven't looked?). I can see some of these methods, such as the wooden former to help shape the plastic, useful for other things as well (parts of buildings, land vehicles, spaceships).
ReplyDeleteVery good tutorial. Thanks, Bob.
ReplyDeleteSteve
Hi Bob,
ReplyDeleteThat is a neat idea and no mistake! Very helpful indeed and these 'How to' posts have given me much food for thought and ideas for my own creations.
I am really looking forward to seeing what goes 'on top'!
All the best,
DC
Fitz-Badger,
ReplyDeleteYou are too kind. I just write them in the way that I would want to be able to read them ... simple step-by-step instructions that are illustrated so that it should be easy to follow what each stage of the process should look like. Mind you, I had lots of practice writing 'How to ...' instruction booklets for my IT students!
The wooden former and boiling water method is quite good for making shapes, although scalding is a hazard!
All the best,
Bob
I'm with Fitz Badger - I have had a yen to make a gunboat for my Sudan project for ages, and your clear tutorial is giving much food for thought...
ReplyDeleteCorporal_Trim (Steve),
ReplyDeleteThanks you very much for your kind words.
I am thinking of turning these 'How too ...' blog entries into downloadable PDFs so that people can print them off to keep.
All the best,
Bob
David Crook,
ReplyDeleteMany thanks for your kind comments. Just don't burn your hands trying these methods at home!
The superstructure may have to wait for a bit as other 'real life' things are likely to take up quite a bit of my time over the next week or so. THat said, I should be able to continue with the smaller 'Monopoly' Battleship project as that is a much simpler 'build'.
All the best,
Bob
Steve-the-Wargamer,
ReplyDeleteIf my 'How to ...' has been of any help, then I am very pleased indeed.
By sharing ideas and methods we all benefit, and even if you do not find that it works for you it might help you to develop a method that does.
I look forward to seeing the completed gunboat at some time in the future!
All the best,
Bob
Have you considered using a heat gun rather than boiling water?
ReplyDeleteSchogun,
ReplyDeleteNot for doing this as I am not sure you can control the temperature on a heat gun (the only one I have ever used was to burn off paint, and that would be far too hot).
A hair dryer might be a better alternative, but I have never used one of those to bend Plasticard.
All the best,
Bob