HMS Insolent followed the Marzibarian gunboat and her attendant convoy of dhows as they sailed towards the north-east, and as Lieutenant Commander Chamberlain had expected, they anchored just off the northern end of Raffia Island.

After holding a council-of-war with Brigadier General George Lumley (the acting commander of the British forces in Dammallia) and Lieutenant Commander Chamberlain, the Tifooti River Field Force was loaded aboard HMS Insolent and two steamers of the Stowe Steamship Line and set sail for Raffia Island.


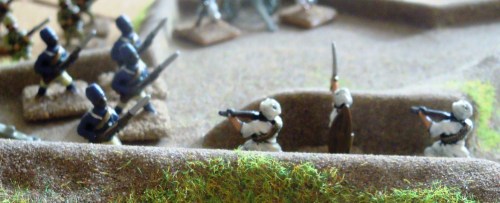
As the first troops of the Tifooti Rive Field Force landed, those from HMS Insolent (the British Dammallian Police) found themselves involved in a battle with the Marzibarian riflemen who were occupying the nearby palm trees.

Both sides suffered casualties, but the British Dammallian Police managed to push the Marzibarians back and followed them into the palm trees.

The noise of the fighting awoke the Marzibarians in the fort, and their artillery opened fire on the advancing troops of the Tifooti River Field Force. Their gunnery was execrable, and they managed to miss what they were aiming at. Not so the heavy gun on HMS Insolent, which not only hit one of the Marzibarian field guns but also killed half of its crew.

Whilst the leading units continued their advance inland and further troops disembarked from the Lady Black and the Lady Brown, the British Dammallian Police continued their battle with the Marzibarian riflemen in the palm trees. Neither side seemed to be able to prevail in this conflict.

Both side's artillery continued to fire at their opponents, and although their aim was better this time, the Marzibarians were unable to inflict serious casualties on their opponents. HMS Insolent's gunnery was slightly inaccurate, and missed the intended target ... only to hit a group of Marzibarians who were near the rear of the fort, causing them minor casualties.

The fighting in the palm trees saw the Marzibarians forced backwards, but this time the British Dammallian Police did not pursue them.

In the meantime the leading elements of the Tifooti River Field Force continued their advance on the fort, supported by further units that were disembarking from their transports.

The artillery duel continued, with both sides missing their intended targets. In the case of HMS Insolent its fire landed dangerously close to the leading units of its own side. The Marzibarian artillery hit some of the newly-landed British troops, and minor casualties were caused to one of the units.

The Marzibarian Riflemen in the palm trees decided to attack the unit of British Dammallian Police ...

... but were beaten off after suffering further casualties.

The main advance continued, and Royal Essex Regiment and the Dammallian Native Police reached the walls of the fort.

The latter stormed the walls with a magnificent bayonet charge, which killed the remaining member of one of the Marzibarian field guns.

Whilst this was going on, more of the Tifooti River Field Force landed.

The Marzibarians were not slow to react to the presence of the Dammallian Native Police within their fort, and a counter-attack was mounted by some of the Marzibarian riflemen.

After a stiff fight, during which both side lost casualties, the Marzibarians were forced to fall back.

Some of the other Marzibarians, fearing that they were about to be captured by the British (and therefore mindful of the possible consequences), abandoned their positions and made a run for the dhows.

Other Marzibarians (including the crew of their remaining field gun) were made of sterner stuff and carried on fighting. The Marzibarian field gun managed to hit one of the advancing British units ... but without any effect.

The recently unloaded Port Albert Artillery was luckier, and managed to hit the Marzibarian gun, killing a member of its crew.

The remaining Marzibarians now fled, pursued by the advancing British.

Unfortunately most of them were able to escape in the three dhows that were moored near the fort ...

... and despite the best efforts of the British troops, only a few stragglers were captured.

Furthermore, it appeared that the slaves had still been aboard the dhows, which now sailed northward towards Marzibar.

The battle to capture Raffia Island had not been the clear-cut victory that the Governor of British Dammallia – Sir James Deville – had hoped for. Although the island was now in British hands and would soon be claimed as part of the colony, the Marzibarians had escaped with their cargo of slaves. Lieutenant Commander Chamberlain was in no position to give chase immediately as he had used most of his crew to form the Naval Brigade, and it would take time for them to re-board the ship so that they could pursue the Marzibarian dhows.
This part of the ongoing campaign against the Marzibarian slave traders was over ... but the campaign was not!

Under cover of darkness Lieutenant Commander Chamberlain went ashore by longboat and discovered that the old fort on Raffia Island had been brought back into use and was serving as the base for the Marzibarian slave traders. Once back aboard HMS Insolent the Lieutenant Commander returned to the Dammallian coast, where he made contact with the Governor of British Dammallia, Sir James Deville.The area around the estuary of the Tifooti River.
After holding a council-of-war with Brigadier General George Lumley (the acting commander of the British forces in Dammallia) and Lieutenant Commander Chamberlain, the Tifooti River Field Force was loaded aboard HMS Insolent and two steamers of the Stowe Steamship Line and set sail for Raffia Island.

A map of Raffia Island.

Raffia Island, looking northwards.

The Tifooti River Field Force comprised:Raffia Island, looking southwards.
- One company, 1st Battalion, Royal Essex Regiment (aboard Stowe Steamship Line's Lady Black)
- One company, 1st Battalion, Dammallian African Rifles (aboard Stowe Steamship Line's Lady Black)
- One Field Gun Battery, Port Albert Artillery (aboard Stowe Steamship Line's Lady Black)
- One company, 1st Battalion, Queen's Own Rifles (aboard Stowe Steamship Line's Lady Brown)
- One company, Dammallian Native Police (aboard Stowe Steamship Line's Lady Brown)
- One Machine Gun Battery, Port Albert Artillery (aboard Stowe Steamship Line's Lady Brown)
- One company, British Dammallian Police (aboard HMS Insolent)
- One Field Gun Battery, Royal Navy Naval Brigade (aboard HMS Insolent)
- One Machine Gun Battery, Royal Navy Naval Brigade (aboard HMS Insolent)

Brigadier General George Lumley (who was aboard the Lady Black) decided that the best place to land was on the west of the island, with HMS Insolent landing its troops near the line of palm trees. The Lady Black would land her troops just to the south of HMS Insolent, with the troops aboard the Lady Brown landing slightly further south. Brigadier General George Lumley set the time of the landings to coincide with sunrise as this would ensure that the troops would not be silhouetted against the horizon as they came ashore.The Marzibarian defences on Raffia Island.
As the first troops of the Tifooti Rive Field Force landed, those from HMS Insolent (the British Dammallian Police) found themselves involved in a battle with the Marzibarian riflemen who were occupying the nearby palm trees.

Both sides suffered casualties, but the British Dammallian Police managed to push the Marzibarians back and followed them into the palm trees.

The noise of the fighting awoke the Marzibarians in the fort, and their artillery opened fire on the advancing troops of the Tifooti River Field Force. Their gunnery was execrable, and they managed to miss what they were aiming at. Not so the heavy gun on HMS Insolent, which not only hit one of the Marzibarian field guns but also killed half of its crew.

Whilst the leading units continued their advance inland and further troops disembarked from the Lady Black and the Lady Brown, the British Dammallian Police continued their battle with the Marzibarian riflemen in the palm trees. Neither side seemed to be able to prevail in this conflict.

Both side's artillery continued to fire at their opponents, and although their aim was better this time, the Marzibarians were unable to inflict serious casualties on their opponents. HMS Insolent's gunnery was slightly inaccurate, and missed the intended target ... only to hit a group of Marzibarians who were near the rear of the fort, causing them minor casualties.

The fighting in the palm trees saw the Marzibarians forced backwards, but this time the British Dammallian Police did not pursue them.

In the meantime the leading elements of the Tifooti River Field Force continued their advance on the fort, supported by further units that were disembarking from their transports.

The artillery duel continued, with both sides missing their intended targets. In the case of HMS Insolent its fire landed dangerously close to the leading units of its own side. The Marzibarian artillery hit some of the newly-landed British troops, and minor casualties were caused to one of the units.

The Marzibarian Riflemen in the palm trees decided to attack the unit of British Dammallian Police ...

... but were beaten off after suffering further casualties.

The main advance continued, and Royal Essex Regiment and the Dammallian Native Police reached the walls of the fort.

The latter stormed the walls with a magnificent bayonet charge, which killed the remaining member of one of the Marzibarian field guns.

Whilst this was going on, more of the Tifooti River Field Force landed.

The Marzibarians were not slow to react to the presence of the Dammallian Native Police within their fort, and a counter-attack was mounted by some of the Marzibarian riflemen.
After a stiff fight, during which both side lost casualties, the Marzibarians were forced to fall back.

Some of the other Marzibarians, fearing that they were about to be captured by the British (and therefore mindful of the possible consequences), abandoned their positions and made a run for the dhows.

Other Marzibarians (including the crew of their remaining field gun) were made of sterner stuff and carried on fighting. The Marzibarian field gun managed to hit one of the advancing British units ... but without any effect.

The recently unloaded Port Albert Artillery was luckier, and managed to hit the Marzibarian gun, killing a member of its crew.

The remaining Marzibarians now fled, pursued by the advancing British.

Unfortunately most of them were able to escape in the three dhows that were moored near the fort ...

... and despite the best efforts of the British troops, only a few stragglers were captured.

Furthermore, it appeared that the slaves had still been aboard the dhows, which now sailed northward towards Marzibar.

The battle to capture Raffia Island had not been the clear-cut victory that the Governor of British Dammallia – Sir James Deville – had hoped for. Although the island was now in British hands and would soon be claimed as part of the colony, the Marzibarians had escaped with their cargo of slaves. Lieutenant Commander Chamberlain was in no position to give chase immediately as he had used most of his crew to form the Naval Brigade, and it would take time for them to re-board the ship so that they could pursue the Marzibarian dhows.
This part of the ongoing campaign against the Marzibarian slave traders was over ... but the campaign was not!


.jpg)


Hi Bob,
ReplyDeleteAbsolutely magnificent! The island looked really impressive and has given me much to think about for my Aegean ideas. Using 15mm figures looked perfect from a size perspective and the narrative was worthy of a G.A. Henty novel.
I can hardly wait to see what happens next and if this is indicative of the usual fruits of your labours after days of gardening then bring on the Laurel excavation around your shed!
Made my Sunday afternoon for sure.
All the best,
DC
David Crook,
ReplyDeleteI am very pleased to hear that you enjoyed this battle report; I certainly had great fun fighting it!
Using Cyberboard to 'create' the island was a great leap forward for me, and I can see myself using it even more in the future. I was very pleased with the way the island looked when it was finished, and something similar would be ideal for your Aegean campaign.
My plans for the next stage of the campaign include a possible sea chase and may even see a naval battle taking place.
All the best,
Bob
Bob,
ReplyDeleteAn excellent read, I really enjoyed this writeup. It's good to see the whole thing in action, and the 15mm scale is perfect for this type of game.
Ed
Colonel Scipio (Ed),
ReplyDeleteI am very pleased to read that you enjoyed this battle report. It was one of the most enjoyable solo wargames I have fought in a long time.
The 15mm-scale figures have lots of advantages. They are cheap to buy, easy to store, and don't look ridiculous on my small 3' x 4' tabletop.
All the best,
Bob
Bob,
ReplyDeleteI particularly liked your palm trees and the fight through and amongst them.
Definitely a good little dust-up and a splendid little battle report, sir.
-- Jeff
Bluebear Jeff (Jeff),
ReplyDeleteI must admit that I prefer these palm trees to the other ones that I own, which are Sugarcraft cake decorations with FIMO bases.
These palm trees were bought from Essex Miniatures, who also supplied the tree bases. The latter were glued to irregular-cut pieces of thin plywood, which were then painted and textured with sand-coloured flock. The trees are removable from the bases for storage.
It was a splendid little battle, that took about three hours to fight, with about half of that time taken up doing the photographs and the battle report.
All the best,
Bob